
 This article describes the long and tortuous process of getting my new Xcel Itron electric meter connected to my Home Assistant. I did eventually succeed.
-
- How you will know that you have a new Xcel Itron electric meter.
- Getting permission from Xcel to do things with your electric meter.
- Getting your electric meter connected to your wifi.
- Finding out the wifi MAC address of your electric meter.
- Giving your electric meter a fixed LAN IP address.
- Dealing with the data format provided by Xcel.
- Convincing your electric meter to be willing to respond to requests for information.
How you will know that you have a new Xcel Itron electric meter.
A first thing to realize is that you might not have one of these new Xcel Itron electric meters. If so, then you get to skip this article.
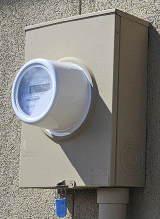
A first way that you might know that you have one of these new electric meters is that you found a hang tag on your door letting you know that it got installed. Or you could figure it out by looking at the electric meter. Your old meter had what was originally a clear plastic case and by now the plastic is hazy. The new meter (seen at right) has a case that is mostly a striking bright white color, with a clear plastic front window.
 But the way that you would know for sure is that the meter says “Gen 5 Riva Itron” as shown at right.
Getting permission from Xcel to do things with your electric meter.
Having confirmed that you do indeed have a new Gen 5 Riva Itron electric meter, the next step is that you need to get permission from Xcel Energy to things with your meter. The way to do this is to go to Meters and Devices in your Xcel account to enroll in Launchpad on your account. It might take some days, but eventually you should hear back from Xcel that you have been admitted into the Launchpad. This means that you can now do things with your electric meter.
At some point if you ask Xcel for help with this stuff, the Xcel representative will try to talk you out of using this Launchpad and will try to talk you into settling for a simpler way to get billing data — the Xcel smart phone app.
Keep in mind that if you have a PV solar array, and if its generating capacity is 10 kW or more, then you have two electric meters — a billing meter and a production meter. The billing meter is the one that keeps track of consumption of electricity. The production meter does nothing more than keeping track of the total amount of energy produced by the PV array.
A chief consequence of having two electric meters is that the Xcel smart phone app won’t work. It works only if the customer has a single electric meter, not more than one.
Getting your electric meter connected to your wifi.
Having gotten admitted into the Launchpad, the next step is to get your electric meter (or meters, plural) connected to your wifi. In my case this was a struggle that took more than a month, and required multiple telephone calls to Xcel.
To do this, you click around on the Xcel web site and you provide the system ID of your wifi network and you provide the password for your wifi network.
In my case this wifi network is on a VLAN that I have set up for my IOT devices. (I use a different VLAN for trusted devices.) Another thing to keep in mind is that a wifi signal that is strong inside the house might not be strong at the place where the electric meters are located. In my case, I chose to add a small wifi access point (fed by wired ethernet) at the meter location. Its SSID and password are what I provided on the Xcel web site.
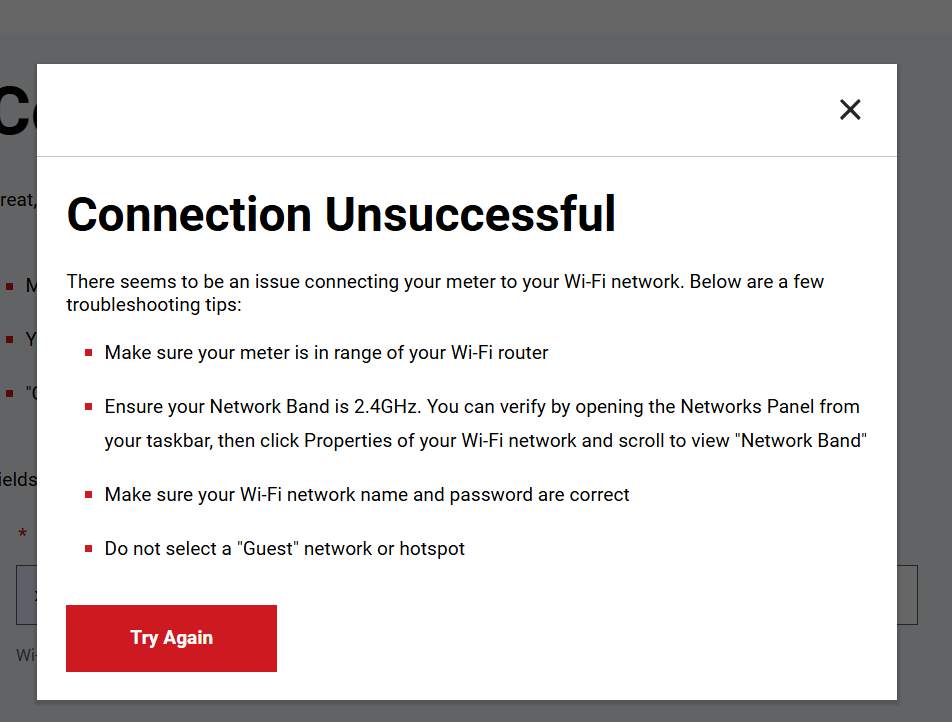
Perhaps the single most vexing thing about this aspect of the Xcel meter system is that the Xcel system would simply state falsely that the “connection” was “unsuccessful”. A typical screen shot of this appears at right.
It took some weeks for me to catch on that most of these “connection unsuccessful” messages were false. It turns out that there are really only two ways to find out the truth about whether or not the electric meters are actually connected to your wifi.
The first way is to look in your DHCP server and see whether the meters have obtained IP addresses from your DHCP server. What you might see in your DHCP server is a device name of “xcel-meter” and a MAC address starting with B4:23:30. (When a MAC address starts with B4:23:30 this means the device is from Itron Inc, located at 2111 N Molter Road, Liberty Lake WA 99019 US.)
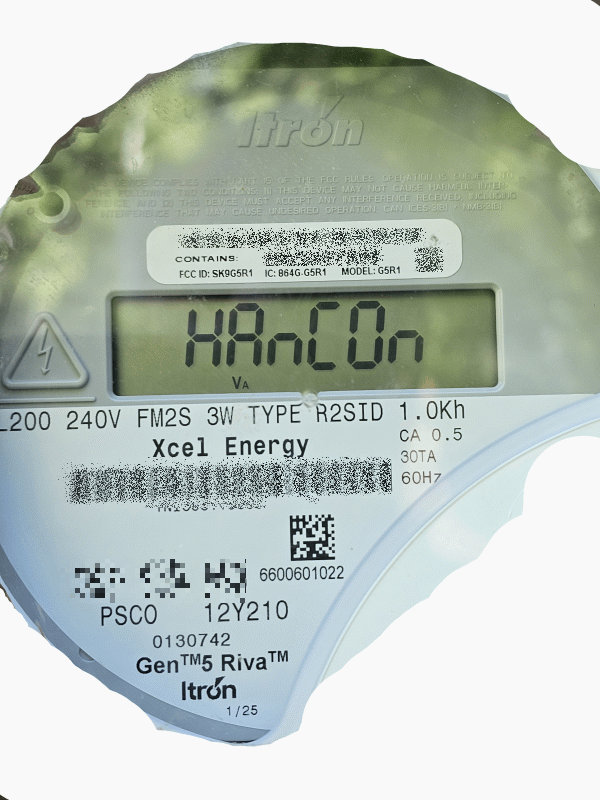
The second way is to go outdoors and spend a few minutes looking at the displays on the meters. The meter display cycles through about sixteen pieces of information, one of which is the wifi connection status. And the wifi connection status is communicated by either of two cryptic messages on the display:
-
- HAndIS, or
- HAnCOn
It turns out that HAndIS means “the electric meter is not connected to wifi”, and HAnCOn means “the electric meter is connected to wifi”. So in the photograph at right, the meter is communicating that it is connected to wifi.
Yes I realize this is cryptic. But it is how Xcel communicates the wifi status.
Finding out the wifi MAC address of your electric meter.
The next challenge, once you get your electric meters connected to your wifi, is to somehow work out which meter is which (as between the billing meter and the production meter). This is harder than you might think. On the Xcel web site, they will detail your “account number” and your “premises” number and your “meter” number. The thing is that you will have two of each. You will have a first account and premises and meter for billing, and a second account and premises and meter for production. And you will find two MAC addresses in your DHCP server. And nothing on the Xcel web site will reveal which MAC address matches which meter.
As we will discuss below, it is impossible to get the Home Assistant connection working unless you can somehow figure out which MAC address matches which meter. Nothing on the Xcel web site will spill the beans on this important piece of information. And, I am astonished to report, if you ever do reach a human being at Xcel about this, he or she will profess not to be able to tell you what the MAC address is for your electric meter.
So there are a couple of ways to try to figure this out. One way, I suppose, would be to avoid actually trying to get both meters connected to your wifi, not at first. Only get one of the meters connected to your wifi, and then go look in your DHCP server to see what MAC address appears there. Then proceed to get the other meter connected to your wifi, and then go look in your DHCP server to see what new MAC address appears there.
Another option, assuming that both meters are already connected to your wifi, would be to click around to tell one of the meters a known-false wifi password, and eventually that meter would drop out from the DHCP server.
You might think that you could figure out which meter is which by telling one of the meters a known-false wifi password and then looking to see which meter stops responding to pings. But Xcel has configured these meters not to respond to pings. So that does not work.
So what you would likely need to do is waiting and waiting for the DHCP lease to expire, and this would tell you which MAC address is which.
Having figured out the MAC address for each of my two electric meters, I then simply printed a couple of labels (each bearing one of the MAC addresses) and stuck one of them them onto each electric meter to show its MAC address.
Giving your electric meter a fixed LAN IP address.
The next thing to realize is that Xcel programmed these meters to use DHCP. Or to say it differently, there is no way through the Xcel web site for the customer to program a meter with a fixed IP address. The only choice is to set up your DHCP server so that for each meter MAC address, the meter will always be assigned the same IP address. The way to do this is different depending on your DHCP server. But anyway, that is what you need to do.
Dealing with the data format provided by Xcel.
A next potential challenge would be to figure out what protocol the Xcel meter uses to communicate its data to the customer. It turns out that the meters are designed to use a protocol called IEEE 2030.5. If you want to read this standard, you have to pay money to get it.
And then one would need to write a bunch of code to extract information from the meter, and transform it into some format that actually works for real users, and then load it into Home Assistant. Fortunately, as so often happens in the Home Assistant community, volunteers have already figured out all of this, and have provided all of the needed code. You can see very helpful bodies of code here and here and here. The third one is the one that worked perfectly for me. It is an “add-on” that you add to your HA.
To make use of this integration, you need to have already installed MQTT in your Home Assistant.
Convincing your electric meter to be willing to respond to requests for information.
The IEEE 2030.5 standard requires that you create an SSL certificate and key which would be used by your Home Assistant for communication with the meter, along with something called a “Long Form Device Identifier”, initialized as “LFDI”. This is a forty-character hexadecimal string that is linked in some way with the SSL certificate. You load the SSL cert and key file into a particular folder in your HA system called “addon_configs”.
The way this works in practice is that you communicate the LFDI to Xcel though the Xcel web site, and then Xcel loads the LFDI into your meter.
The idea then is that Home Assistant will try to communicate with the meter. Home Assistant knows the IP address of the meter (because you told Home Assistant this information in the “configuration” tab of the Xcel iTron MQTT add-on). Home Assistant tries to communicate with the meter at that IP address and at TCP port 8081. HA uses the SSL cert and key to secure the communications. Somewhere hidden away inside the SSL cert is the forty-character LFDI. The meter looks at the SSL cert that HA presented to it, and the meter extracts the LFDI from the SSL cert. The meter then looks at the list of LFDIs that were previously loaded into the meter to see if there is a match. If there is, then the meter concludes that this visitor is legitimate and it exchanges data with this visitor.
You can load more than one LFDI into your meter. You do this through the Xcel web site, clicking on “add a device” on the Xcel web page. When you paste the LFDI into the web page, you are also required to fill in three fields called “type” and “nickname” and “manufacturer”. You might wonder what the consequences might be if you fill in one or another of those three fields incorrectly. The answer, actually, is that it absolutely does not matter what information you enter into any of those three fields. The only reason for these fields is to help you recall, at some future time, why you went to the trouble of entering that particular LFDI into the meter.
Where did you get the LFDI that you pasted in at the Xcel web page? You got it from a “configuration” tab in your Xcel iTron MQTT add-on.
In the “configuration” tab it looks like the LFDI field is user-editable. And in a way it is. But the real situation is that you need to have the self-control not to edit that field. The add-on provides that LFDI information to you by extracting it from the SSL certificate and displaying it for you in the LFDI field. Your goal is to faithfully copy the LFDI from the “configuration” tab of the add-on and paste it without error into the LFDI field in Xcel’s web page for “adding a device”.
So let’s suppose you do paste your LFDI into the “add device” page on the Xcel web site, and you fill in some random information into the “nickname” and “manufacturer” and “device type” fields, and then suppose you click “next”. You might wonder how long it is going to take for Xcel to load this LFDI into your meter. The answer seems to be “a few seconds”. I found that my Xcel iTron MQTT add-on was able to communicate with success with the meter within just a moment or two of when I clicked “next”.
So to review some of the steps.
You need to choose the IP address that will be given to the meter when it asks your DHCP server for an IP address. Having determined the IP address, you need to enter this IP address into the “configuration” tab of the Xcel iTron MQTT add-on.
You need to find out, from your Xcel iTron MQTT add-on, what LFDI it established when it created your SSL cert and key. You learn this piece of information by copying it from the “configuration” tab tab of the Xcel iTron MQTT add-on and pasting it into the “add a device” web page of the Xcel web site.
Then you can click “start” for the Xcel iTron MQTT add-on. And if you are very lucky, the Xcel iTron MQTT add-on will successfully communicate with your meter.
To see this success, you would go into your MQTT integration, and look at your list of “devices”. And hopefully one of the items in that list is “Xcel Itron 5”. (Or you may have renamed the device in which case it will appear as the name that you picked.) And then hopefully you will have several sensors, including the amount of power passing through the electric meter (which might be “into the house” or might be “into the grid”).