
 We recently started using a new VPN solution at OPLF. It is faster than our previous VPN solution and has lower latency. It has no recurring cost and the one-time cost to get it working was under $100. In this article I will describe this new VPN solution in detail. I will also explain how you could set this up yourself in your own office.
By way of background, when the Covid lockdown happened, OPLF faced the same situation everybody faced, which was that we needed to make sure everbody could work from home. This required VOIP phones that would seamlessly work as if they were in the office, and it required VPN connections so that our people could reach the many data servers in our office.
Over the past twenty years or so, we have used half a dozen different VPN solutions. I feel very sorry for our long-suffering office colleagues who have had to install and configure one VPN solution after another, each of which had its own foibles and drawbacks.
Each time that we picked and tested yet another VPN solution, we tried to satisfy several goals:
-
- No recurring cost. What we did not want was any solution that involved paying monthly fees to some VPN service provider.
- High level of cryptographic security. We did not want to be using a security approach that was easy for a determined adversary to crack.
- Non-proprietary. We did not want a proprietary VPN solution. With any proprietary solution, we faced the worry that the service provider might have included some “back door” in it. A big advantage of an open-source solution is that interested persons can review the code to see if anybody had put a back door into it. A second advantage of an open-source solution is that interested persons can see exactly which encryption algorithms are being used. This relates to the previous point about wanting a high level of cryptographic security. If the VPN solution is proprietary, then it is impossible to know whether the service provider chose wisely when it picked the encryption algorithm to be used.
- Works through NATs. Most of the time these days, a user will be “behind a NAT”. NAT is “network address translation” and it is the way that a home or hotel or other public place will hand out non-routable IP addresses to users. The NAT server typically receives one routable IP address from an internet service provider, and will then hand out as many as 253 individual IP addresses to users. There are many implementations of NAT and some implementations are less friendly to VPNs than other.
A long time ago we used PPTP (point-to-point tunneling protocol) . This VPN often simply failed to connect at all depending on what kind of NAT was being used at the user’s location. It also often failed to connect depending on the firewall settings at the user’s location. Still another problem was that in the cryptographic community, it became apparent that there were cryptographic weaknesses in PPTP. A determined adversary might be able to “crack” PPTP. Here is what it says in a Wikipedia article:
The Point-to-Point Tunneling Protocol (PPTP) is an obsolete method for implementing virtual private networks. PPTP has many well known security issues.
For a while we tried to use IPSEC. This was very fragile in many user network configurations. For a reliable IPSEC connection we needed to have a routable IP address at both ends of each connection. This is nearly always impossible to achieve when the user is in a hotel or some other public place. It is quite a lot of fuss and bother to try to get IPSEC to work “behind a NAT”.
We then migrated to OpenVPN. This protocol is able to work “behind a NAT”. When Covid struck, this was our day-to-day solution for our VPN needs.
But OpenVPN has a big drawback for us. The VPN servers that we were using at the time of the Covid lockdown had a hardware limitation of five VPN connections at a given moment, for each server. We found ourselves having to set up two or more VPN servers running in parallel to be able to accommodate the desired number of simultaneous connections.
Which brings us to Wireguard (Wikipedia article). Wireguard has only been in production service for a little over two years. But it is open-source and if there were weaknesses in it, I think they would have been uncovered by now.
One potential advantage of Wireguard is the size of the code base. The code to make IPSEC or OpenVPN possible is 400,000 or more lines of code. In contrast, Wireguard’s code base is only about 3800 lines of code. This means that an interested member of the public wishing to check for weaknesses or backdoors only has to review 3800 lines of code instead of 400,000 lines of code.
The “attack surface” available to those trying to penetrate the security is much smaller for Wireguard.
The actual instructions that are repeatedly executed to carry out the actual encryption and decryption are very few for Wireguard, as compared with a much higher instruction count for other approaches like OpenVPN or IPSEC. The practical consequence is that the throughput of the VPN connection is often quite a bit faster for Wireguard.
Actual speeds and latency. Actual speed tests and file upload-download tests by our colleagues at OPLF have found speed enhancements consistently at least ten or twenty percent faster, and in some cases the connection is as much as 2½ times faster. Latency (for example ping times to a server) is consistently better with Wireguard compared with OpenVPN. A ping time might be 60 ms rather than 80 ms, for example.
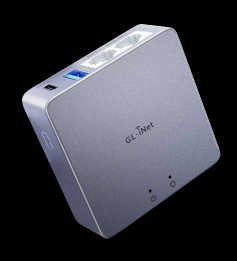
Implementing Wireguard. A big enabler for us was the recent release of a high-bandwidth router that is optimized for VPN server functions. This new router is called the Brume 2 or the GL-MT2500 router, shown at top right (manufacturer’s page). An important thing about this router is that it is running an open-source version of Linux. So you do not need to wonder whether the manufacturer might have included a back door or some intentional weakness in the cryptographic algorithms being used. This router only costs $60, and that includes air courier shipment from the manufacturer to you.
The CPU in this router is a MediaTek MT7981B dual-core processor, running at 1.3GHz clock speed. The ethernet ports on this router are gigabit or faster.
Here is how we implemented Wireguard in our main server farm in our office.
-
- Set up the Brume router to use DHCP on its WAN port. Connect it to the LAN of the server farm. Go look in the DHCP server to find out the WAN MAC address of the Brume router. (Yes it is written on the bottom of the Brume router but then I would have to hand-key the MAC address in later steps. At the DHCP server I can copy and paste the MAC address of the Brume router.)
- In the DHCP server, set up a static mapping from MAC address to LAN IP address. Make a note of the mapped IP address.
- In the main router for the server farm (the router that is exposed to the Internet at its WAN port), set up a service called Wireguard which is defined as UDP port 51820.
- In that router, set up port forwarding for the Wireguard service to the mapped IP address of the Brume router.
- In the Brume router, go into the “applications” tab and turn on the native DDNS. You will be assigned a DDNS domain name along the lines of “xza79dd.glddns.com”. Optionally, also turn on “HTTPS remote access”. This is not as risky as it seems given that nobody is going to be able to reach that HTTPS remote access unless they are already logged in with a VPN or are otherwise already trusted enough to be on the LAN of the server farm.
- In the Brume router, go into “System” and “Upgrade” and turn on automatic firmware updates. Also, do as many manual firmware updates as needed to get up to date. (At press time the version was 4.1.1, compiled in November of 2022.)
- In the Brume router, go into “VPN” and “Wireguard server” and “Configuration”. Click to activate the Wireguard server, and click to turn it on. Find “Wireguard server options” and turn on “Allow Remote Access LAN”.
- Within the Wireguard server tab, click on “Profiles”. Click “+ Add” to add a profile. A popup window will permit you to configure and download a configuration file. Select “use DDNS domain”. Click “download” to download the Wireguard client configuration file.
- If your remote device (such as a notebook computer) does not already have a Wireguard VPN client installed or built-in, then you will now need to download and install a Wireguard VPN client. You can get it at https://www.wireguard.com/install/.
- In the Wireguard VPN client, click on “Add Tunnel”. Select the Wireguard client configuration file that you downloaded two steps above.
- Now connect your remote device to the Internet in some way that is not the same as your office LAN. Maybe use a hot spot on your mobile phone, or a LAN at home or in some public place.
- Test the new tunnel by clicking on “Activate” in the Wireguard VPN client. You should next see two green checkmarks letting you know the Wireguard tunnel has been established. Test it by trying to make use of server resources in your server farm.
- For extra credit, do some uploads and downloads of big data files and time the uploads and downloads. Compare the upload and download times using Wireguard with the upload and download times using your legacy VPN solution. Maybe it will be a lot faster.
- Repeat steps 8-12 above for each of your remote users.
Please post a comment below to let me know how this works for you.
I have been in search for the perfect VPN these past twenty years. My business case is to access remote home locations in Canada and Switzerland primarily to obtain a local IP address to access my cable TV programming with is geo blocked. After spending lots of $$$ on various solutions, I found my perfect solution with the latest ASUS routers. I have an AX-88U and XT8 router. These routers have a VPN server and client built-in including WireGuard. Set-up is super easy. I used to use OpenVPN before but was never very happy with the speed as my video would often buffer. WireGuard speed is so much faster and the connection more reliable compared to OpenVPN.
Thank you for commenting.
I was very interested to see this post, as I am looking for alternatives to NordVPN which I currently use. I am not unhappy with the VPN, just with having to subscribe. One question I have is about certain web sites – I have to pause the VPN in order to be able to log in. Citi Bank is one example. They don’t like me logging in through the VPN, presumably so that they can put stuff I don’t want on my computer. Do you see this problem with the setup you described? If so, is the workaround to pause the VPN client while logging in to these sites?
Thanks.
Michael,
I think (but don’t know) that the reason banks won’t accept logins via a VPN is that they do not know where the purported account owner is really located. Banks would increase the risk of hacked bank accounts were they to ignore such mismatches — account-hold resides in US, login from ‘owner’ in random foreign country in which they have never before been.
When we say “some banks won’t accept logins via a VPN” we need to be precise. What is really being observed is “banks not accepting a login if the IP address is a telltale for use of some partiular commercial VPN service provider.”
If I set up a VPN server at, say, my home or office, and if I then travel to a faraway place and use my VPN client to connect to my VPN server, and if I then try to log in at a bank … it is absolutely impossible for the bank to know that I am trying to log in “via a VPN”. It is impossible for the bank to distinguish my (VPN-mediated) login attempt from a login attempt where I am physically located at my home or office.
No, what we are talking about here is something quite narrow and specific, namely the bank somehow laying its hands on a database of IP addresses that have in the past been used by commercial VPN service providers. And the bank choosing to blog attempted logins from IP addresses in that database. This is the same database that Hulu or HBO or Netflix would use to block somebody who is trying to do streaming from a location that is not permitted.
So to repeat an earlier point, if I set up a VPN server at, say, my home or office, and if I then travel to a faraway place and use my VPN client to connect to my VPN server, and if I then try to stream some Netflix or HBO or Hulu … it is absolutely impossible for the streaming service to know that I am trying to log in “via a VPN”. It is impossible for the streaming service to distinguish my (VPN-mediated) login attempt from a login attempt where I am physically located at my home or office.