
 These days, most people who want to have security camera systems choose cloud-based systems. The cloud-based systems have recurring costs, and it is anyone’s guess how badly one’s privacy could be violated in the cloud. Wouldn’t it be nice if there were some way to set up a security camera system that is completely self-contained, that does not send video data to a cloud, and that has no recurring cost? The alert reader will have no difficulty guessing where this article is going. Of course there is a way to set up a security camera system that is completely self-contained, that does not send video data to a cloud, and that has no recurring cost. For convenient reference I will give a name to such a system: “a good system.” I will describe how to do this.
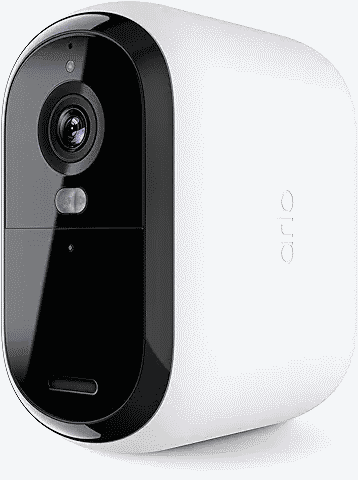 Let’s start with the cameras. Each of the various cloud-based camera systems (for example, Blink, Ring, Wyze and Arlo) is, of course, designed specifically to lock you into some particular cost-based and proprietary cloud. How is the camera powered? The answer will be either a battery or an unsightly cord with wall wart. If it is a battery, then you will be forced periodically to deal with replacing or recharging the battery. The battery might run down at some inopportune moment. Depending on the placement of the camera, you may be stuck going up and down a ladder to deal with the run-down battery.
With nearly all of the various cloud-based camera systems, the way the camera communicates its video information is by means of wifi, to the internet, to the proprietary cloud. A burglar can easily jam the wifi. If the internet goes out of service for 45 minutes, then the video stream is lost for that 45-minute period. If the burglar cuts your cable internet line, then the video stream is cut off.
Let’s turn to the cloud. What if the cloud service provider (the company that sold you the cameras) were to become unreliable? What if the cloud service provider were to fail to secure its cloud against sneaky people breaking into the cloud, and seeing your stored video recordings? What if the cloud service provider were to provide a backdoor for government agencies? Or, closer to home, what if the cloud service provider were to shift to a higher monthly fee after the expiration of a teaser introductory monthly fee?
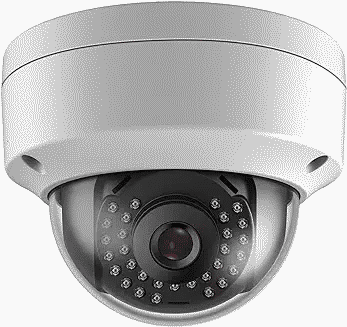
The cameras used in a good system are wired, not wireless. You run a category-5 ethernet cable to the location for each camera. This means the cameras do not use wifi, and so the burglar cannot accomplish much by jamming your wifi.
The cameras in a good system are powered by POE (power over ethernet). This means you run a single cable to each camera location, and the camera gets both its power connection and its data connection through that single cable.
Let’s remind ourselves how these various cameras look to burglars. Every cloud-based recurring-cost camera (for example, Blink, Ring, Wyze and Arlo) has an appearance that screams out “amateur” and “easily defeated”. The cameras in a good system do not scream, but quietly signal “professional” and “maybe it would be better to pick some other house to burgle”.
One of the nicest things about cameras that are made for a good system is that they do not lock you into any particular ecosystem. They all use a protocol called “ONVIF” (Wikipedia article) to communicate with other devices such as an NVR (network video recorder). At my house, the ONVIF security cameras are made by three different manufacturers, and the NVR is made by a fourth manufacturer. Everything communicates with everything else seamlessly despite the mix of manufacturers.
Another nice thing about cameras made for a good system is that they are less expensive than cloud-based, recurring-cost cameras. A camera for a good system might cost only $39. A cloud-based, recurring-cost camera might cost $60 or $150.
I mentioned the NVR (network video recorder). This is a device that you place somewhere in your home. It contains a big hard drive — maybe 6 TB capacity. Depending on how many cameras you have, it might store two weeks’ worth of around-the-clock recordings. It then records the newest video over the oldest recordings. The NVR has a one-time cost (in a range from $89 to $350) but no recurring cost. The NVR costs more money if you want it to be able to connect with more cameras at the same time (16 instead of 8, for example). The NVR costs more money if you want it to be able to record higher-resolution video streams instead of grainier video streams (8 megapixels instead of 2 megapixels, for example).
 Let’s talk about how you, the home owner, can interact with the NVR. For any ONVIF-based NVR, there are always three choices:
-
- an app on your smart phone or tablet;
- using your notebook or desktop computer to connect to a web site embedded in the NVR; and
- standing in front of the NVR, using a mouse and display screen.
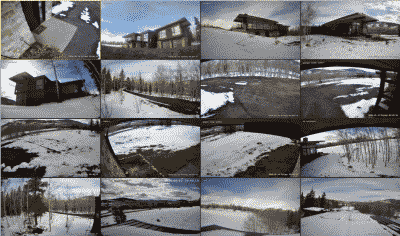
- Let’s suppose you have a sixteen-channel NVR (an NVR with enough bandwidth to receive video streams from sixteen security cameras). Such an NVR will allow you to live-stream a “sixteen-up” summary of the views from the sixteen cameras, as shown above right. This can be viewed on the smart phone or on the tablet or on the notebook or desktop computer. You can also go and stand in front of the NVR and view the sixteen-up summary on the display screen.
On any of these devices, you can then click on an individual stream to make it fill the screen. You can also do “playback” of recordings. You can snip a video clip from a recording and load it onto a USB drive, or email it to somebody.
Again, as I mentioned at the beginning of this article, in a good system there is no recurring cost. The system is not vulnerable to wifi jamming. The system is not vulnerable to a burglar cutting the Internet line to the house. The recordings are stored locally, not in any cloud. Nobody has access to the video streams, or to the recordings, unless you give them access.
I ought to mention that if you were for some reason in love with cloud-based services, every camera that is made for a good system always comes with some cloud, hosted by its manufacturer, that you could use. Every NVR that is made for a good system always comes with some cloud, hosted by its manufacturer, that you could use. But I think the Best Practice is to have the self-control not to turn on the feature of the camera that sends data to a cloud. I think the Best Practice is to have the self-control not to turn on the feature of the NVR that sends data to a cloud.
Setting things up. The clear advantage of every cloud-based security camera system is that no skills are needed to set up or use the system. Everything about the system is designed to make it incredibly easy to install and use. No networking experience is needed, no mechanical abilities. It’s just that the manufacturer might be providing a back door to law enforcement, or might fail to secure its cloud against prying eyes. It’s just that the cameras scream out “amateur” and “easy to defeat”. It’s just that you will be paying money to the manufacturer in perpetuity.
In contrast, if you are going to use a good system, you have to set it up. Either you yourself will need to have a lot of time and energy for reading manuals and fiddling around with router configurations, or you will need to find some helpful person to do this for you. Here are some tips.
Cable runs. First, plan ahead and run a category 5 cable to every place where you might some day want to put a security camera. Ideally your planning-ahead preceded the construction of your house.
Failing this, in an already-built house, be ready to spend some time and energy for remodel work, running category-5 cables to the camera locations. This may require fishing wires through walls and attics and crawl spaces.
Yes, you can purchase ONVIF cameras that are able to use wifi to reach the NVR. But think about it. Even if the camera uses wifi to send and receive its video data, it still needs electrical power. If you are going to go to all of the fuss and bother to run a cable from the camera location to a location where there is electrical power, why not do the small additional effort of running a category 5 cable? Not only that, the ONVIF cameras that use wifi are visually distracting looking, with one or two antennas sticking out. And, as mentioned above, it is very easy for a burglar to jam your wifi. Why not just suck it up and run the category 5 cable?
Cable runs do not need to be home runs. If you have sixteen security cameras, you do not need to run sixteen cat 5 cables all the way to the NVR. You can distribute ethernet switches to various places that are closer to groups of cameras. From the ethernet switch you need run only a single cable to the NVR.
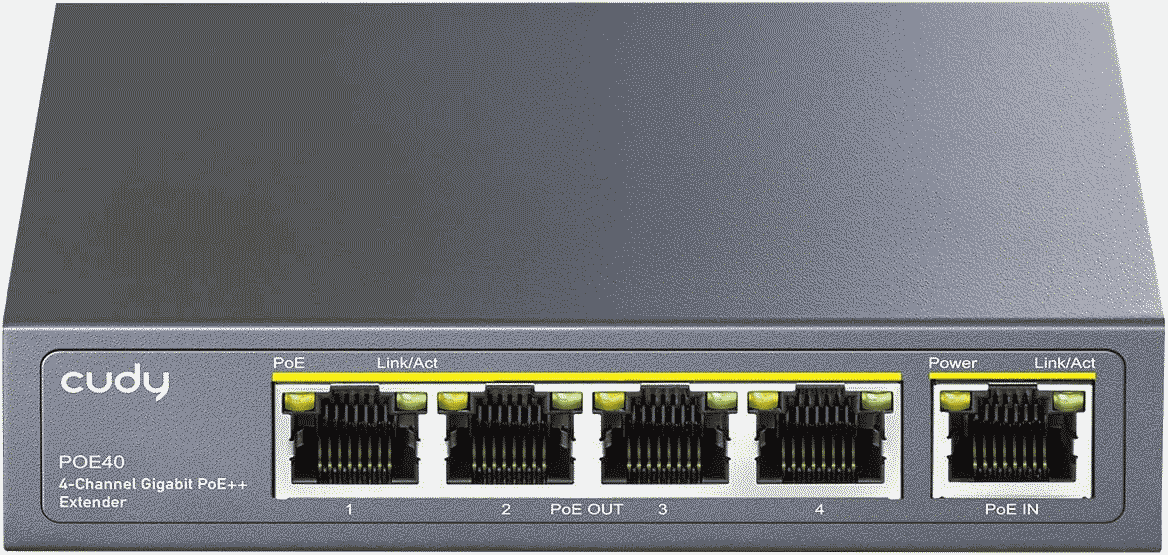
Power over ethernet. What you will realize early in your setup process is that every camera’s cat 5 cable needs to reach a POE ethernet switch. Only in this way will the camera receive its electrical power. It is at this point that you will be delighted to learn that there is such a thing as a POE extender. This device does not require any electrical power to do its work. You pass one POE connection from a powered location to this extender. And it provides some individual POE connections to distal devices such as security cameras or VOIP telephones.
VLANs. Any house that contains a mix of trusted and untrusted devices needs to have VLANs. See my article Setting up a VLAN for your IOT devices. The best practice would be to set up several VLANs in the house, and confine the security system cameras and the NVR to a VLAN that is not the same VLAN as you use for trusted devices like file servers and personal computers.
Browser plugins. For reasons known only to the makers of web browsers, no commonly available web browser has the ability to view the kinds of video streams that come from security cameras and NVRs. This means that if you use your notebook or desktop computer to connect to the embedded web server of the camera or NVR, the streamed video will not render in the web page. The usual solution is to click on a link in the embedded web page to download a browser plugin, and then install the plugin. This then permits the user to manage the cameras and the NVR.
Setting up each security camera. My suggestion is to turn on DHCP for each security camera. The NAT router that serves the VLAN of the security cameras will be providing DHCP service for that VLAN, and my suggestion is to use address reservations to assign fixed LAN IP addresses to the security cameras, based upon their MAC addresses.
In each security camera, make sure that ONVIF is turned on. Use the OSD (on-screen-display) function of the camera as a way to tag the camera image with a word or two to provide a reminder of the location of the camera or the direction that it is pointed.
NTP. In each security camera, turn on NTP (network time protocol) and set the time zone. Pay particular attention to the parameter that determines how often the camera queries the NTP server; one family of cameras that I have worked with has a default setting that queries the NTP server once every sixty seconds. Such a setting abuses the NTP server — it is more than adequate to query the server a mere once per 24 hours.
Camera cloud. In each camera, turn off services that are not needed. In particular, turn off any service that would stream the camera video to a cloud.
Camera alarm. Many inexpensive ONVIF security cameras are set by default to carry out some task whenever they detect motion. The task might be to send an email with a snapshot, or to carry out an FTP transfer of a video clip. If you are mostly making use of the camera by means of an NVR, then you probably do not want the motion-detection process using up processor bandwidth. So go into “event” or “alarm” and turn off “motion detect”.
Auto maintain. Many inexpensive ONVIF security cameras have a feature rather opaquely called “auto maintain”. If turned on, this permits you to select a time of day and a day of the week at which the camera will carry out a scheduled task, namely a reboot of the embedded Linux operating system of the camera. If there were any memory leak, this could restore the camera to service. I think it is a good idea to turn this feature on.
Setting up the NVR. The NVR uses an embedded Linux operating system, much like the cameras. It, too, will benefit greatly from having “auto maintain” and NTP turned on. It will have services that are intended to pass video streams to one or more cloud service providers; I suggest turning these off.
Linking the cameras to the NVR. The NVR may have a built-in POE ethernet switch. If so, I suggest not using it. The built-in ethernet switch will define its own LAN that lacks IP connectivity to anywhere else. Any security cameras that are plugged into this built-in switch will be inaccessible to you for management or configuration. I suggest using some external POE switch (or more than one) for the security cameras.
The NVR will have a wizard setup feature that offers to go out over the LAN and find the security cameras, and will carry out lots of network configuration of the cameras. It is all too easy to get suckered into using this wizard feature, but I suggest avoiding any use of this wizard feature. If you use this feature, the security cameras will get lost to you. The NVR will choose for itself the IP addresses to assign to the cameras, and it won’t tell you the IP addresses. They will be chosen from some subnet that the NVR does not tell you about, and the NVR will turn off DHCP on the cameras. On a practical level this means you will lose any ability to connect to or manage the cameras. Later when you realize that you need to get in touch with the cameras again, you will have to use a “camera finder” app to try to find the cameras and reset them to turn DHCP back on. This is tedious and awkward.
To avoid all of these problems, when you are configuring the NVR to communicate with the cameras, do it “the hard way”. This means that you explain to the NVR what the IP address is of each camera, one by one. (Recall that you previously left DHCP turned on in each camera, and you arranged for the LAN DHCP server to assign a fixed IP address to each camera based upon its MAC address.) This is more work up front, but it preserves your ability to get into each camera for later management or reconfiguration.
Delivering POE to security cameras. There are, unfortunately, too many POE “standards”. Some devices are set up to do data on ethernet pins 1, 2, 3 and 6 and to do power on ethernet pins 4, 5, 7 and 8. This is not what you want to do for your security cameras because they are designed for the “smarter” kind of POE that delivers power over the same pins as the data. Once you realize this, you will further realize that for some camera installations, it will be very very helpful to to be able to “cheat” and put two cameras on a single four-pair category 5 cable. You can use ethernet splitters such as shown at right. The splitters are used in pairs, at two ends of a single cat-5 cable. The splitters renumber pins 4, 5, 7 and 8 as pins 1, 2, 3 and 6. Each set of 4 wires is able to deliver both data and power to a single security camera. Yes, these ethernet runs are limited to 100base-T (instead of gigabit) but this is absolutely not a problem given that the data streams are nowhere close to using up 100 Mbps of bandwidth.
NVR network settings. The NVR will probably invite you to use UPnP as the way to set up port forwards in your main router. My suggestion again is to avoid this seemingly “easy way” to do the port forwards, but instead to do this “the hard way”, constructing your own port forwards in the main router. My further suggestion is to avoid any use of UPnP with IOT untrusted devices (or even with trusted devices).
DDNS. You likely do not have a static WAN address from your ISP. This means that if you are going to do things with the NVR from remote locations, you will need to use some kind of DDNS. You can spend money on DDNS (for example through no-IP) but if you have a Synology box in the house, you can use a free-of-charge DDNS provided by Synology. If you use GL-inet routers (which I recommend), they provide a free-of-charge DDNS provided by GL-inet.
Smart phone app. We now turn to the smart phone app that you will use to gain access to the NVR from remote locations. This is provided by the maker of the NVR, but I suspect that most such smart phone apps, provided by the various makers of NVRs, can actually be used cross-platform to communicate with NVRs made by other companies. Anyway, you will need to have set up appropriate port forwards in your main router. A typical “server port” for the smart phone app will be 8000. You will use the DDNS mentioned above, and server port number, and a user account on the NVR, to make use of the NVR remotely.
HTTP or HTTPS remote access. You will probably want to be able to use your notebook or desktop computer to gain access to the NVR from remote locations. Again you will need to have set up appropriate port forwards in your main router, probably to non-traditional high port numbers.
Picking a hard drive for the NVR. Most of the ONVIF NVRs can be purchased with your choice of a hard drive already installed or not already installed. You can save money by purchasing it with no hard drive, and then install your own hard drive (or more than one). It is sensible to pick a drive capacity that is large — 6TB or more. It is also sensible to pick a hard drive that is specially made for surveillance recordings. Such a hard drive has firmware optimized to try to avoid running hot despite being in a state of near-constant activity. The firmware is also optimized for the activity that takes place nearly all the time (writing) given that reading takes place very rarely.
Choosing when and what to record. In the NVR, you get to pick when and what to record from your security cameras. One might be tempted to limit the times of day to record, on a camera-by-camera basis, and this might be a smart thing to do in some settings. Likewise one might be tempted to say “yes” to the NVR’s proposal that it would only bother to record video after a motion-detection event. I think there is much to be said for “keeping it simple” and having the NVR simply record around the clock for all cameras. You would not want to find that the NVR’s idea of “what counts as motion” to be different from your own.
NVR network settings. As you can see from the above discussion, I am a fan of setting DHCP “on” for nearly all devices that are plugged in to a LAN, and using address reservations in the main router to set fixed LAN IP addresses for the devices that need fixed IP addresses.
Conclusion. As you can see, it requires a certain level of network experience, and a certain amount of up-front work, to set up an ONVIF-based system of security cameras. The rewards, however, are great. The cameras are sophisticated, they are not vulnerable to wifi jamming, the recordings are stored locally instead of in some cloud about which you know very little, and the monthly cost of the system is zero.