
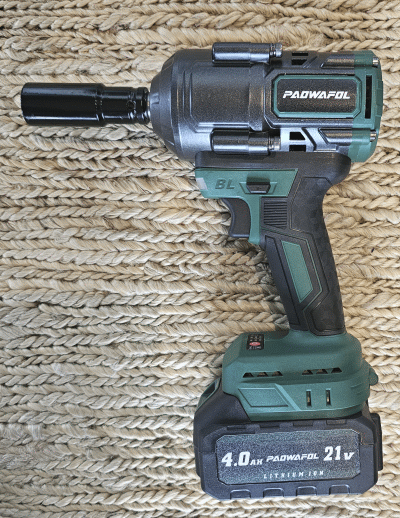
The Amazon product B0DF7LJKF4 (seen at right) is one version of the Paowafol cordless brushless impact wrench. This page tries to explain the meaning and use of the Smart Control Panel on this wrench.
Many cordless ½-inch drive impact wrenches with familiar American brands cost $200 to $300. But if you click around, you can find cordless ½-inch drive impact wrenches with brand names that are perhaps less familiar (for example Paowafol) for as little as $85. The one that I just purchased (for that price) also included two batteries, a charger, and a set of four impact sockets. They also threw in a pair of nonslip gloves, and it all neatly fits into a sturdy carrying case.
So far as I can see, this Paowafol wrench is a very good choice for the do-it-yourselfer who wants to save a lot of work when changing snow tires in the spring and fall. It easily removes lug nuts. Used correctly, it can put the lug nuts back into place. But the user manual that came with the wrench was wholly inadequate. It absolutely fails to explain how to use the “Smart Control Panel” that is an important part of this feature-packed wrench.
Becoming familiar with the wrench. We will start with some terminology for various parts of the wrench.
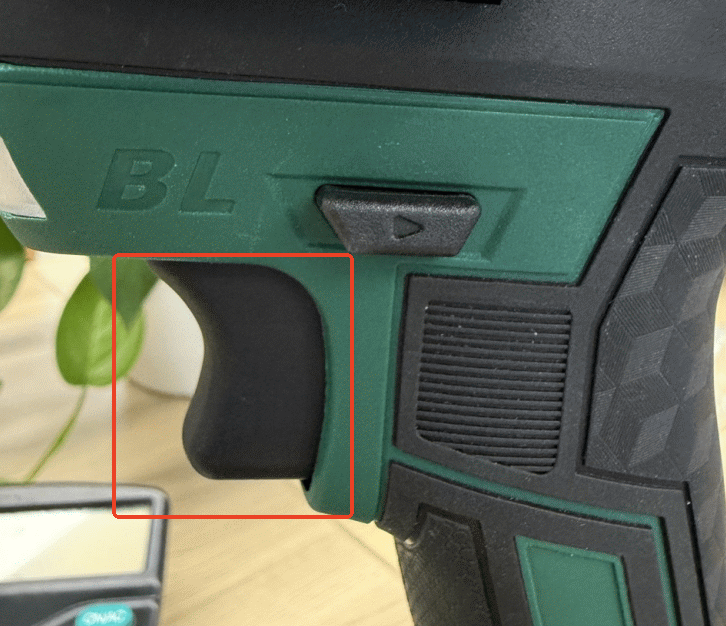
The trigger. The part of the wrench that the user will make use of more than any other part is the trigger, highlighted at right. I’d guess that most users are extremely familiar with the trigger, from previous experience with a cordless drill. With many cordless drills, the trigger is continuously variable across a continuous range of speeds. It is different with this wrench — the trigger can be pulled to any of three positions, yielding any of three amounts of speed and torque.
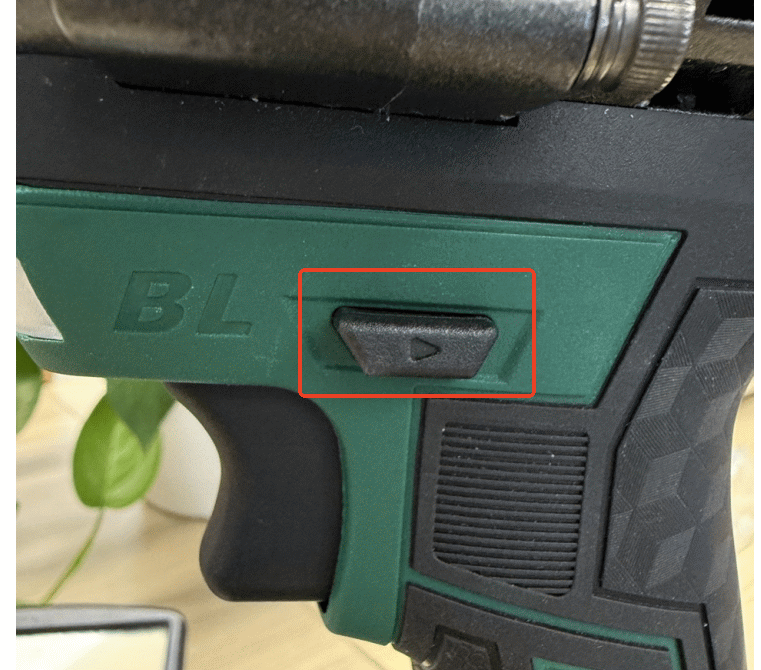
The direction buttons. The second-most-frequently used part of the wrench is the direction buttons, highlighted at right. I’d guess that most users are extremely familiar with the direction buttons, from previous experience with a cordless drill. Most users know that if you aim the socket of the wrench toward the work, and push the left direction button all the way in (toward the right) then the wrench will rotate the socket counterclockwise. If you push the right direction button all the way in (toward the left) then the wrench will rotate the socket clockwise. For this wrench, there is a third option which is to center the direction buttons. This blocks the trigger. This option is very helpful because it reduces the risk of the user accidentally bumping or pulling the trigger at some unintended moment. It is smart to set the direction buttons in this middle position whenever the wrench is being set aside for a moment.
Most users also appreciate “lefty-loosie, righty-tighty”. For most threaded fittings, such as bolts and nuts, clockwise rotation tightens the fitting. Counterclockwise rotation loosens the fitting. (Some fittings have what is called “reverse threading” meaning that clockwise rotation loosens the fitting and counterclockwise rotation tightens the fitting. This topic will arise again in the discussion below.)
The flashlight. Most users of cordless drills will also be accustomed to the presence of a very helpful white LED that serves as a flashlight, illuminating the work area. It lights up when the trigger is pulled and stays lit for a few seconds after the trigger is released.
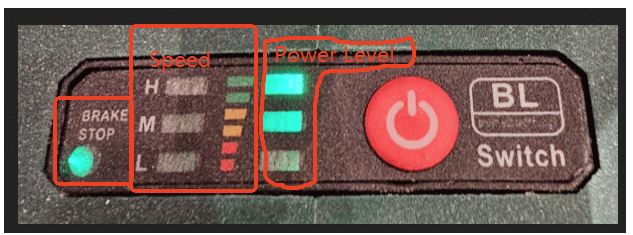
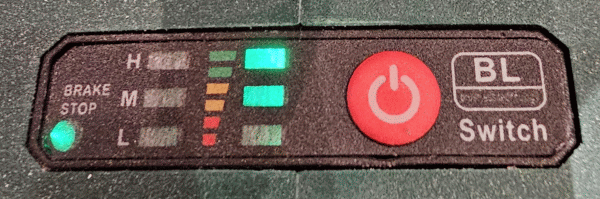
The indicator panel. The new user of this wrench, likely already being very familiar with the trigger and the direction buttons, will find one remaining part of the wrench that is unfamiliar — the indicator panel shown at right. As highlighted in the image, there are three indicator areas that the user will want to become familiar with:
-
- the “brake stop” LED;
- the three “speed” LEDs which have “H”, “M”, and “L” legends; and
- The three “power level” LEDs which have green, orange, and red legends.
Most of the time, the entire indicator area is dark (all of the LEDs are off) because the trigger has not been pulled recently. There is a red button at this indicator area. Most of the time, pressing the red button does nothing at all, once again because the trigger has not been pulled recently. Given that most of the time the LEDs are off and the red button does nothing, a new user of this wrench might be forgiven for assuming that the entire indicator area has no actual meaning or function.
Here, then, are two learning opportunities for the new user, as I will describe.
First learning opportunity. Push the direction button to the right (which selects counterclockwise rotation of the socket). Tap the trigger gently and briefly. Take a quick look at the indicator panel. If you look quickly enough, you can see the status of the “brake stop” LED (either on or off) and you can see the status of the “power level” LEDs. (The “power level” LEDs are actually miscaptioned in the image above. The LEDs do not tell you about “power” — they tell you about “energy”. They tell you the state of charge of the battery. Saying this another way, they tell you how much energy is in the battery.)
What remains to learn about is the meaning of the “brake stop” LED, which is discussed below. But next we turn to the second learning opportunity.
Second learning opportunity. Push the direction button to the left (which selects clockwise rotation of the socket). Tap the trigger briefly and lightly. Take a quick look at the indicator panel. If you look quickly enough, you can see the status of the “power level” LEDs, just as in the previous learning opportunity just discussed. They tell you the state of charge of the battery. You can also see the status of the “speed” LEDs (H, M, and L). The “speed” LEDs are discussed below. But next we will talk about “brake stop”.
What is “brake stop” and why do I care? With an old-fashioned air-powered wrench, what will often happen, when one is loosening a lug nut, is that the moment that the lug nut comes “loose” is be a moment that the wrench would instantly spin much faster. The now-loose lug nut might get flung away and be hard to find. Which brings us to a really nice feature of some cordless ½-inch drive impact wrenches including this one. When the wrench is set to turn counterclockwise to try to loosen a tight lug nut, a circuit can detect the reduced power load from the motor at the moment that the lug nut comes loose. In response, the motor can reduce speed, so that the lug nut will not get flung away. This is called “brake stop”.
The alert reader will wonder “how do I know whether the wrench will do this very handy ‘brake stop’ thing?” The answer is given in the first learning opportunity discussed above. You tap the trigger (having previously set the wrench to “counterclockwise” mode) and take a quick look at the “brake stop” LED. If it is lit, then the wrench will do this handy thing, reducing speed and reducing the risk that the lug nut will get flung away. It is not lit, then the wrench will maintain speed and torque for so long as the user continues to be pulling the trigger.
The alert reader will ask “how may I turn this ‘brake stop’ feature on and off?” Usually for most users and most tasks, you probably want this “brake stop” feature to be “on”. When you set the “direction” button for counterclockwise rotation, usually the thing that you are doing is trying to loosen a lug nut, in which case you would very much like it if the wrench were to cut power as soon as the lug nut gets loose. But every now and then you might be working on some task where you very much want the wrench to keep turning no matter what happens. One example of this might be if you have a wheel or other fitting with reverse threads — a fitting where counterclockwise rotation actually tightens the fitting rather than loosening it.
One goal of the Smart Control Panel is to let you pick whether this “brake stop” feature is on or off. The answer is that you press the red button. Except, of course, that most times that you might press the red button, it will not do anything because you had not recently tapped the trigger.
So here is what you need to know. To turn “brake stop” on or off, you need to do two things. First, you need to be in “counterclockwise” mode. So if the wrench is not already in “counterclockwise” mode, you push the “direction” button to the right, meaning counterclockwise operation. Second, you need to briefly tap the trigger, which activates the Smart Control Panel. Then, without delay, tap the red button. This will toggle the “brake stop” LED on or off. The wrench will then remember this mode for future activity in the counterclockwise direction.
I think that reverse-threaded wheels and fittings are rare nowadays. If I am right about this, then as a general rule you would almost always want the “brake stop” feature to be “on”.
This brings us to a discussion of safety. Every minute that a vehicle is off the ground, held up by a jack, is a dangerous minute. To be safe, we want to minimize how many minutes the vehicle is off the ground. If we are fussing around with old-school “breaker bar” wrenches, this takes time. We want to minimize the number of minutes that we are fussing around with the vehicle off the ground. If we use an impact wrench to get the lug nuts loose, this may serve our goal of minimizing how many minutes the vehicle presents a safety risk.
To say this another way, the user who makes use of an impact wrench like this to remove lug nuts, instead of using old-school “breaker bar” wrenches, will probably be safer. Yes the work goes faster. But the work is probably safer as well. And the “brake stop” feature makes the removal of lug nuts more convenient because the lug nut is less likely to get flung away.
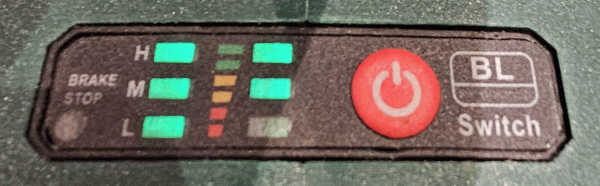
What is H-M-L and why do I care? We now return to the second learning opportunity discussed above, which relates to the “speed” LEDs that are marked H and M and L.
The idea here is that you had already pushed the “direction” button to the left, meaning that you had already selected clockwise motion. And then you briefly tapped the trigger. As mentioned above, this means that for the next few seconds, you were able to see the speed LEDs. This feature determines what happens when the wrench is operating in the clockwise direction.
If you see all three of the speed LEDs lit, then it means that pulling the trigger will make the socket turn at high speed and the wrench will deliver high torque. (Actually you have three choices for how much to pull the trigger, yielding three variants of the high speed and torque.)
If you see only two of the speed LEDs lit, then it means that pulling the trigger will make the socket turn at medium speed and the wrench will deliver medium torque. (Once again you actually have three choices for how much to pull the trigger, yielding three variants of the medium speed and torque.)
If you see just one of the speed LEDs lit, then it means that pulling the trigger will make the socket turn at low speed and the wrench will deliver low torque. (Yet again you actually have three choices for how much to pull the trigger, yielding three variants of the low speed and torque.)
Again the alert reader will ask “how may I adjust this speed setting?” The answer is that you press the red button. Except, of course, that most times that you might press the red button, it will not do anything because you had not recently tapped the trigger.
So here is what you need to know. To adjust the speed setting, you need to do two things. First, you need to be in “clockwise” mode. So if the wrench is not already in “clockwise” mode, you push the “direction” button to the left, meaning clockwise operation. Second, you need to briefly tap the trigger, which activates the Smart Control Panel. Then, without delay, tap the red button one or more times. This will cycle through the three possible speed settings (H, M, and L). The wrench will then remember this speed setting for future activity in the clockwise direction.
I suppose there might be some situations where you would want “H” or “M”. Maybe you are assembling some apparatus that is not a vehicle. Maybe everything in your apparatus is very strong steel and you want it screwed together as tightly and strongly as possible.
But most DIYers are working on a vehicle. The vehicle has wheels. The wheels may be aluminum or magnesium-aluminum alloy. If the lug nuts are too tight, then this could damage the wheels. Not only that, but the lug nuts are fitted onto steel studs. The studs are not infinitely strong. The studs are designed to receive some particular amount of torque and not more. On my vehicle, for example, the specified amount of torque is 129 foot-pounds. This is a “goldilocks” number — it is bad if the number is too high or too low — it needs to be “just right”.
-
- If you fail to achieve at least 129 foot-pounds then there is a danger the lug nut would work loose. Maybe eventually the wheel would fall off.
- But if you tighten the lug nut too much, there is a danger you would damage the stud or even break it off. Or you might damage the wheel.
The alert reader will have compared the wrench specs (as much as 885 foot-pounds) with the number I just stated (129 foot-pounds) and will have noted that the former number is much bigger than the latter. The simple fact is that a user of an impact wrench might, if they were not paying close attention, tighten a lug nut to some torque that is wildly more than the specified 129 foot-pounds.
So there are as many as three things the DIYer might do to avoid over-tightening the lug nuts.
One choice is to go “old school”. Do everything by hand. Tighten the lug nut using an old-fashioned torque wrench, stopping when the specified torque of 129 foot-pounds has been reached. A first drawback to this choice is that it takes a long time. Every minute that we are fussing around with old-school wrenches is a minute when the vehicle might be off the ground, held up by a jack. This is a safety concern. We want to minimize the number of minutes that we are fussing around with the vehicle off the ground.
Another choice would be to use a “torque stick” as described in this blog article. If it can be believed, a torque stick might limit how much torque is delivered to the lug nut by the impact wrench.
Still another step that the DIYer might take is to make use of the Smart Control Panel to choose a the lowest power level, namely “L”. In addition, the user would try to pull the trigger only to its first (and lowest-power) position. These two measures, together with use of the torque stick, might lead to a situation where the lug nut receives (maybe) a controlled number of foot-pounds of torque.
Once the lug nut has been tightened somewhat using the wrench (at the “L” speed, and maybe using a torque stick, and only pulling the trigger to its first position), then the DIYer could set side the impact wrench, and put an old-fashioned torque wrench onto the lug nut. Hopefully the torque wrench would click at least once with at least a little rotation of the socket. This would mean that the impact wrench did successfully avoid doing “too much” — going past the specified 129 foot-pounds. And then when the click happens, the DIYer could conclude that now, for the first time, the lug nut has been tightened to the specified 129 foot-pounds. (Keep in mind that your car might need a different number of foot-pounds instead of 129.)
The user manual that came with this wrench was inadequate. Absolutely nothing that you see in this blog page was disclosed or even hinted at in the user manual. I have been in communication with the manufacturer and I think there is a chance the manufacturer will revise the user manual to explain these things.