
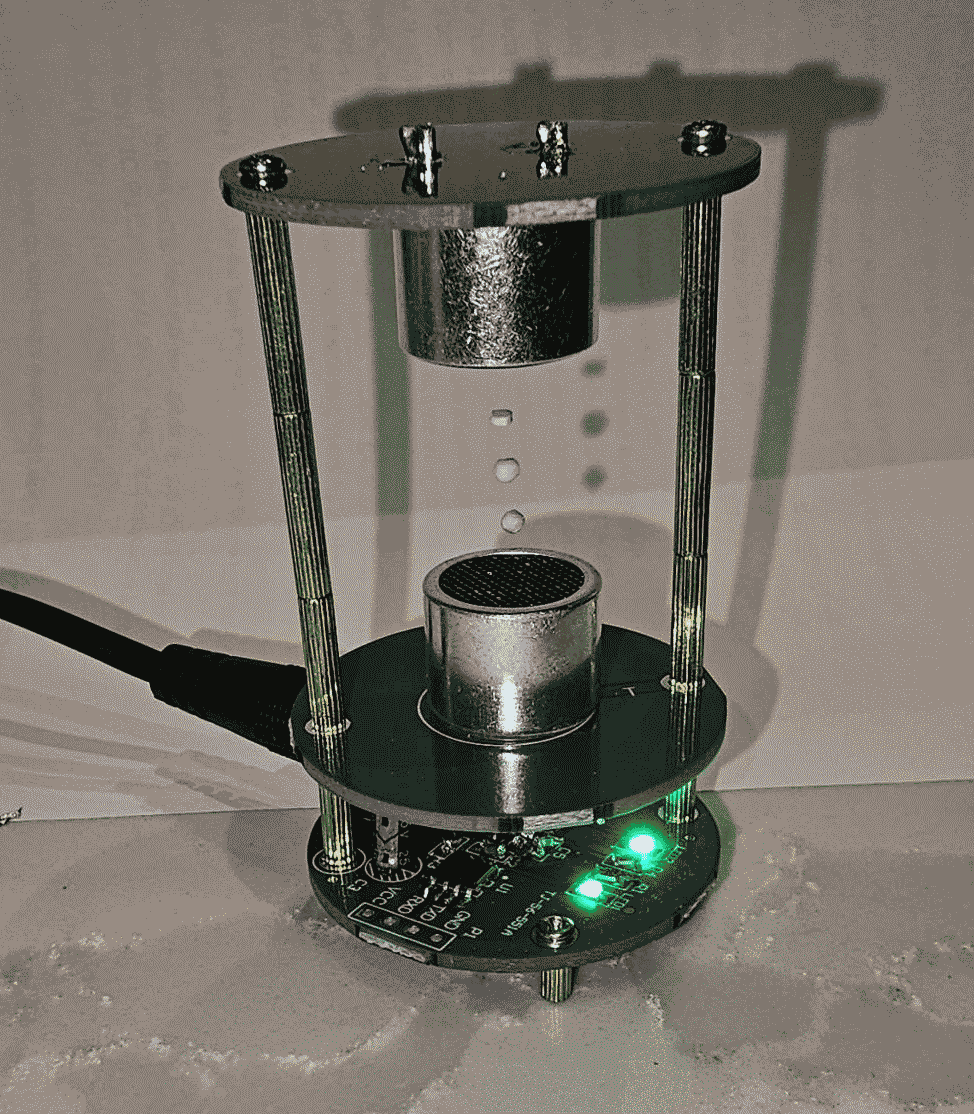
What you can see at right is something that I find astonishing in several ways. One astonishing thing is that three small styrofoam balls are suspended in space, defying gravity. These three balls have been suspended in space, defying gravity, for over 48 hours, and they might continue this way for many days, unless a breeze or puff of air were to disturb them.
A second astonishing thing is that this device cost only $4.79.
In this blog article I describe how it is that for a mere $4.79, I found myself able to defy gravity, suspending three small styrofoam balls in space.
First, a sense of scale. This device is not big — it is about 2½ inches (about 6 cm) tall. The vertical gap within which the three styrofoam balls are suspended is a mere ¾ of an inch (about 2 cm).
How does this device defy gravity? It uses something called “acoustic levitation” (Wikipedia article). Acoustic levitation, it turns out, is a method for suspending matter in air against gravity using acoustic radiation pressure from high-intensity sound waves. In the device shown above, there are two piezoelectric transducers, one above and one below. Each transducer emits a high-intensity sound wave toward the other transducer. The two sound waves give rise to constructive and destructive interference, resulting in a standing wave. Each of the styrofoam beads is trapped at one of the nodes of the standing wave.
By measuring the distance between two of the beads (around 5.5 mm), one can work out the frequency of the high-intensity sound waves. The nodes are half a wavelength apart, so the audio frequency is around 31 kHz. (Human hearing drops off at perhaps 20 kHz, so the human ear will not hear this high-intensity sound.)
We can return to the price of the device — under $5 at Aliexpress. For this price, what you get is what the vendor calls a “do-it-yourself” kit. But for most people, I think this would not count as “do-it-yourself”. It requires knowing how to solder electronic components, but not only that, the components are “surface-mount” components, meaning that the soldering is extremely difficult. The components are extremely small and fragile. I am not very good at surface-mount soldering, but against all odds I did manage to assemble the kit and it worked on the first try.
The parts are so small that a magnifying glass did not suffice to let me see how to orient the parts onto the circuit board. I literally had to use a microscope for this.
In the video below, you can see what happens when I tap the top of the device.
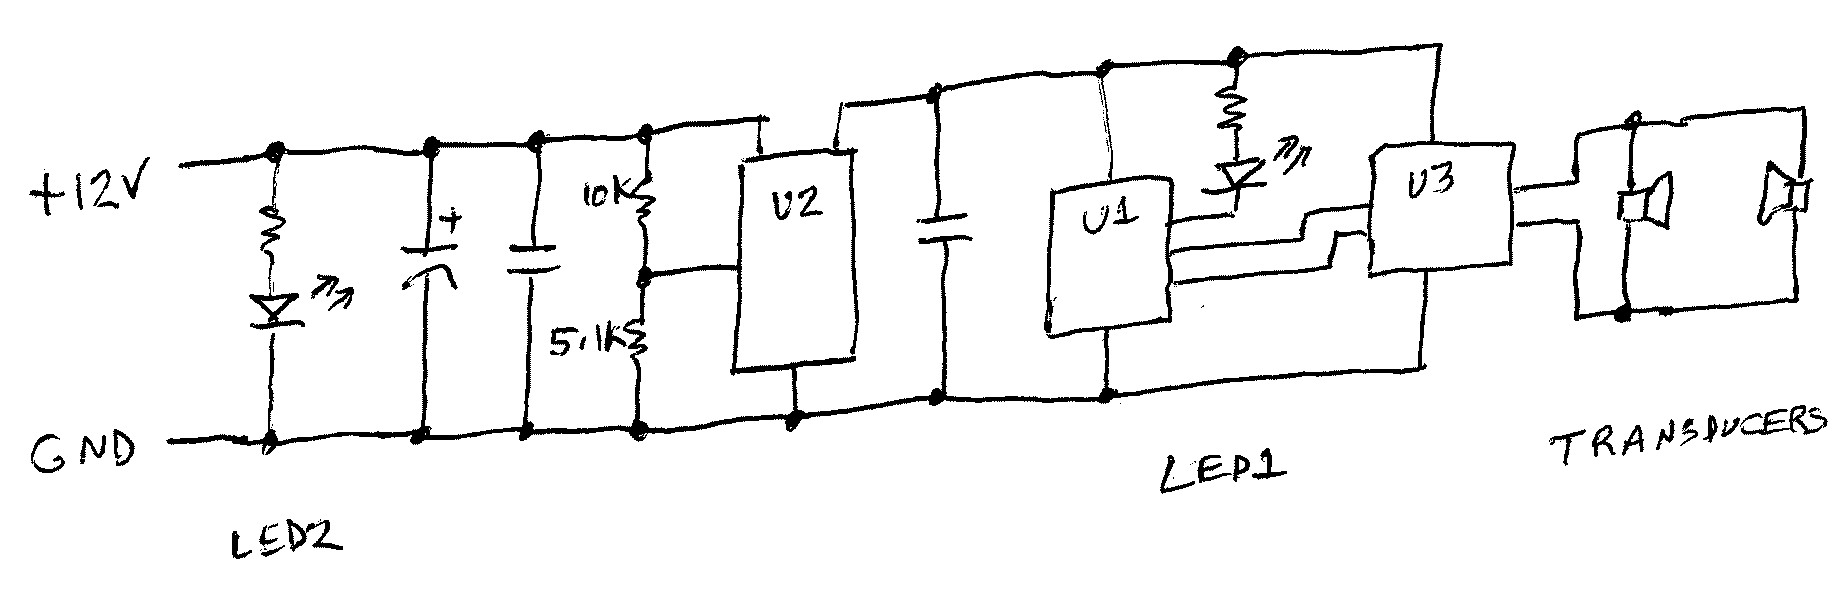
The alert reader will, of course, want to see an electronic schematic diagram, and here it is.
LED2 simply lets you know that you have supplied the 12V power. U2 is a TPS709 voltage regulator delivering 3.3V to U1 and U3. U1 is an STC15 microcontroller. U3 is a TC4427 dual-MOSFET driver. U1, in this application, represents a sledge hammer being employed as a fly swatter. It is a high-performance 8051 CPU and was preprogrammed by the vendor with very simple code that does two things — it turns on LED1, and it emits two phases of a 31-kHz signal. This drives U3 to drive the two piezoelectric transducers.
One advantage of this STC15 microcontroller is that it does not require an external crystal. It has an internal RC clock that works well enough for these purposes.
Interestingly, it does not matter whether the do-it-yourselfer pays any attention to the phasing of the two transducers, nor is there any requirement that the do-it-yourselfer space the two transducers at any particular exact distance apart. Any variations in spacing or phasing merely lead to the positions of the standing-wave nodes being a little higher or lower in the gap between the transducers.
With this kit you have to provide your own power supply. I used a power supply from my junk box, delivering a nominal 12 volts to the device. I put an ammeter on it and found that it consumes about 43 mA or about 52 mW.
I invite comments from readers. Have you, perhaps, carried out acoustic levitation at your home or office? Have you, perhaps, successfully assembled and operated one of these under-five-dollar kits from Aliexpress? Please post a comment below.
Nice soldering work! Also, while a human will not hear the sound, my guinea pig will, so alas I will not be picking up one of these.