
Update: in response to my complaint, it looks like the vendor might take corrective action so that future customers would not face a repeat of my very disappointing experience. See blog article.
Hello dear readers. It will be recalled (blog article) that I was working on a project to replace a window regulator in my car. I am delighted to be able to report that the car window is now once again working properly. It took far longer to accomplish than it should have taken, but now all is well with the window. Hopefully soon I will be able to report corrective action by the maker of the replacement regulator.
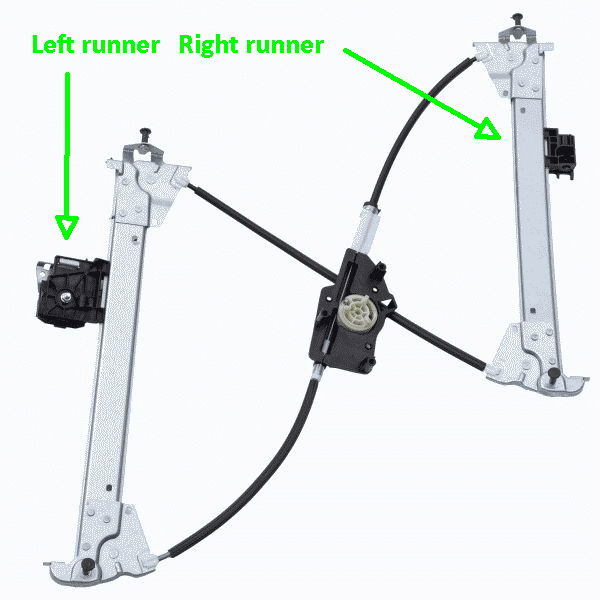
It will be recalled that many vehicles with power windows make use of a window regulator. The window regulator has two parallel vertical tracks. On each track is a runner. The two runners slide up and down the tracks in tandem.
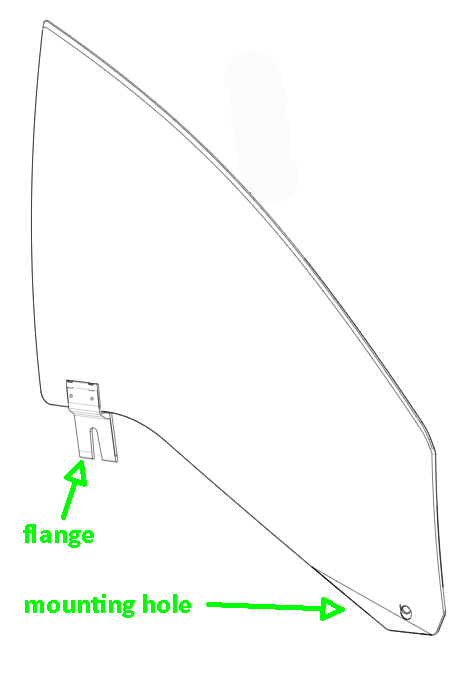
Here is what the window glass looks like. At the lower left corner the glass has a metal mounting flange with a slot in it. This flange gets held in a vice-like grip by the left runner.
At the lower right corner the glass has a mounting hole. This hole gets snapped into place in the right runner by a spring-loaded pin.
For all of this to work, clearly what must somehow happen is that these two mounting features of the window glass must necessarily get securely engaged to the corresponding runners of the regulator.
The OEM (original equipment manufacturer) window regulator had failed prematurely, as described in the previous blog article. Its steel cables had fallen apart. I figured it would be a mistake to spend the $240 to buy another OEM window regulator because maybe its steel cables would also fail prematurely. So I purchased a third-party window regulator on Amazon for $60.
An important part of the process of replacing the window regulator is that the window glass needs to be disconnected from the old (failed) regulator and later it needs to be secured to the new regulator. The moment arrived yesterday when when the new regulator was in place, and I needed to lower the window glass into its engagement with the new regulator. With the help of a nice neighbor, we lowered the mounting-hole corner of the glass into the right runner, lined up the hole with the pin, and heard the very satisfying snap as the pin locked into the hole. That was the easy part.
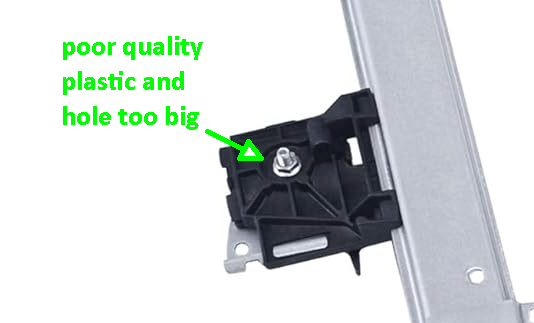
We also lowered the slotted flange of the window into the left runner. It is recalled that what needs to happen next is that the left runner secures the flange in a vice-like grip. To do this, we needed to tighten a 10-mm nut. You can see the nut in the photograph at the top of the article.
In the OEM regulator, the left runner was made of two metal jaws. The jaws would clamp the flange securely because of the tightening of the nut.
In the third-party regulator, the left runner has a jaw made of poor quality plastic. You can see this black plastic jaw in the photograph at the top of the article.
Perhaps the alert reader can guess where this is going. I tightened the 10-mm nut, carried out all of the remaining steps to close up the door (which took half an hour), and then rolled the window up and down a few times to test it. There was a sort of “pop” and a rattle as something dropped inside the door. The window stopped working.
So I had to take the door apart again, which took another half an hour. I saw what had gone wrong. The black plastic jaw had deformed and the hole under the nut (which all along had been almost as big as the diameter of the nut) had enlarged itself enough for the nut to pass through the hole. The black plastic jaw had come loose from the left runner and had dropped to the bottom interior of the door.
The fix was straightforward. I reassembled the black plastic jaw to the runner and put a suitably sized steel washer in place beneath the nut. This permitted the nut to squeeze the jaw and permitted the runner to grip the window flange securely. I once again carried out all of the remaining steps to close up the door (which took yet another half an hour), and then rolled the window up and down a few times to test it. It worked perfectly and even now continues to work perfectly.
What I would hope is that starting now, the maker of the third-party regulator would take corrective steps so that other customers in the future will not have to go through this very bad experience. The ideal measure would be to use a metal jaw, matching the materials choice made by the maker of the OEM regulator. Failing that, the maker could use a high quality plastic and size the hole under the nut to be safely small enough that the nut would not risk deforming the plastic. If this corrective measure were taken, what would also need to happen is the maker providing a strong and suitably sized metal washer to go under the nut.
I have contacted the maker of the third-party regulator about this. They tell me they will talk with their production department and get back to me. Hopefully I will soon have good news to report.
Update: in response to my complaint, it looks like the vendor might take corrective action so that future customers would not face a repeat of my very disappointing experience. See blog article.
One Reply to “Window regulator success after problems”