
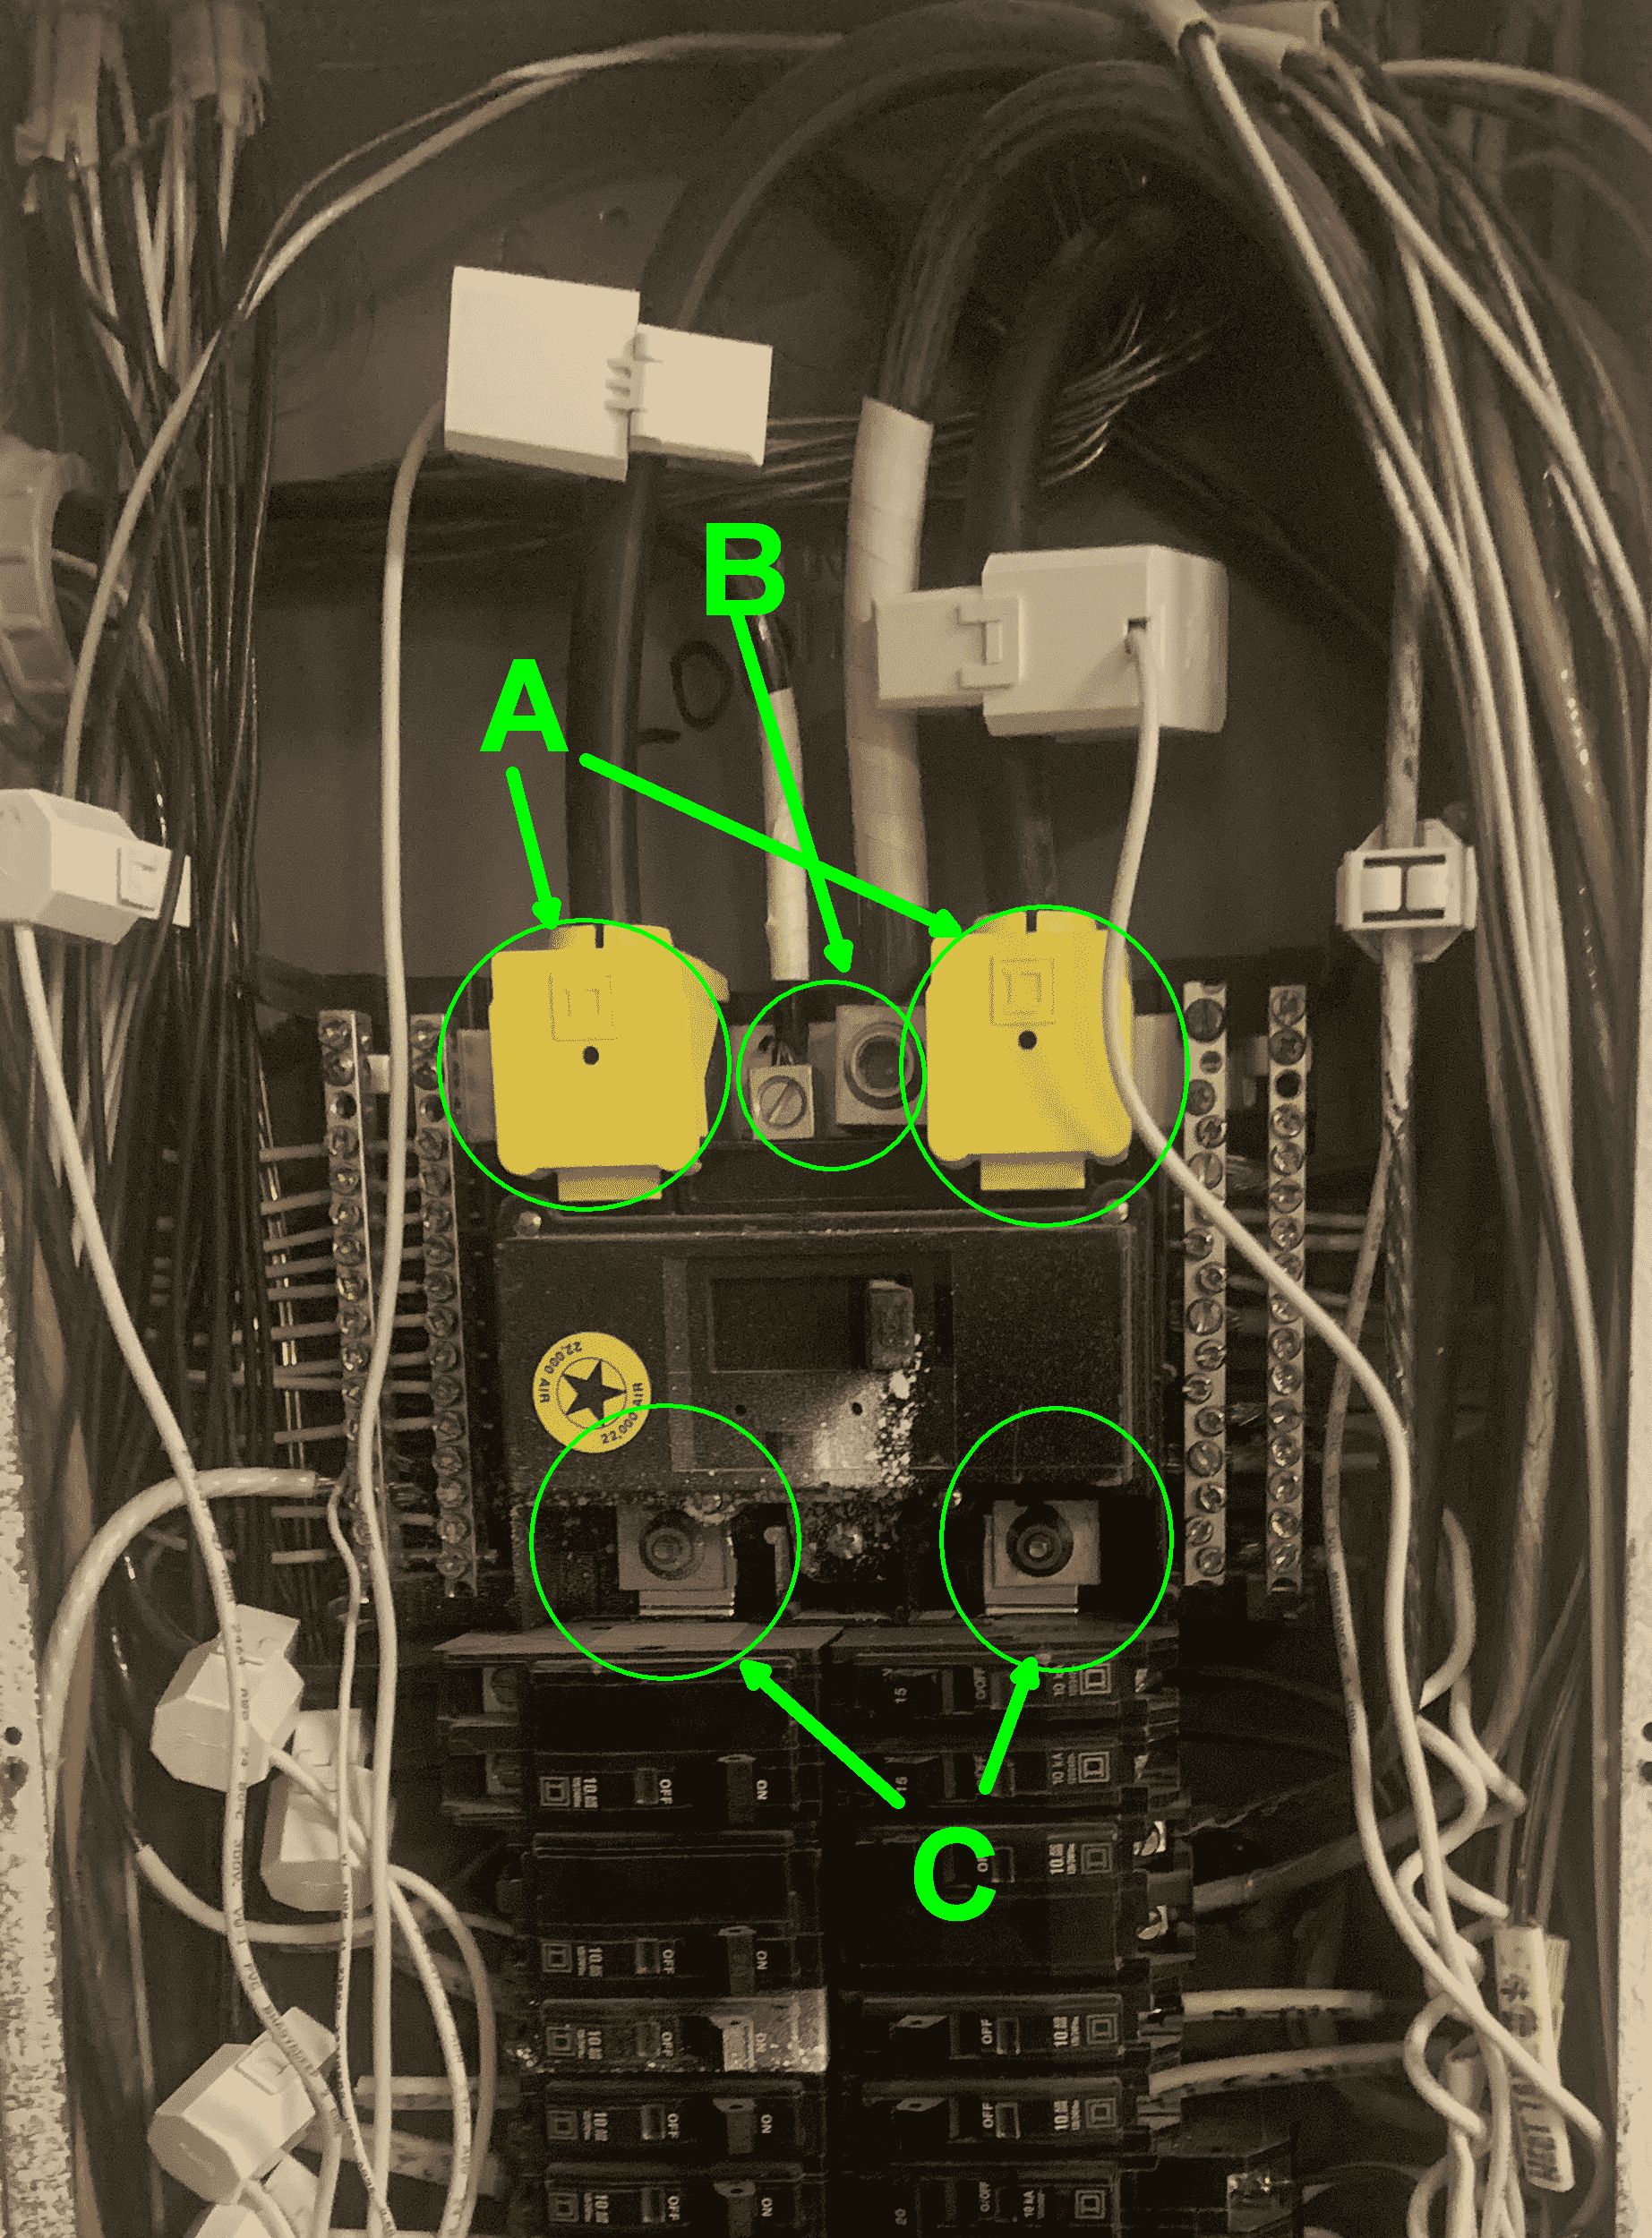
This blog article talks about a situation that comes up frequently in all of our daily lives — removing the front cover of a circuit breaker panel and working on the panel. The main point of today’s article is that in the circuit panel shown at right, we recently added the two yellow caps shown at A. This makes the circuit breaker panel less dangerous.
By way of background, we see at above right a typical “main disconnect” circuit breaker panel. A main disconnect circuit breaker panel has several recognizable characteristics:
-
- Three very thick electric wires enter the panel at the top, having originated at the “meter socket” which is where the electric power enters the home.
- The three thick wires are connected to corresponding connection points shown at A and B.
- There is a massive “disconnect” switch just below the connection points A and B for the three thick wires just mentioned. In the photo above, the disconnect switch has a yellow circular sticker on it with a black star in the center of the circle.
- Below the disconnect switch are terminals C.
- Below the terminals C are lots of circuit breakers.
- Because it is a “main disconnect” panel, the panel has a strap that ties the house “neutral” line to the house “ground” line. (If the circuit breaker panel were not a “main disconnect” panel, for example if it were a “subpanel”, then there would be no strap tying the neutral line to the ground line.)
 As you can see in the photograph above, this particular circuit breaker panel has lots of CTs (current transformers) which are part of an Emporia energy monitoring system. (If you have not already done so, you should install a sixteen-sensor Emporia energy monitoring system in your circuit breaker panel.)
Now we can look closely in the photograph above to identify points of interest. When I have the cover off of a circuit breaker panel, if there are any other people nearby, I usually spend a few moments showing them exactly which places in the circuit breaker panel are better not to touch. By this I mean the places where, if you touch them, you might get shocked or electrocuted. The general idea is to help everybody to be careful and not touch the dangerous places. When I say “identifying points of interest”, what I mean is “places that should not be touched” or “places to keep your fingers away from”. This also means “places to keep metal tools away from”.
In this circuit breaker panel, starting at the top and working our way down, the topmost two points of interest (dangerous places) are the two points at A. Each of these points is at 120 volts AC relative to ground. Between the points A are terminals B which are ground/neutral terminals.
Continuing to work our way down, the next important thing is the main disconnect switch. As mentioned above, this main disconnect switch has a round yellow sticker with a black star in the middle.
Continuing to work our way down, the next important things are the terminals C. These are usually dangerous to touch, because each of these terminals C is also at 120 volts AC relative to ground.
Continuing to work our way down, we see lots of circuit breakers.
We can now talk about the pros and cons of working on the circuit breaker panel “live”. By this we mean the pros and cons of turning off the main disconnect switch before working on the circuit breaker panel.
Working on the panel “live”. By this we mean that the main disconnect switch is on. This has the disadvantage that it leaves the panel “live”, meaning that there are lots and lots of places in the panel that could shock you or electrocute you. It means there are lots of places that you need to avoid touching while you are working in the panel.
But it has the advantage that people around the house will not be plunged into darkness while this work is going on.
For purposes of this blog article I will say that as a general matter, the reader should not work on his or her circuit breaker panel “live”.
Working on the panel with the main disconnect switch “off”. It will not surprise you at all when I say that everybody always says “be sure to turn off the main disconnect switch before removing the cover from the circuit breaker panel.” Everybody always says “never work on the panel ‘live’!”.
There is a reason why everybody always says this. If, for example, you were to look at the installation manual for the Emporia energy monitor system, the first thing that it says is, before you do anything in your circuit breaker panel, turn off the main disconnect switch. The Emporia company wants you to proceed in the safest possible way when you are installing their energy monitor system. They do not want to get sued.
Having said this, if you turn off the main disconnect switch, it means everybody in the house is plunged into darkness. Not only that, the clock in your oven will forget what time it is. Later you would have to reset that clock.
So the real situation is that lots of people will work on a circuit breaker panel “live”. An experienced electrician knows exactly where the dangerous places are, that should not be touched, and the electrician will … wait for it … avoid touching those places!
The average homeowner who has not spent a lot of time working in circuit breaker panels might not be so familiar with “places that you must not touch if the panel is live”. Such a homeowner must surely follow the advice of turning off the main disconnect switch before removing the cover of the circuit breaker panel.
Now that we have talked about this background information, we can talk about making this circuit breaker panel less dangerous by installing the two yellow caps that you can see in the photograph above right.
What is the consequence of “turning off the main disconnect switch”? The chief consequence is that the terminals A get disconnected from the terminals C. When the main disconnect was “on”, the terminals A were connected to the terminals C. This meant that it was dangerous to touch terminals C. It also meant that lots of places below terminals C were electrically “live” and so a person would need to be careful about them.
But when the main disconnect switch has been flipped to “off”, the terminals A get disconnected from the terminals C. This makes the circuit breaker panel much less dangerous. If one were to accidentally touch one of the terminals C, the result would not be shock or electrocution. Lots of other places below the terminals C which would normally be dangerous to touch would cease to be dangerous to touch because the main disconnect swich has been flipped to “off”.
But now it is important to ask ourselves, even if the main disconnect switch has been flipped to “off”, are there nonetheless places that we should avoid touching? And of course the answer is the terminals A. The terminals A are always “hot” even if the main disconnect switch has been flipped to “off”. The only way to make the terminals A “safe” would be to pull the electric meter out of the meter socket. Normally it is only the electric company people who would be fiddling with the electric meter and the meter socket. So as a general matter, for the ordinary homeowner, the terminals A are always “hot”. This means that for the ordinary homeowner, it is important to avoid touching the terminals A. It is likewise important for the ordinary homeowner to avoid letting metal tools get anywhere near the terminals A.

Having established all of this background, we can now talk about service entrance barriers. You can see two yellow service entrance barriers at right. You can go to a Lowes or a Home Depot and probably they have the yellow service entrance barriers in stock, at a price of $20 for two such barriers.
The house whose circuit breaker panel appears at top right was constructed about thirty years ago. At that time, there was no such thing as these yellow service entrance barriers. From thirty years ago until yesterday, in this circuit breaker panel, the terminals A were exposed. It was easy for a person to inadvertently touch one of the terminals A.
In 2017, the national electrical code got amended to require that yellow service entrance barriers be installed in circuit breaker panels in new construction. The idea was to protect any terminals that are “hot” even when the disconnect switch is off. If you purchase a circuit breaker panel nowadays, it will always come with such yellow service entrance barriers.
But if we do the math, we can work out that if a house was constructed thirty years ago, this means the house was built before 2017. This means that the circuit breaker panel did not have these yellow service entrance barriers because they had not been invented yet.
But it is super easy to retrofit such service entrance barriers into an existing circuit breaker panel! And that is what we did with this particular circuit breaker panel yesterday. What you do is, you spend $20 to purchase the two yellow service entrance barriers, and you pull the front cover off from the circuit breaker panel, and you carefully put the service entrance barriers into place.
When I say “you”, of course I might not mean you the reader. You might get shocked or electrocuted doing this. But a person who is very experienced with working on circuit breaker panels can install such service entrance barriers safely.
One starts by putting on rubber gloves that are dry (not wet). A next step is to look closely to see where the terminals A are, which of course do not yet have the yellow service entrance barriers on them. One can then identify the two thick wires that are connected to the two terminals A. A next step is to look carefully at the terminals A and to look carefully at the yellow service entrance barriers, to work out how each barrier is going to fit onto its respective terminal A. The barrier is made of flexible plastic, and the barrier is shaped very cleverly so that it snaps onto the terminal A in a very secure way after having snapped onto the thick wire in a very secure way.
Now one can hold one of the yellow service entrance barriers in hand, with the plan of snapping it into place onto one of the terminals A. The smart way to do this is to identify a place on one of the thick wires that enters from the top, that is, a place that is above its terminal A. Snap the barrier onto the thick wire at a place that is above the terminal A. Then gently slide the barrier down the thick wire, until the main body of the barrier is positioned in front of the terminal A. Then push the barrier firmly into place onto the terminal A. Repeat the process for the second thick wire and the second terminal A. Success! The two yellow service entrance barriers are now in place.
And now the circuit breaker panel is less dangerous.
The alert reader will know where I am going with this. If your house was constructed prior to 2017, I suggest you install yellow service entrance barriers in your main disconnect circuit breaker panel. (And if you have any subpanels, I suggest installing yellow service entrance barriers in each of your subpanels.)
Have you already installed an Emporia energy monitor in your circuit breaker panel? If so, please post a comment below.
Have you already retrofitted yellow service entrance barriers into your circuit breaker panel? If so, please post a comment below.
We took a different approach and installed a 200amp switch between the meter and the main panel when we built in 97-98.
Thank you for commenting!
This merely changes the place where the service entrance barriers need to be. It means they are needed in the panel where you have your 200-amp switch.
Thanks for that! I’ll follow your advice.
Some 50 years ago I was climbing on top of 2,500 hp motors, sticking probes into stress cones of 13.8 kV connections. Fast forward to here and now, still hating to work on deenergized circuits, but much more careful, even on 120V circuits, having essential tremors.
Happy New Year!