
Each time I install another internet-of-things (“IOT”) device in my home, it is always the same: the device requires that I tell it the wifi password for the Internet connection in my home. The app that needs to be installed on my smart phone to get the IOT device working also asks lots of intrusive things, and demands to be given access to my “location”. This leads to a situation where the IOT device could be a security risk for trusted devices on my local area network. What can be done to reduce or eliminate the security risks presented by the dozens of IOT devices in my home? Part of the answer is to set up a VLAN (virtual local area network). Then the IOT devices are denied any opportunity to have any access to my trusted devices. I will describe how this is done.
The executive summary is, I did the following:
-
- I created a new VLAN for the IOT devices in the LAN settings of my main router.
- I went to my wifi access point and I created a SSID (new wifi network) in the wifi access point, to be used going forward by the IOT devices that use wifi.
- I configured the new IOT SSID (wifi network) so that each IOT device is denied the ability to communicate with any other device on that wifi network.
- In the ethernet LAN ports of my main router, I picked one LAN port and dedicated it to the new VLAN for the IOT devices that use wired ethernet.
- I went around to all of the IOT devices in my house that use wifi, and I reconfigured each of them one by one to use the new SSID for the IOT devices.
- I rearranged ethernet patch cables as needed so that the IOT devices that use wired ethernet are all connected to the dedicated ethernet LAN port for the IOT devices. I had to power-cycle each such device to get it to pick up a new IP address from the DHCP server of the new VLAN.
- I changed the wifi password on the SSID that is used by the trusted devices, to a new wifi password.
The steps just described added up to something like two lost weekends. I will describe in some detail what I needed to do to get this VLAN for the IOT devices working. With a bit of luck, I hope that you will be able to do the same for your own local area network and maybe it will not lead to two lost weekends for you.
What is a VLAN? There is a pretty good Wikipedia article about VLANs generally. The idea of the VLAN is that the trusted devices in your home (personal computers, file servers) will use one set of IP addresses (one “subnet”) and the untrusted devices (the IOT devices) will use a different set of IP addresses. The two subnets are set up so that the IOT devices do not have access to the IP addresses of any of the trusted devices, and so that the to the extent possible, the IOT devices cannot even communicate with each other. Of course the writers of the Wikipedia article were not in a position to describe in detail how exactly to do the detailed setups in the main router and in the access point.
A first step in this process was to go into the DHCP server in the main router, and to enumerate every device in the home that had obtained an IP address. In my case this was some sixty IOT devices, including things like thermostats and an oven, some VOIP telephones, a couple of VOIP analog telephone adapters, about sixteen security cameras, and controllers for things like a fireplace, window shades, and light switches. One of the reasons for making a list of all of the IOT devices was to help me later to be methodical about teaching each IOT device how to connect to the new VLAN.
What do we mean exactly by “IOT device”? In this context, when I refer to an IOT device (Wikipedia article), I mean a device with some or most of the following characteristics:
-
- The device is made by somebody who is not me, and it needs to be connected to the Internet to do its job, and it has software in it.
- I am not in a position to independently check whether the software has any nasty surprises in it, like malware.
- I am not in a position to independently check whether the software has any security vulnerabilities in it, so that a bad person could load bad software into it, like malware.
- The device is told what to do by some “cloud” somewhere on the Internet.
- The device only works if I install some app on my smart phone, and the app refuses to proceed unless I allow it to track my location. (I say “yes, but only when I am using the app”.)
- The device is made by a company whose name I never heard of until now, that is located in a foreign country.
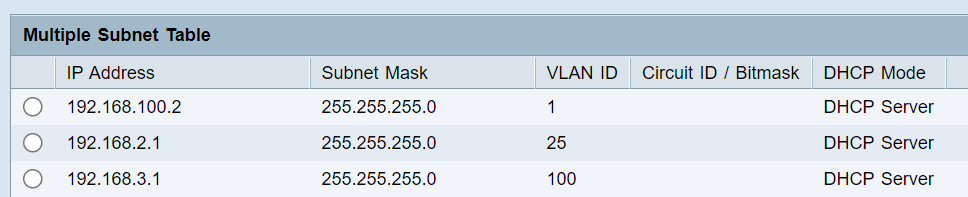
Having enumerated all of the IOT devices, I proceeded to set up a new VLAN in the main router. (Not all routers have a VLAN capability. For a recent VLAN project at a neighbor’s house it was necessary to swap out the old router for a new one that knows how to do VLANs.) At right is a screen shot showing how this looks in one of the routers that I was working with recently. You can see a second VLAN with IP addresses ending in “.2.1” and it has a “VLAN ID” of 25. (In this case I also created a third VLAN with IP addresses ending in “.3.1” and it has a “VLAN ID” of 100.)
Some routers will, by default, isolate the VLANs from each other, which is what you want. Other routers will only isolate the VLANs from each other if you click around to ask for such isolation. You will have to test this for yourself, connecting (say) your notebook computer to the IOT VLAN and confirming that your notebook computer is unable to reach trusted devices such as file servers.
So in this example, the new VLAN which will be dedicated to IOT devices is a block of IP addresses ending in “.2.1” and having a so-called “VLAN ID” of 25.
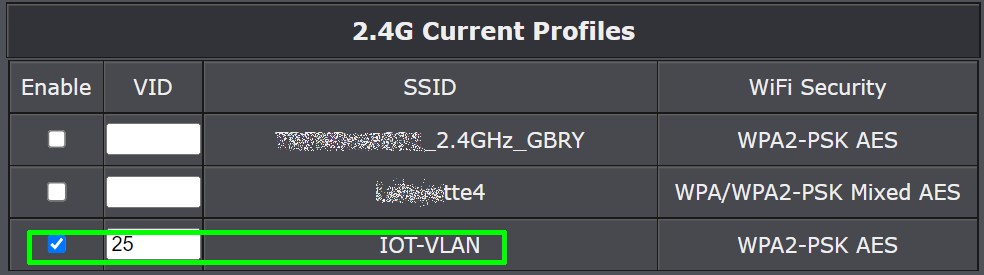
A next step is to configure the access point with a new SSID (wifi network). You can see this in the screen shot at right, where the new wifi network “IOT-VLAN” has been created and it is tied to a “VID” (VLAN ID) of 25. The practical consequence of this, if things go as desired, is that any device that connects to the wifi network “IOT-VLAN” will be given only an IP address ending “.2.1” which is the VLAN dedicated to IOT devices.

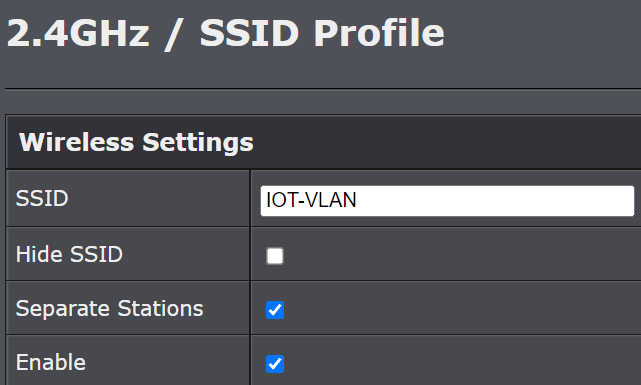
For this to work, the access point needs to be connected to an ethernet LAN port on the main router that is capable of providing more than one VLAN to the access point. In this way, depending on which wifi network a device connects to, it will be given an IP address from one VLAN or from another VLAN. This brings us to the “port management” screen in the main router, which you can see at right.
I will confess that this part of the VLAN project is the part that I found most difficult. As you can see, there is a table with three rows (one for each VLAN) and with seven columns. Four of the columns deal with the four ethernet LAN ports on the main router. I found it very challenging to work out the right settings for the twenty-one cells in this table.
Inter-VLAN routing. This entry defines whether a device connected to a particular VLAN will be permitted to have access to devices on the other VLANs. In this particular main router, the default setting is “disabled” which is what you probably want.
Device management. I think this means “if you are connected to the main router through this particular VLAN, will you be able to log in at the main router to make configuration changes”. Of course what you do not want is that the IOT devices would have the opportunity to try to log in at the main router to make configuation changes. So this is “enabled” only for the trusted VLAN which is VLAN number 1.
Ethernet port configuration. Most household data routers have a plurality of LAN ethernet ports, typically four. Over the course of my life I have nearly always been in situations where it absolutely does not matter whether some ethernet cable is plugged into, say, LAN port 1 or LAN port 4. Here, however, is a situation where it matters very much whether something is connected to LAN port 1 or LAN port 4.
In this particular case, the wifi access point is connected to LAN port 1. A first ethernet switch is connected to LAN port 2, and this switch is in turn connected to trusted devices that use wired ethernet for their connections to the network (as contrasted to trusted devices that use wifi for their connection to the network). A second ethernet switch is connected to LAN port 3, and this switch is in turn connected to IOT devices that use wired ethernet for their connections to the network (as contrasted to IOT devices that use wifi for their connection to the network).
Now we turn to the twelve cells of the table. In each cell, I am able to choose any of three values:
-
- untagged,
- tagged, or
- excluded.
Perhaps some readers of this blog article had a clear understanding a long time ago of exactly what these three values mean in the context of VLANs. I certainly did not, and even now I lack complete confidence in my understanding of all of the consequences that might flow from one value or another in a particular cell of the table. The Wikipedia article on VLANs, for example, mentions the word “tagged” three times but does not mention the word “untagged” even once. The article refers to “ports” being tagged, as if some particular port needs to be “tagged” to a particular VLAN to the exclusion of being “tagged” to any other VLAN. Here are two quotations from the Wikipedia article:
-
- “Such trunks must run between tagged ports of VLAN-aware devices …” (emphasis in original).
- “… these ports must be tagged.”
The article makes it sound as though any particular port is either “tagged” or is not “tagged”. But as you can see in the main router screen shot above, this is not at all what really happens in the router. For example LAN port 1 in this router is both “untagged” and “tagged” depending on which VLAN we are talking about.
In this router, if you try to configure a particular port so that it is “untagged” with respect to all three of its table cells (meaning that it is “untagged” with respect to all three VLANs), you will get an error message. The error message is a bit of word salad that sort of hints around that the user is apparently not permitted to use the “untagged” value more than once in the column of cells that relates to any single LAN port.
The Wikipedia article helpfully explains that various makers of routers have, over the years, devised their own ways of providing VLANs. Cisco, for example, for years implemented VLANs in its own peculiar way (called “Cisco Inter-Switch Link” or “ISL”) that did not work well with routers or ethernet switches or access points made by other companies. It seems that a competing standard called “IEEE 802.1Q” has come to be commonly followed by most non-Cisco router makers. The access points that I discuss in this blog article apparently also follow the IEEE 802.1Q standard. It also turns out that when people are together at a meeting and this IEEE 802.1Q standard arises during a discussion, they usually do not actually say “IEEE 802.1Q” but instead refer to this kind of VLAN as a “dot 1 Q VLAN”. What seems to be a bit confusing is that nowadays most network devices such as routers, ethernet switches, and access points actually always follow the IEEE 802.1Q standard, and so then the term “VLAN” tends to mean “the kind of VLAN that you get if all of the devices involved follow IEEE 802.1Q”. But layered on top of this is that nowadays most network devices such as routers, ethernet switches, and access points that do follow the IEEE 802.1Q standard don’t bother to say so. Many of them simply say they “do VLANs” or something.
Another way to say this is that nowadays when someone says “VLAN” it usually turns out that even if they do not know it, what they are saying is “the kind of VLAN that you get if all of the devices follow IEEE 802.1Q”.
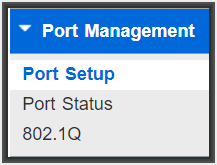 One bizarre consequence of this business about there being several kinds of VLANs, some of which are “IEEE 802.1Q VLANS”, is that if you are clicking around in the configuration screens of a particular router, looking for the place to set up a VLAN, it will very often turn out that you cannot find the acronym “VLAN” to click on to reach the place for setting up a VLAN. Instead, if you wish to reach the place for setting up a VLAN, you need to somehow already know that what you should click on is a link that says nothing other than the six characters “802.1Q”. See an example of this at right.
At this point I despaired in gaining understanding through any reading or re-reading of the Wikipedia article entitled “VLAN”. The deep-dive Wikipedia article about IEEE 802.1Q VLANs was likewise quite opaque to me.
Further sources of bafflement for me were the user manuals for the routers and access points that I was struggling with to try to set up my VLANs. The user manual for the router depicted in the screen shot says nothing more than “click here to select whether the table entry should be ‘untagged’, ‘tagged’, or ‘excluded'” with not one word to say how you might go about picking which of those three values to use.
I will skip ahead to describe the choices that I made in configuring the wifi access point, and I will talk a bit about DHCP “IP and MAC binding” which can be very helpful with VLANs, and then I will return to the question of what it means to pick “tagged” or “untagged” in a particular cell of the VLAN configuration table.

Here is one of the configuration screens for one of the wifi access points that I was struggling with to set up an IOT VLAN. You can look and look and the acronym “VLAN” appears nowhere in the configuation screen. Well, this is not quite correct. You can see “VLAN” as part of the SSID name “IOT-VLAN” but the only reason that “VLAN” appears there is that when I created the SSID name, I picked “IOT-VLAN”. I could just as well have named the SSID “walter-plinge” in which case the screen shot would have said “walter-plinge” in this screen shot.
It turns out that somehow the user needs to already know that “VID” sort of means the same thing as “VLAN”. The user manual for this access point, for example, merely says something like “optionally you may enter a VID in this field” but it never says what “VID” is supposed to mean. Whatever a VID is, it is apparently optional, that much is clear. It turns out that VID means something like “the ID number of the particular VLAN that you would like to lock in for this particular SSID”. At this point I will remind the reader that I had previously connected this wifi access point to ethernet LAN port 1 on the router. So now I will describe in practical terms the actual functional and practical result of putting the number “25” into the VID column of the row for the wifi network called “IOT-VLAN”. The practical result is:
If a device connects to the wifi access point using the SSID called IOT-VLAN, then when the device makes a DHCP request to get an IP address, the IP address will get selected from the pool of available IP addresses ending in “.2.1”. This happens in the DHCP server of the main router. I guess what happens is that the ethernet frame that served as the DHCP request got “tagged” with a VLAN ID 25 by the access point, and then when this ethernet frame reached the main router, this somehow signaled to the DHCP server that it should pick the IP address not from the “regular” pool of IP addresses (here, “.100.1”) but instead from the pool that is associated with VLAN ID 25.
There is another practical result from all of this VLAN configuration. In the wifi access point, when I was setting up the new wifi network called “IOT-VLAN”, one of the boxes that I could optionally check was “Separate Stations”. One might wonder how to pick whether to check this box or not. The user manual for this access point helpfully explains it like this:
You can check the “Separate Stations” box. Doing so will activate the “Separate Stations” option in the access point.
Nowhere in the manual is it explained what the “Separate Stations” option is exactly, or what would happen differently in the function of the access point depending on whether this box is checked or unchecked. But my best guess is that if you check this box, then any device that is connected to the access point through the wifi network “IOT-VLAN” will be denied the ability to communicate with any other device that is connected to the access point (no matter which wifi network on the access point was used by that other device to connect to the access point). Such a device will only be able to send data packets to and from the router. Roughly speaking, the result will be that a device connected to the access point through the wifi network “IOT-VLAN” will not be able to connect to anything except the WAN port of the router and from there to the Internet generally.
Let me emphasize this point. It seems that if you play your cards right in the configuration of the wifi access point, you may be able to deny any particular untrusted IOT device that is connected to the access point the ability even to spy on any other IOT device. And as discussed below, within an ethernet switch there can be some prospect of minimizing the ability of an ethernet-connected IOT device to spy on any other ethernet-connected IOT device.
Let’s return to the VLAN table (at right). Recall that the wifi access point is connected to LAN port 1 on the router. The column of cells for the ethernet LAN port 1 has the following three entries:
-
- for VLAN ID 1, the cell says “Untagged”.
- for VLAN ID 25, the cell says “Tagged”.
- for VLAN ID 100, the cell says “Tagged”.
So, despite the Wikipedia article saying that a port is either “tagged” or is not “tagged”, we see that LAN port 1 is simultaneously “untagged” (once) and also “tagged” (twice). What I guess this means, more or less, is that if you were to connect to the access point using an SSID that is tied (in the access point) to the number 100 (that is, the “VID” 100), then you will eventually end up with an IP address ending in “.3.1”. If you were to connect to the access point using an SSID that is tied (in the access point) to the number 25 (that is, the “VID” 25), then you will eventually end up with an IP address ending in “.2.1”. Finally, if you were to connect to the acess point using an SSID that is not tied (in the access point) to any particular number (that is, the “VID” field is left empty), then you will eventually end up with an IP address ending in “.100.1”.
I previously mentioned that if you go to the router and find LAN port 3 and follow its ethernet cable to the other end, you will reach an ethernet switch that is intended to provide network connectivity only to IOT devices (by which we mean IOT devices that use wired ethernet rather than wifi to connect to the network). The idea here is that if a particular IOT device gets powered up and gets connected to this particular ethernet switch, it will of course emit a DHCP request ethernet frame. We see that the LAN port 3 is set up with a column of cells like this:
-
- for VLAN ID 1, the cell says “Excluded”.
- for VLAN ID 25, the cell says “Untagged”.
- for VLAN ID 100, the cell says “Excluded”.
I guess what this sort of means is two things:
-
- In the router, IP packets associated with VLANs 1 and 100 never get sent to LAN port 3. Probably as well, any device connected to LAN port 3 that is pretending to have an IP address in either of VLANs 1 or 100 will get its IP packets discarded.
- If a DHCP request arrives at the router that came in on LAN port 3, it will get handled by the DHCP server responding with an IP address that is drawn from VLAN 25.
We can now turn to ethernet LAN port 2. We see that the LAN port 2 is set up with a column of cells like this:
-
- for VLAN ID 1, the cell says “Untagged”.
- for VLAN ID 25, the cell says “Tagged”.
- for VLAN ID 100, the cell says “Tagged”.
I guess what this sort of means is two things:
-
- If a DHCP request arrives at the router that came in on LAN port 2, the default behavior of the DHCP server is that it will respond with an IP address that is drawn from VLAN 1. This is because port 2 is configured with “untagged” for VLAN 1.
- If, however, I have set up “IP and MAC binding” for the MAC address of some device (for example some IOT device) that binds the MAC address to an IP address in either the “.2.1” subnet or the “.3.1” subnet, then the DHCP server will respond to a DHCP request with that IP address. I sort of assume that this means that henceforth the router will treat that IP address as being a member of VLAN 25 or VLAN 100, respectively.
What this means is, if I have some IOT device that uses wired ethernet, and if I want to force it to belong to (say) VLAN 25, I can accomplish this by plugging that IOT device into the ethernet switch that is connected to LAN port 2, and by setting up IP and MAC binding to the VLAN 25. This then permits me to connect a mix of trusted devices and untrusted devices (here, IOT devices) on the same ethernet switch and broadly speaking, the untrusted devices will be unable to communicate with the trusted devices.
I am overstating the level of protection available here in the case where trusted and untrusted devices are all plugged into the same ethernet switch (which is in turn connected to a port like this LAN port 2 that has been so carefully configured to handle VLANs). Any ethernet device, if programmed to do so, can go into “promiscuous mode” where it tries as hard as it can to listen to each and every ethernet frame, even if it is not the intended recipient of that frame. If it does this, then it could conceivably eavesdrop on traffic from trusted devices that are connected to the same ethernet switch.
So the homeowner who wants to protect against this kind of eavesdropping will want to think about this.
A first thing is to avoid using a mere ethernet hub. The way that ethernet hubs work, every ethernet frame gets sent to every port of the hub, no matter whether which port is the right one to reach the actual intended recipient. But nowadays nobody uses mere ethernet hubs. Everybody uses ethernet switches. An ethernet switch tries very hard to avoid sending an ethernet frame to every port. The switch does this only in the (hopefully fairly rare) case where it has not figured out which port is the right port for some particular MAC address. So in general the ethernet switch will have previously figured out that a particular MAC address is connected to, say, port 7. And when the switch encounters an ethernet datagram addressed to that MAC address, it will almost always have the self-control to send that ethernet datagram only to that port 7. This will frustrate to some extent the efforts of a badly behaved IOT device that might try to go into promiscuous mode.
But there is more that the diligent homeowner can do about this risk of “promiscuous” eavesdropping. If the homeowner selects a fancy enough ethernet switch, the homeowner can configure particular ports of the switch to be allowed to exchange ethernet frames only for a particular VLAN. This would further hamper this kind of attempted eavesdropping.
There are ethernet switches that have sophisticated enough firmware that they can try to automatically block any instances of tagged traffic (traffic tagged with a particular VLAN ID) from passing from one port to another port uness the port is known to be a “good” port for receiving traffic that is tagged for that VLAN ID, without the user having to do any port-specific configuration.
So there you have it. If you want to protect your trusted devices, such as notebook computers and file servers, from possible security risks of untrusted Internet-Of-Things (IOT) devices, all you need to do is lose one or two weekends making lots of changes to your network. This may require replacing your old main router with a newer router that knows how to do VLANs. This may require replacing your old wifi access point with a newer one that knows how to do VLANs. This may require replacing your old ethernet switch with a newer one that knows how to do VLANs. This will require doing lots of clicking and puzzling through unclear configuration screens in at least the main router and the access point. You will want to try connecting your notebook computer as if it were an IOT device, to independently confirm that the setup that you did really does isolate the two VLANs from each other the way you intended, while nonetheless permitting the IOT devices to reach their untrusted clouds through the WAN connection.
And, perhaps the most time-consuming and thankless task will be to work your way through a long list of IOT devices, one by one, to reconfigure things. For an IOT device that connects using wifi, this means somehow working out how to teach it the new IOT VLAN settings. This will be a device that you installed a year ago and have not thought about since then. It will be a device where it is not easy even to find the setup instructions now that a year has gone by. The app on your smart phone might not be there any more because you changed phones. The app on your smart phone probably requires you to “log in” using an account and password that you have long since forgotten. For me, this process repeated for each of several dozen IOT devices. It led to the two lost weekends that I mentioned earlier.
And then for each IOT device that uses ethernet rather than wifi to connect, you may find that there is no choice but to use “IP and MAC binding” to force it that the device is only able to obtain an IP address within the “untrusted” VLAN. In my case the candidates for this extra step included such things as:
-
- VOIP phones
- VOIP ATAs (analog telephone adapters)
- home automation controllers
- security cameras
- a whole-house battery electric power storage backup gateway
- an inverter for photovoltaic solar panels
For several of these devices I was able to accomplish the port-level VLAN traffic separation simply through cabling. But for a few devices, I was in a situation where there was a remote ethernet switch that commingled traffic from both VLANs. In those cases I chose to use “IP and MAC binding” to force the untrusted devices to the untrusted VLAN.
Changing the wifi password for the original wifi SSID. The remaining step, which is extremely important, is to go find the original wifi SSID that was previously shared by both trusted and untrusted devices, and change its password. There are several reasons to do this:
-
- A first reason is that many cloud systems, including Amazon’s cloud for echo dots and fire TV sticks, try very hard to “save” your wifi password to make it easier for you to connect your next Amazon echo or whatever. If you change that original wifi password, you minimize the mischief that somebody might do if they get their hands on that “saved” wifi password.
- A second reason is that absolutely inevitably it will turn out that no matter how hard you tried enumerate all of your untrusted IOT devices, it will turn out that you overlooked at least one, and probably more than one. If you change that original wifi password, this will eventually smoke out those last one or two untrusted IOT devices, because you will eventually notice that they stopped working.
What about using a wifi router? You will find that most retailers push you very hard to purchase a “wifi router” rather than purchasing a wifi access point and a router that are not the same thing.
And you might be tempted to go the “wifi router” path because you may hope that by doing so, you will avoid having to figure out all of the things that I had to figure out, about how to teach the access point to make nice with the router so far as VLANs are concerned, and vice versa.
I strongly counsel against proceeding along the “wifi router” path. There are several reasons that I feel strongly about this.
-
- If you spend the big bucks to get a wifi router, and if the wifi part stops working right, then you have to throw away the router. On the other hand if the router part stops working right, then you have to throw away the access point.
- If you spend the big bucks to get a wifi router, and if you figure out that the wifi part is lacking some feature that you wish you had, then you have to throw away the router. On the other hand if you figure out that the router part is lacking some feature that you wish you had, then you have to throw away the access point.
- Probably in your house is some place that is the Best Place To Put Your Access Point. This best place is influenced by things like some walls being thicker than others, or big metal appliances being somewhere. You can find web discussions where people experiment with Where To Put Their Access Point and they end up finding that some particular place is by far the Best Place to put it, and it is some unexpected part of the house, and they cannot at all come up with any reason what that is The Best Place To Put It, but that is indeed the Best Place.
- Meanwhile there is some place that is The Only Place To Put Your Router. It will be at some place where the cable TV coax enters the house, or some place where a pair of copper wires for DSL enter the house.
- My point here is that in general, it would be an astonishing surprise if the Best Place To Put Your Access Point turned out to be the same as The Only Place To Put Your Router. Yet the homeowner who gets suckered into purchasing a wifi router will face this big problem and will end up putting the access point at A Stupid Place To Put The Access Point.
What about using a device that does three things — it is your cable modem, and it is your wifi access point, and it is your router? This is absolutely the dumbest thing that a homeowner could do. This path has all of the drawbacks that I just discussed about making the mistake of purchasing a wifi router, because the three-way device is among other things a wifi router.
This has the further drawback that barring some surprise, this path includes needlessly paying rent to your cable internet provider to rent the cable modem.
This has the further drawback that probably the cable internet company is surreptitiously providing public wifi access point service, at your expense, to all of the other customers of that company, through the three-way device that they suckered you into using.
Yet another drawback is that every often the three-way device provided by the cable internet company is very weak on features that you might want, like DDNS (dynamic DNS) service.
Yet another drawback is that almost inevitably you will someday need to use a different and better cable modem, so that you can get “more channels” of data connectivity. If you made the mistake of getting a three-way device, then to get the different and better cable modem, you would need to throw away (and lose a weekend reconfiguring) the router part and the access point part.
This three-way device situation also makes it much more trouble to switch to some other internet service provider, like phone company DSL or Starlink.
Similar big drawbacks present themselves for customers who get suckered by their DSL provider into using a three-way device that is the DSL modem and is the router and is the access point.
So the homeowner who follows my advice will carefully keep the access point separate from the router, and will keep both of them separate from the cable modem or DSL modem.
Three migrations by now. I have by now suffered through this migration process not only in my own home but also in the home of one of my employees (where we maintain one of our offsite file server backups for the firm) and in the home of one of my neighbors. It has gotten to the point where, if I am doing a second or third home, it only loses one weekend or maybe even only one full day to make the transition to VLANs.
So there you have it! Armed with my crystal-clear explanations (feeble attempt at humor), it should only take you two, maybe three lost weekends to duplicate these results in your home.
Maybe you had already set up your IOT VLAN a long time ago. If so, please post a comment about it below. How did you set it up? How difficult was it to set up? Can you share any tips as to how to get it right?
Maybe this blog article prompted you to set up an IOT VLAN right now (and maybe prompted you to regret not doing so a long time ago!). If so, how did it go?
I shared your article with a young person. Her analogy, “I invited all these people into my house and now I don’t want them to be there so I locked each one in a separate room” does ring true. Becoming comfortable with intrusive devices is the problem in the first place.
An easy way to save a lot of time would have been to just convert the existing SSID to the IoT SSID, so all the junk that already had your wifi password would just keep on using that, get isolated, and keep on keeping on. Then the new SSID would be the private(r) VLAN for the trusted stuff. 😉
I’m currently trying to figure out the best way to have junk like Apple’s crap (e.g. HomePods) that is really IoT, but *thinks* it’s trusted, and will silently steal passwords and switch SSIDs by talking to iPwns and Macs that *are* (kinda) trusted. 🤬 Apple is infuriating!