
Now and again, usually completely by accident, I learn of some very clever and inexpensive device that solves some problem that previously could only be addressed in some complicated way. The magnetic camber gauge, seen at right, is such a device.
The presenting problem is that very often a car owner, or someone carrying out service on a car, wants to know the exact “camber angle” (Wikipedia article) for each of the wheels of the car. Normally it is a lot of trouble to measure this angle. Some time in recent years, some very smart person whose name we will probably never learn figured out a very clever way that the camber angle can be measured using a simple and inexpensive device. That is the point of this article.
Part of what made this device possible is the migration from drum brakes to disk brakes. When I owned my first car, most cars had drum brakes. As time passed, drum brakes fell out of fashion and disk brakes became commonplace.
Another part of what made this device possible is what I call “open wheels”. In the old days, a car wheel was stamped out from very thick sheet steel. There were few if any openings by which anyone could see what was going on inside the wheel. Nowadays it is commonplace for a wheel to be cast and machined from aluminum or a magnesium-aluminum alloy, and there will be large openings in the wheel through which an external observer may see the brake disk.
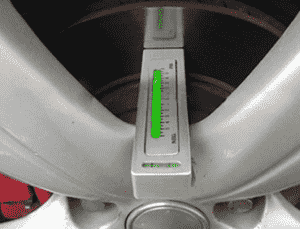
Brake disks are always shiny, just like railroad rails are shiny if trains pass over them frequently. In the photo above, you can see the shiny brake disk. Brake disks are always ferromagnetic. Usually they are made of carbon steel. This means that you can stick a magnet to it.
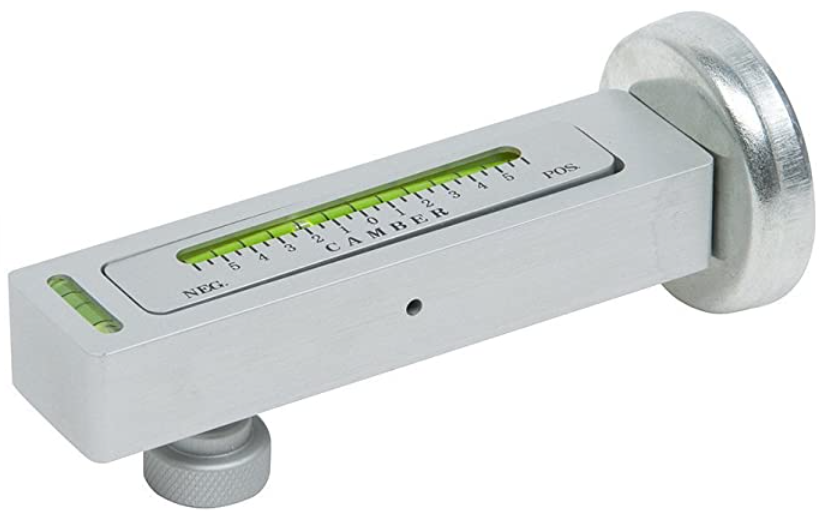
Which brings us to this incredibly clever camber gauge which you can buy for a mere $16. It has a strong magnet at right in the photo (made from rare earths of course). The idea is that you stick the magnet onto the brake disk, which of course is by definition exactly parallel with the wheel.
It has a bubble gauge at the far left in the photo which permits the user to adjust the gauge for level in a lateral direction. And then it has a long bubble gauge which permits reading the absolute camber angle. Cleverly, however, the designer of this device also provides a thumbwheel (visible at the bottom) that permits the user to define a relative camber angle. This can be helpful if, for example, the car has gotten jacked up and the wheel is no longer supporting the car. The thumbwheel can be adjusted up or down to define a relative camber angle for purposes of camber adjustment that will later match some desired camber angle once the car is again lowered to the ground.
A first very important practice tip is that when you are getting ready to make such measurements, you need to make sure your car is level. This is sometimes not as easy as you might think. For example you might think the floor of your garage is level, and then you might learn that you are mistaken about this. For example maybe your garage has a floor drain. Yeah, I bet you never thought about that, huh? A carpenter’s level can be helpful in learning what is level and what is not.
A second very important practice tip is that when you are getting ready to smack this gauge onto your brake disk, you should inspect the magnet first to see if there are any unwanted bits of metal stuck to the magnet. If there are, you need to pull them off because they would deflect the gauge from a nice flat position on the brake disk.
A third very important practice tip is to pay attention to what part of the brake disk is nice and smooth and shiny, and what part is rough and sticks out. The smooth and shiny part gets that way because that is where the brake pads grip the brake disk. When you are getting ready to smack this gauge onto your brake disk, you need to make sure it lands completely on the smooth shiny area of the brake disk and not onto any of the rough bumpy parts of the brake disk.
A fourth very important practice tip is that when you are all done playing with this camber gauge, you need to remember to remove it from the brake disk before driving the car.
Hopefully you already had one of these clever magnetic camber gauges. Or if not, hopefully you promptly purchased one for about $16 after reading this blog article, so that now you have one.
On my car, the manufacturer’s spec is that each front wheel should have a camber angle that is somewhere between 0.3° and 1.2° outwards at the top. Each rear wheel should have a camber angle that is somewhere between 0.8° and 2.8° outwards. This gauge makes it very easy for me to check this.
Do you have one of these clever magnetic camber gauges? Please post a comment below.