
Hello readers. For some twenty years now I have had the highest level of amateur radio license that it is possible to have (“extra class”), but until now I have not really made full use of the license (call sign AA2KW). Until now I had only made use of the license for communications in the two-meter (VHF) and 70-centimeter (UHF) bands. Those bands are only useful for local communications (with others who are no more than a few miles away). Recently, however, some neighbors who are good friends asked if I might introduce their grandchildren to the world of HF (high frequency) amateur radio, which can reach thousands of miles. So I have put my toe in the water and maybe soon I will successfully do some two-way communications in the 40-meter HF band.
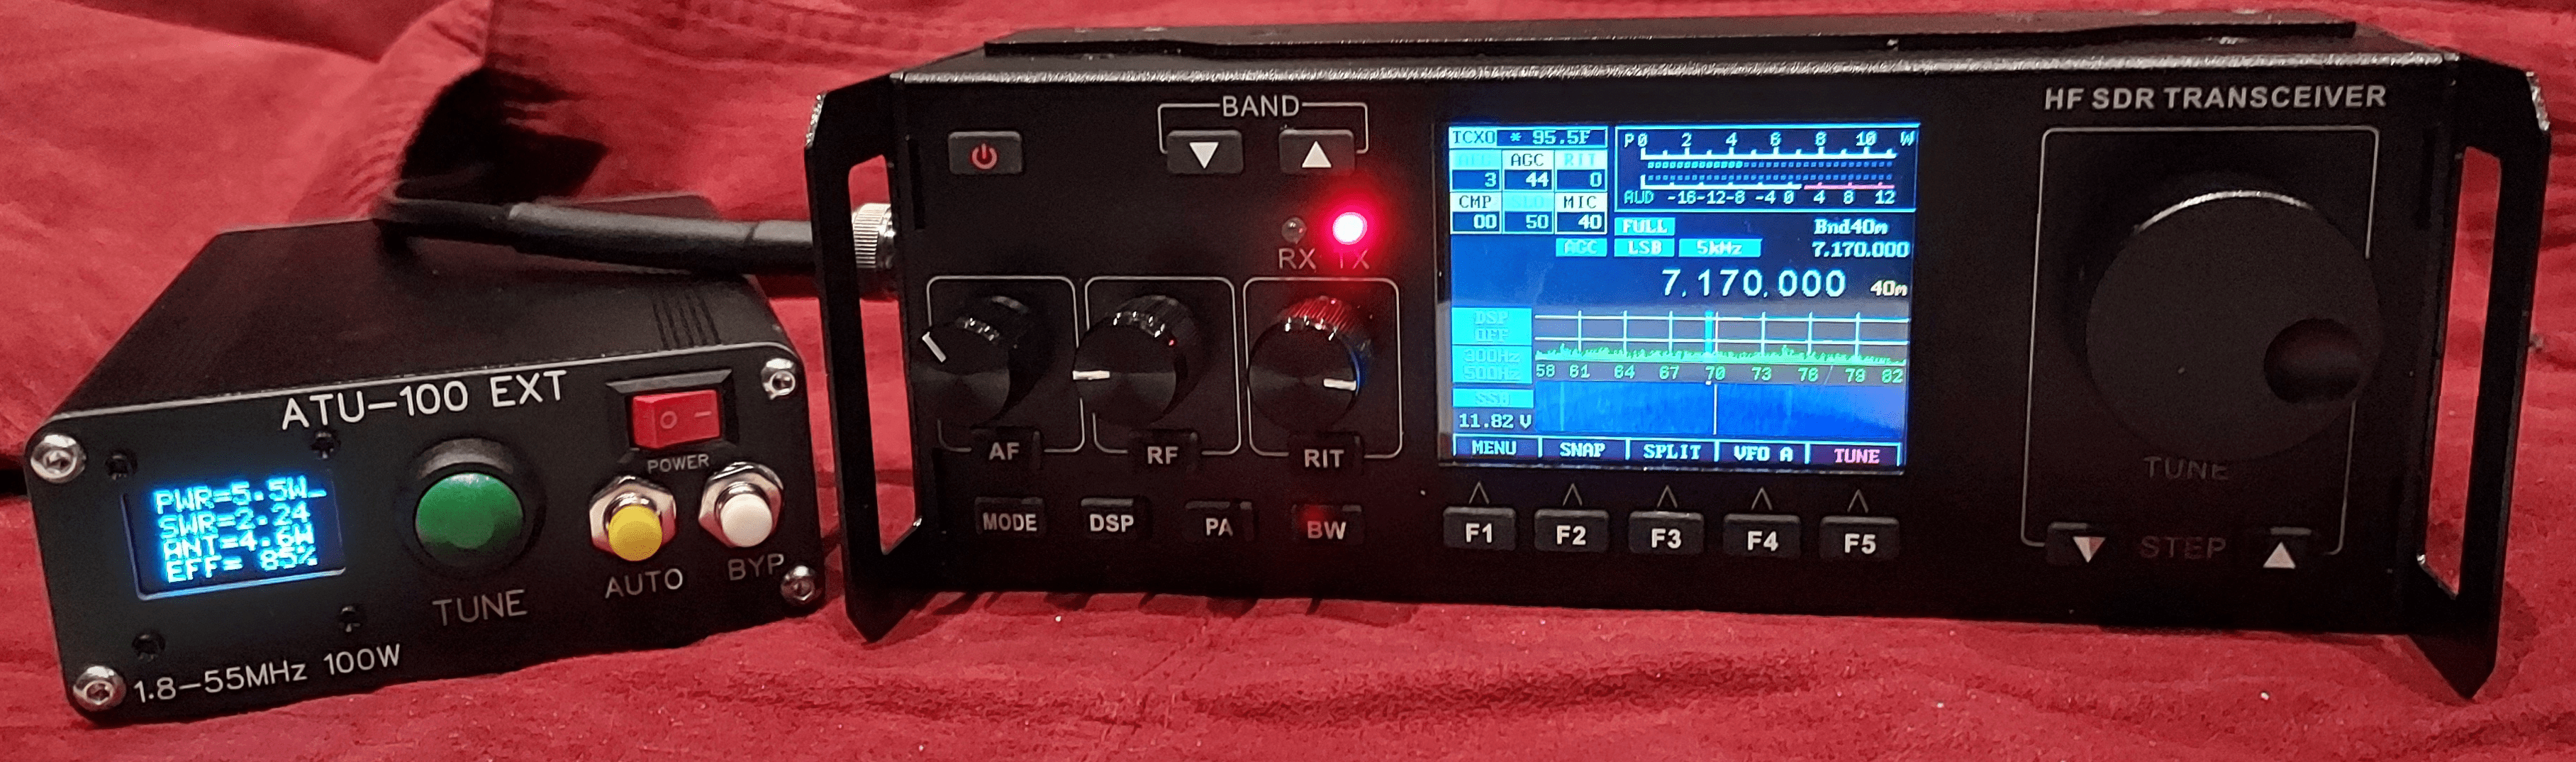
What you can see in the photograph are the beginnings of my setup — two devices that run on open-source software.
The device on the right is an SDR (software-defined radio) transceiver, operable between about 500 kHz and 30 MHz. It can transmit at up to about ten watts. It is a Recent RS-978 transceiver (manufacturer page).
The device on the left is an ATU-100 antenna tuner. This is a device which, in real time, checks the SWR (standing wave ratio) of an antenna and interposes an LC network as needed to present the best possible SWR to the radio transmitter. At the moment this photo was taken, the transmitter was in “tune” mode, transmitting 5.5 watts of a lower-sideband signal for testing purposes, and the tuner was passing 4.6 watts to the antenna. The original SWR was about 1:3 and the tuner managed to reduce (improve) the SWR to 1:2.24. (The antenna tuner came from the factory with firmware version 3.2 which is the current version.) The tuner can handle up to 100 watts of transmit power.
Each of these devices is designed, from a hardware point of view, to contain the absolute minimal amount of hardware possible (in terms of both parts count and complexity and fixedness of interconnectedness), with almost everything about the configuration and function and user interface of the device carried out in software.
In the world of ham radio, if you are transmitting with a mere five or ten watts of power, this is considered “low power” or so-called “QRP” operation. This transceiver is most definitely a QRP transceiver.
There is, perhaps unsurprisingly, an active open-source community in the world of amateur radio HF SDR transceivers, and by now there is a well-developed body of firmware for transceivers like the one in the photograph above. My radio came from the factory with firmware version 2.5.130 which dates from the year 2017, so one of my first tasks was to update the firmware to version 2.12.2 which dates from November 6, 2021 (firmware community page). This firmware provides lots of nice user functions including, for example, the spectrum display that you see in the photo and below that a “waterfall” display (Wikipedia article). The waterfall display is very helpful if you are hunting around in some frequency band to try to find radio activity that is reaching you at whatever hour of the day you are operating (and given the condition of the atmospheric bands that might be propagating the signals to you from some faraway place). With this firmware, the radio can operate in single-sideband, AM, FM, and CW (carrier wave) modes. In CW mode, the receiver can decode Morse code.
The radio came from the factory with a bootloader of version 3.4.2 which I updated to version 5.0.4.
The antenna I have set up so far is an offset-fed dipole antenna optimized for operation on the 40-meter amateur radio band. So far, I have successfully received signals from New Zealand, from China, and from the Mariana Islands.
I have not yet used the “transmit” capability of the transceiver, other than for antenna tuning and system testing and calibration. I need to spend more time getting familiar with the equipment and gaining some confidence at initiating and conducting communications with others in HF radio bands. Eventually, I hope I will be able to introduce the aforementioned children to the notion of communicating by radio with people who are thousands of miles away.
Carl – Though I haven’t operated in the HF bands in many years, I got my start around age 12 using my dad’s Kenwood TS-830. After school, I would come home and troll around the 10-meter bands talking to people all over the world. I kept in touch with both of my parents on the 2-meter band, and every car our family owned had a 2m radio in it. I was never alone when I was on the road, and developed a ton of friends that kept me company as I commuted around southern California. In a time before the Internet and mobile phones, ham radio was utilitarian in additional to recreational! Best of luck getting your feet wet on the HF bands. Perhaps our paths will cross on 40m (or another band) sometime. 73, de A.R.S. N7HQS.
Steps to build a ham radio from scratch. Step 1: become familiar with the various components of your ham radio. Step 2: obtain a valid ham radio license. Step 3: design and build a working circuit.
It is beneficial to have an experienced ham radio mentor. So, if you need assistance, think about contacting the amateur radio community and appropriate forums. You will undoubtedly value the perceptions, expertise, counsel, and help that others can offer.
You can do amateur radio yourself. Ham radio can be built by anyone with the right tools and resources: a circuit board or a ham radio kit. Aside from that, learning how to start a radio hobby from scratch takes a lot of patience and perseverance.