
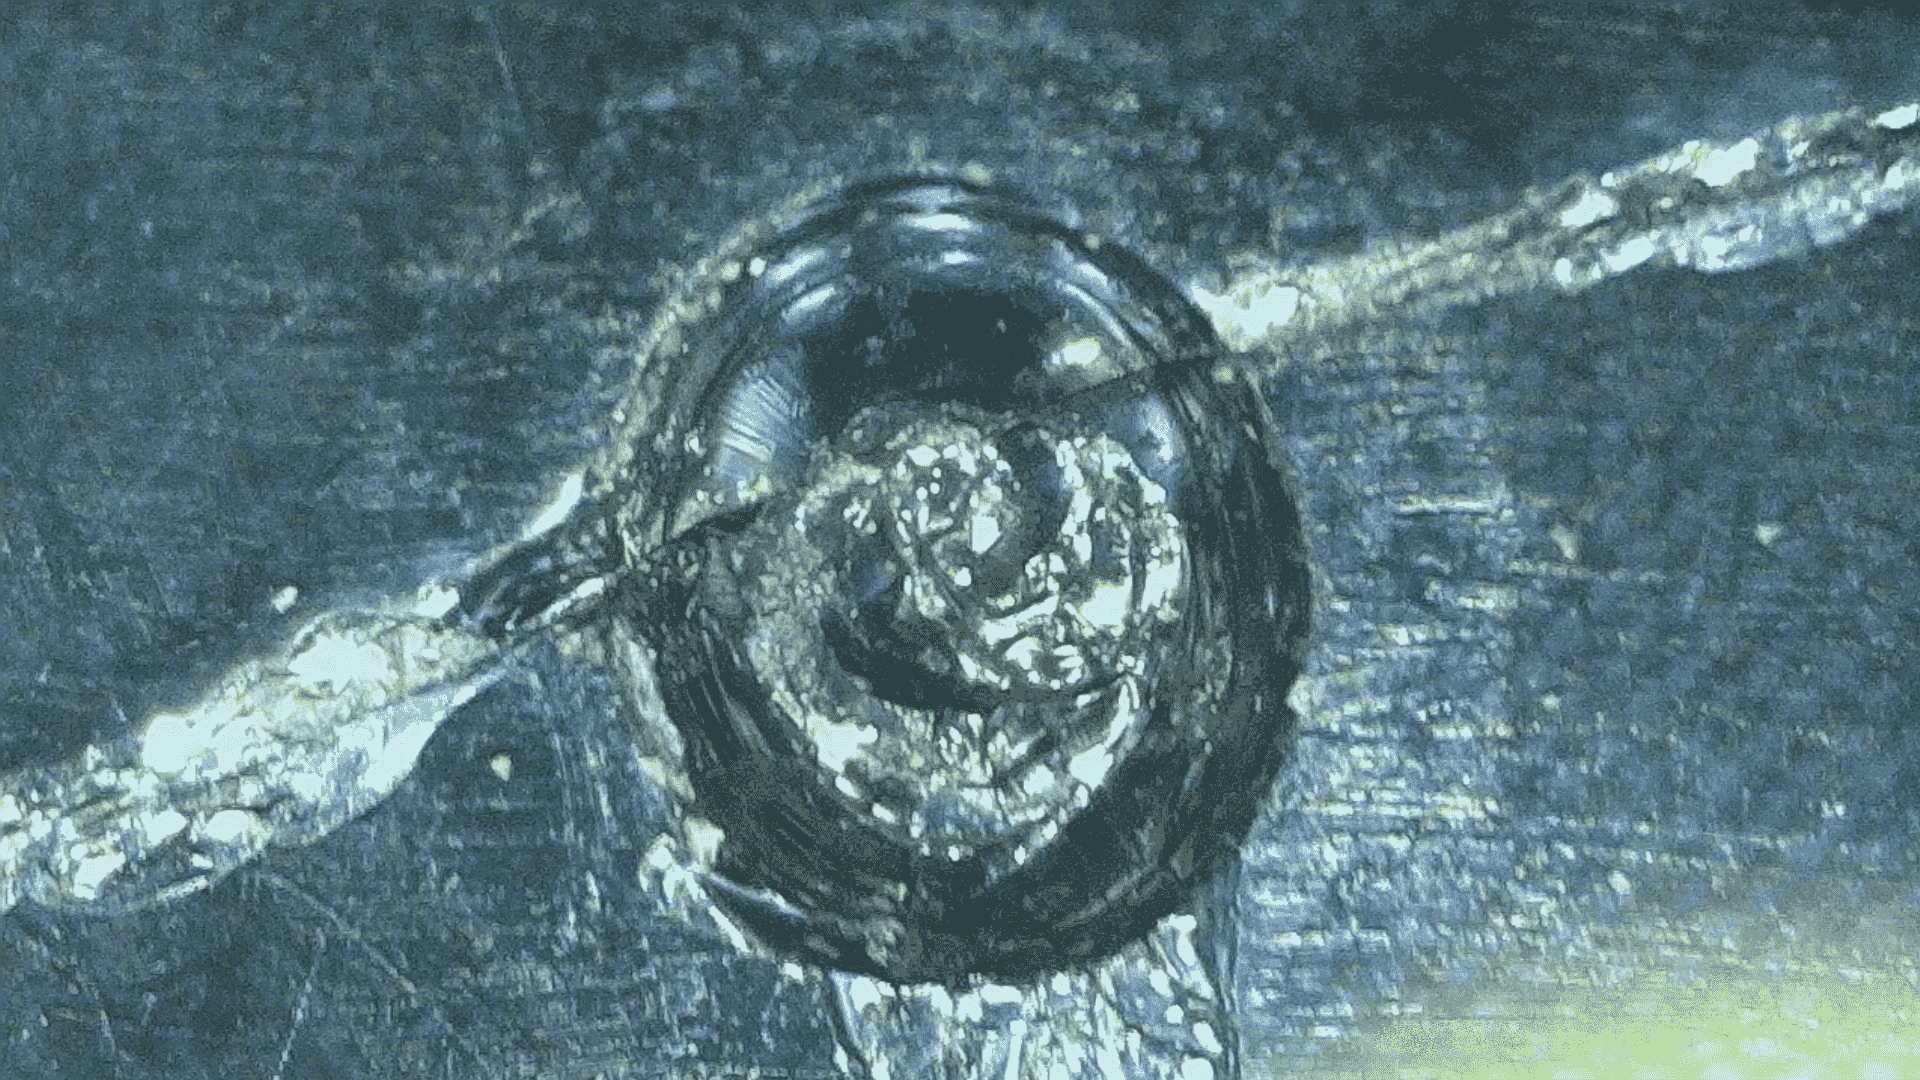
Loyal readers will recall that recently I did a large number of test welds to measure welding currents generated by my new inexpensive stick welder (blog article). I had been using my smart phone to log real-time current measurements via Bluetooth from a clamp-on DC ammeter (blog article). Part way through the large number of test welds, I was astonished to see that my smart phone had powered itself down. I tapped the power button and coaxed the phone back to life and completed my current logging activities, and eventually figured out why the phone had so mysteriously and abruptly powered itself off. A tiny bit of hot steel from one of my test welds had flown several feet and had landed on the glass screen of the phone, and had melted a small crater in the glass. You can see the crater, which is less than one-fourth of a millimeter in diameter, in the photomicrograph above. After about a day, cracks had traveled from this crater across the full expanse of the glass. I realized I would need to learn how to replace the screen. This blog article describes it.
We have all passed by kiosks in shopping malls that advertise smart phone repairs. Some smart phones cost a thousand dollars or more, and I guess at such a kiosk it is sometimes possible to get a screen or battery or charging port replaced, typically at a cost of $150 to $300. One of the things that puzzles me is how the proprietor of such a kiosk could possibly maintain an inventory of spare parts to permit same-day repairs of all of the hundreds of popular models of smart phones.

Here at right is a photo of the crater using a regular macro lens. In this photo you can see the straight cracks that ran off to the left and the right across the entire expanse of the screen. The little teardrop hanging down from the crater is not something that you can touch on the surface of the screen. I think it is some disturbance in the glue, below the top flat glass layer, that propagated out from the crater over some days. (The teardrop was not there right away when the crater and the two straight cracks were first visible. It took some days to appear.)
The tiny bit of red-hot steel that had melted the crater was as small as the smallest grain of sand. It is hard to imagine that it had enough thermal mass to bring about the melting that we see at the top right photo. But there is no doubt that it did have enough thermal mass to do this, given what we see.
What I imagined is that if I were to try hard enough, maybe I could replace the screen myself. So I went onto Amazon to shop around.
The screen of a smart phone has layers. The front layer is a thin sheet of glass. Next is the touch screen, which is a nearly transparent array of vertical and horizontal electrodes. (I’d guess it is one layer of horizontal indium-tin-oxide electrodes, an insulating layer, and then a layer of vertical indium-tin-oxide electodes, all connected to some microchip that scans the electrodes.) Proceeding inwards, the next set of layers is the display, which is maybe made of LEDs, or in some phones, might be an LCD that is backlit with LEDs. Proceeding further inwards, the layers just mentioned are all mounted to a frame. The frame communicates with the motherboard through a ribbon cable.
Some of the screen repair kits on Amazon, typically priced at $15-20, apparently contemplate that the user would try to separate the glass layer from the touch-screen layers. The kit has little more than a thin glass sheet and some adhesive and some pry tools. The idea, I guess, is that you get the cracked glass somehow pried away from the lower layers, and then glue a new thin glass sheet onto the lower layers. I have to imagine that this would almost never end well for the user.
My choice was to purchase a screen repair kit that replaces everything about the screen all at once. The replacement part is a front-panel assembly that includes the front glass, the touch-screen sensing array, the OLED display, and the mechanical frame. (It must be that this is repair part that was obtained from the actual manufacturer of the smart phone. It is impossible that any third party could possibly replicate the entirety of such a complicated assembly.) The entire repair kit cost $80, and this included not only the OEM front-panel assembly but also a variety of pry tools and tweezers and screwdrivers and cleaning products and adhesives.
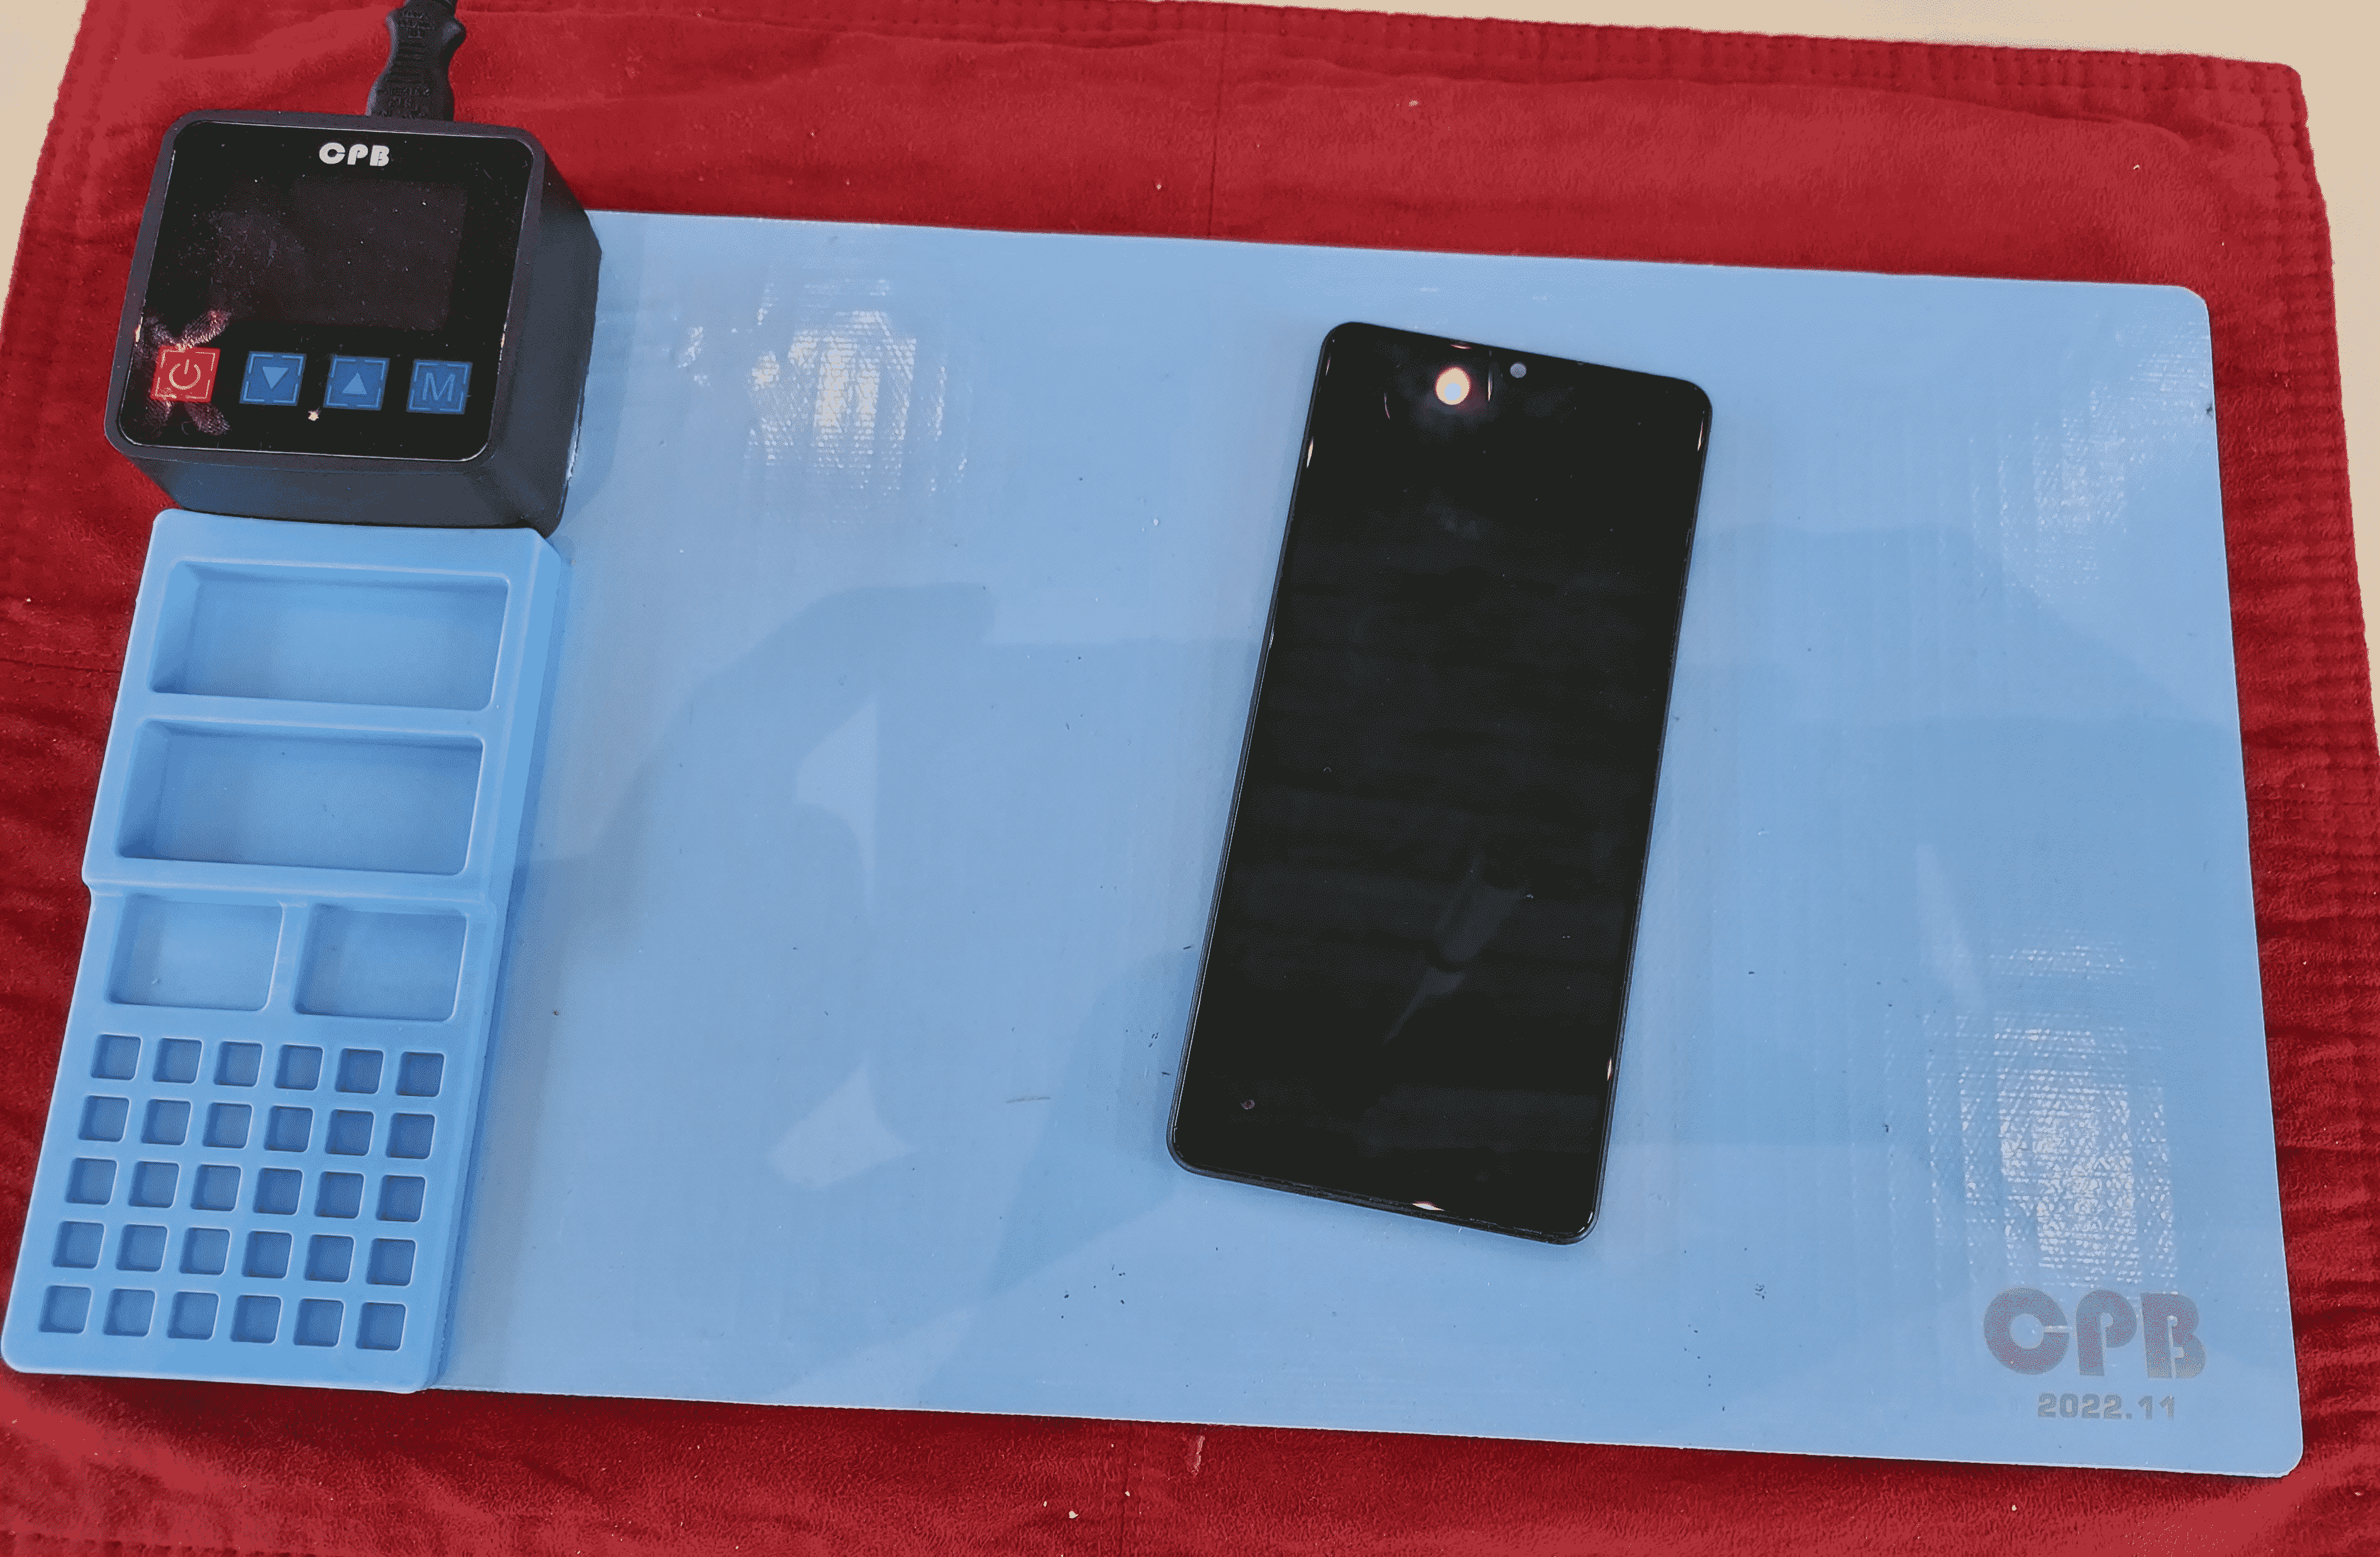
I gather that in the old days, it was commonplace that a person who is trying to repair a smart phone would start by heating up the phone with a hair dryer. The idea is to soften up the adhesive that was used to glue the phone together at the time of manufacture. I have learned that nowadays the people who are experienced in this area always use a “hot mat”. One very popular mat is made by a company called CPB, and you can see it at right. The hot mat has lots of little pockets at left where you can stow screws and small parts during the disassembly and reassembly process. A controller at top left lets you pick the exact temperature for the mat, and lets you pick how long the mat will stay hot. (Lots of people use a temperature of 80°C, applied for maybe ten minutes, for softening the adhesive.)
The next step is to very promptly pry off the back of the phone, using an extremely thin metal pry tool and maybe some other plastic pry tools. You need to attack the back of the phone a mere instant after pulling the phone off of the hot mat, without any delay or lost time, because the phone instantly starts cooling down pretty fast, the moment that the phone is lifted off the hot mat.
Everything about this process is, of course, Goldilocks stuff. The hot mat needs to be not too hot but just hot enough. The period of time that the phone dwells on the hot mat needs to be not too long but it has to be a long enough time. The thing is that if you let things get out of hand in the direction of being too hot for too long, you could damage the chemicals in the battery, or the OLED (organic light-emitting-diode) display, or some other heat-sensitive component. But if you don’t get it hot enough, you will fail to get the back off the phone and you will probably injure yourself when trying too hard to force the super-thin metal pry tool into place in the nearly invisible seam. Yet another thing is that if you were to fail to get the back of the phone perfectly uniform in its elevated temperature, then some area would probably end up too hot and some other area would probably end up not hot enough. The hair dryer approach is, of course, far less likely to achieve perfectly uniform heating, as compared with the hot mat.
Hot mats like this cost about $100. So I had laid out $180, all told, for this repair. This is cheaper than what I think a kiosk repair would have cost ($300-400) for the replacement of the entire front display assembly. (Plus now I have the hot mat so if this sort of problem comes up again some day, I already have the hot mat for the next repair.)
It turns out that there are generous people who make Youtube videos on the exact steps to follow for any particular make and model of smart phone, for replacing the screen or replacing the battery or replacing the charging port. For my model of smart phone, I was delighted to see that half a dozen generous people had recorded videos. I was able to watch all of the videos, taking copious notes and watching for consistency among the various videos in terms of how exactly to carry out particular steps.
Broadly speaking, what I was going to need to do is:
-
- Download and install a system test app, and try it out to gain full familiarity with the app. (See discussion below.)
- Power off the phone. (People forget to do this!)
- Remove the SIM card tray. (Even more people forget to do this!)
- Get the hot mat to about 80°C.
- Lay the back of the phone on the hot mat for about ten minutes. (Note that the cameras protrude so it is not a flat face-to-face contact. That’s the way it is but the hot mat still accomplishes the desired heating.)
- Confront the back of the phone, jamming the super-thin metal pry tool into the nearly invisible seam where the back of the phone meets the main body of the phone. Work the tool along the four edges of the back, prying off the back with a Goldilocks amount of pulling so as not to warp or damage the back.
- A normal blunder here for the first-time person is to accidentally turn the phone on again. That’s what I did. I was gripping the phone tightly with one hand from various angles, while forcing the pry tool this way and that from various angles, and I was paying no attention to the fact that the power button was right there. And I powered up the phone. So I then realized how I had no choice but to avoid pushing the power button. I had to power off the phone, and by now the adhesive had cooled. So then I had to heat up the phone all over again.
- Once the back has been removed, hopefully with very little cosmetic damage to the main body of the phone, and very little cosmetic damage to the back, the real work begins. With this particular phone, the next step is to unscrew about 25 phillips-head screws. This is where the storage pockets in the hot mat are a big help.
- A next step is to gently unplug a couple of antenna cables.
- A couple of 5G antennas need to be gently unplugged and gently lifted out from the main chassis.
- Lots of flat cables need to be gently unplugged.
- Eventually the time comes for separating the front screen frame from the main chassis. This is a snap-fit that needs to be unsnapped. Of course it needs to be done gently. Goldilocks gently.
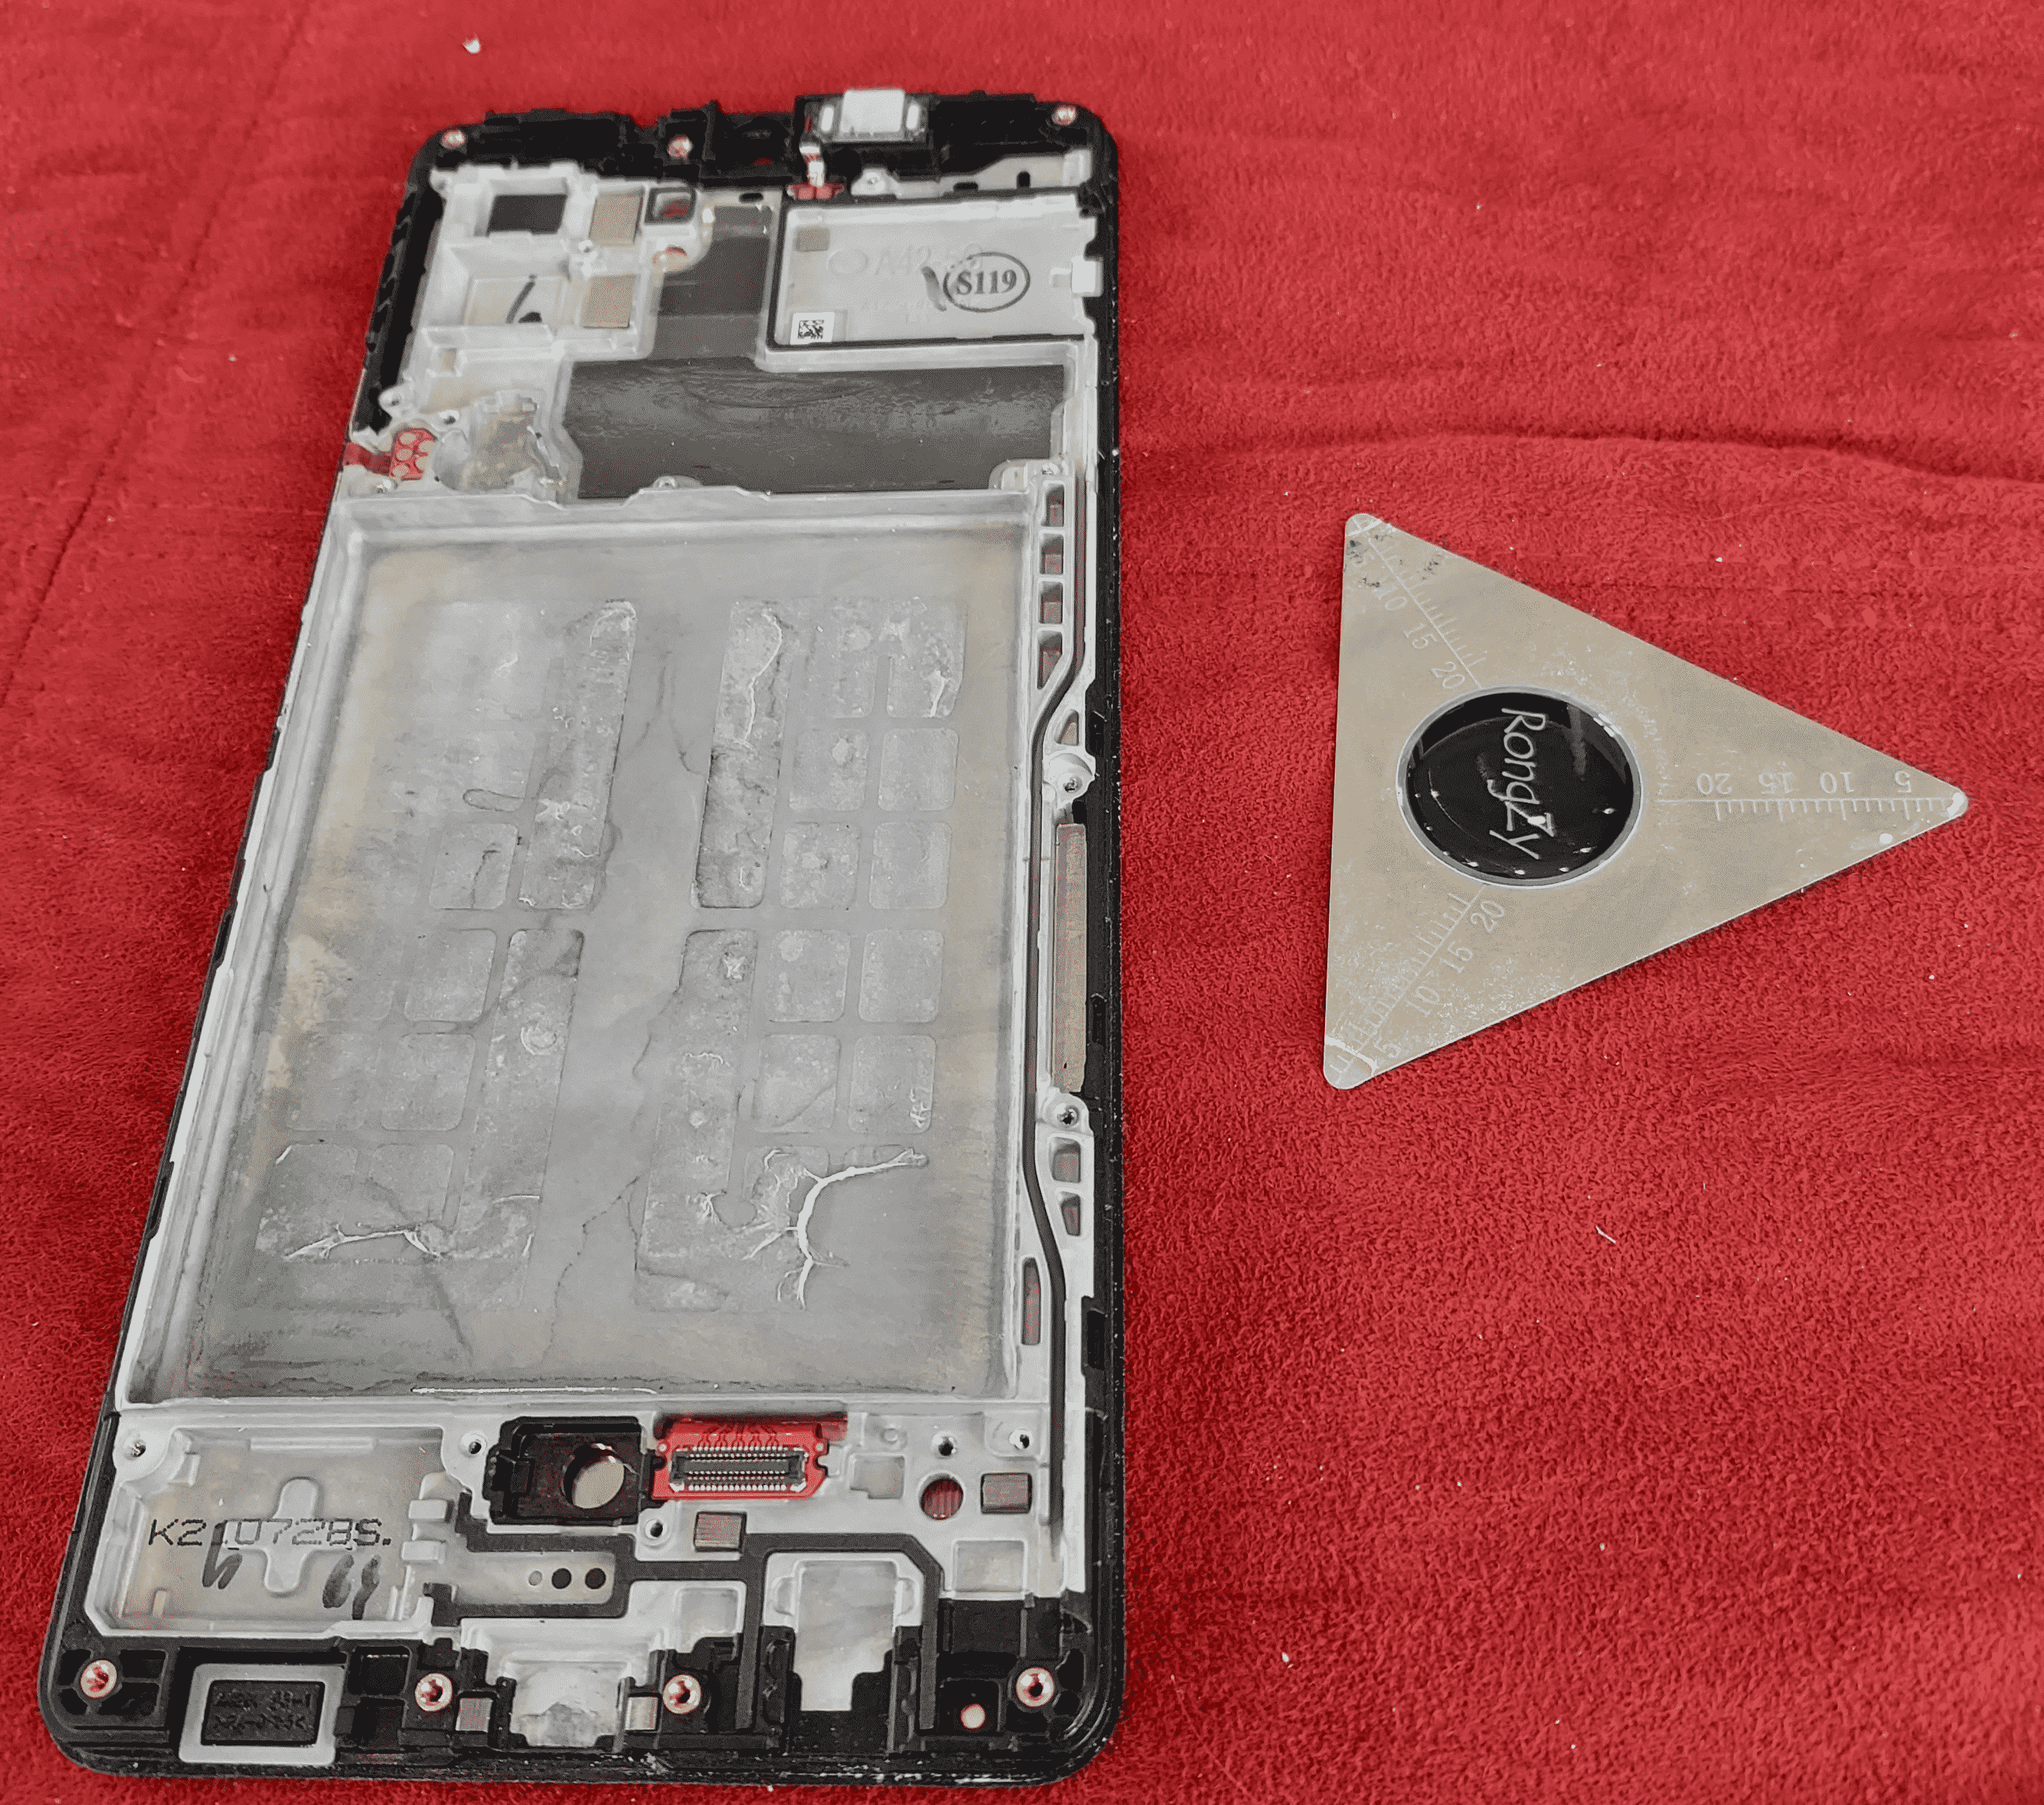
Now what we have in front of us is the bad front-screen frame. It is lying with its front face in a face-down direction and we are viewing the back face of the bad front-screen frame. This is a part of the phone that most users never see, of course. This face had last seen the light of day maybe two years ago, when this phone was being assembled in the factory.
What one can do now, in an effort to be methodical, is to put the new front-screen frame next to the old (bad) front-screen frame. They are side by side on the work surface. What needs to happen next is transferring lots of electromechanical components from the old (bad) frame onto the new frame. Things that need to be transferred include:
-
- the charging-port circuit board (at the bottom in the photograph)
- the fingerprint recognition camera (center near bottom in the photograph)
- the battery
- the three public-facing cameras and their circuit board (top right in the photograph)
This transfer process requires unscrewing a few more screws that are not the same length as the previously mentioned screws. Once again we are thankful that the designer of the hot mat provided lots of little pockets (at left in the photo) for storing small parts and keeping track of which little screws came out before and after other little screws.
One of the most interesting sub-tasks is transferring the battery from the old (bad) screen assemby to the new screen assembly. The challenging part of this is prying the battery out from its snug-fit home in the screen assembly. In the photo above you can see the empty battery place which is a large rectangle accounting for most of the surface area of the assembly.
In the videos, the presenters use various combinations of isopropyl alcohol or denatured alcohol to try to soften up the adhesive that is under the battery. They heat up the assembly on the hot mat and the alcohol evaporates and they pour more alcohol into the places around the edges of the battery, hoping that some of it will seep under the battery. Then a variety of plastic pry tools get used to try to coax the battery up out of its home. The key thing here is that if you are too rough on the battery, it will catch fire before your eyes.
I have to imagine, looking back on it, that an experienced person will often just plan from the outset to replace not only the screen assembly but also the battery. The replacement battery costs only $20-40. And anyway at this point the original battery may have lost some of its capacity, in which case you might be extra glad that you had replaced the battery as part of a screen replacement.
So now we return to the events of the way. Gradually we reverse all of the previous steps, doing our best to recall the sequence in which we pulled things apart so that we can reassemble things in the correct sequence. One of the skill areas is plugging the ten or so flat cables back into place, each having a very fragile plug that needs to plug into a very fragile socket. Once again this a very much a Goldilocks thing. If you push too hard on the plug to try to set the plug into the socket, at a moment when it is not lined up exactly right, you will destroy the plug or socket or both, and then your $1000 smart phone has become a paperweight and the $180 that you spent on the repair stuff has also gone to waste. But if you don’t push hard enough, you will think that you seated the plug in the socket, and it will turn out that you were a zillionth of an inch shy of having plugged it in all the way, and nothing will work, but you probably won’t figure it out that nothing is working until you have reassembled everything including glueing the back of the phone very securely back into place. Meaning that now you get to start all over again, putting the back of the phone onto the hot mat, jamming the super thin metal pry tool into the invisible seam, accidentally powering the phone up at the wrong time, and so on.
But after a few tries you get to where you can actually get the Goldilocks stuff “just right”. You can gently line up the plug of the ribbon cable with its socket, put a finger onto the plug, and super gently sort of wiggle the plug clockwise and counterclockwise just the tiniest bit while pressing down just exactly the right amount, and an extremely satisfying “click” happens and you know it really did get plugged in.
The click is not so much something you hear with your ears. It is more a click that you feel in that finger as the plug pops downwards into its connector in an extremely straight-down and level way. The closest analogy I can make is that I assume this is a bit like the way that a phlebotomist “feels” where your vein is before doing a blood draw, rather than trying to locate your vein visually, by looking with the eyes. A gentle feel with a pad of a fingertip.
There comes a point where it might seem like the next thing to do is to securely glue the back onto the nearly fully reassembled phone. The reason for this is that as far as you know, you have reassembled everything, reconnected every cable, and screwed every screw back into place.
The smart thing to do now is, don’t glue the back onto the phone. Instead, power up the phone. This powering-up is the thing you have been desperately trying not to do for the past half hour. Now all of a sudden it is the smartest thing you could ever do.
The sweetest thing you ever could see, at this point, is a normal screen message saying that the phone is powering up. And then it does whatever the next thing is when it is powering up, and the next thing. And then it asks for the unlocking code to open the screen for normal use.
At this point you realize that it is all fine and good to see the familiar things on the screen. But what needs to happen next is unlocking the phone. Maybe it will turn out to be impossible to unlock the phone! Maybe you damaged the touch screen, or its flat cable, or its flat cable plug, or the mother-board socket for that plug. Or maybe what if the replacement front-screen assembly was itself defective and you did not know that it was defective? What if the replacement front-screen assembly was a counterfeit? What if somebody just sold you somebody else’s broken front-screen assembly that they removed from their phone? You hate to think about all of these things. But you tap the screen to enter the unlocking code, and it works! The screen looks normal, like it always did.
Now what you are going to want to do next is a test of every possible sensor and input and output device on the phone. You don’t want to glue the back into place and find out only later that something does not work. Here are examples of things that might not work, and you would hate to find out only later:
-
- the built-in microphone or microphones
- the built-in speakers of which there are at least two
- the infrared emitter and infrared receiver if this phone has them
- the NFC (near-field communication) antenna
- the chi charger coil if this phone has one
- one or more of the red pixels of the screen
- one or more of the green pixels of the screen
- one or more of the blue pixels of the screen
- one or more of the fifty or so distinct touch areas that define the touch screen
- the self-facing camera
- any of the three outward-facing cameras
- the flash LED
- the fingerprint imaging scanner
- the battery charging circuitry
- the USB port generally, whether for data or for charging function
- the 3½ mm headset port
- the button array for power and volume up and down
- the haptic vibrator motor
- the SIM card tray, including connectivity for the second SIM card if there is one, and for the SD card
- the wifi interface, both 2.4 GHz and 5GHz
- the mobile phone interface (which communicates with a cell tower)
So what you will want to do now is to test each and every one of these twenty-one or so functions before gluing the back onto the phone.
In the app store for your phone there will be half a dozen advertising-supported system test apps that solve this need. You download one of them ahead of time, before the repair, and try out the app so that you can be sure you know how to do all of the twenty-one or so system tests.
Now that you think you have reassembled the phone correctly and without breaking anything, it is time to run these system tests. You proceed methodically through the twenty-one or so system tests. Against all odds, they all work perfectly! Time to power down the phone yet again.
Now it is time to glue the back cover onto the phone. You might think that what you need to do is apply some glue to the main chassis, or to the back, or both, and smoosh them together. But what I found with my phone is that I was able to simply nudge the tendrils of old glue more or less back into place, and then I pushed the back into place in an approximate way, and then I popped it back onto the hot mat to soften up the glue again. And then I used my hands and thumbs to push the back very firmly into place. Everything lined up just right. The old glue got placed into service a second time, and it did its job just fine.
I then powered up the phone again, and did the twenty-one or so tests yet another time. They worked!
If you were to look super closely at this phone now, you would just barely be able make out a couple of pry marks from where I had jammed in the super-thin metal pry tool to get the back off. But most people would never be able to guess, from looking at the phone, that it had been disassembled at all, let alone disassembled so completely.
Oh and guess what? The screen repair kit came with a thin flexible adhesive-backed plastic screen protector. I had never used such a screen protector before! I decided it was stupid that I had never used one before. If I had used one before, then maybe this particle of red-hot steel from the welding rod would not have melted a crater in the glass. Maybe the damage would have been limited to the screen protector.
I placed the screen protector on the newly installed replacement screen. The screen protector does not interfere with the touch screen. It does not interfere with the fingerprint imaging scanner. It does not make the screen harder to read. Yeah, I should have used a screen protector a long time ago.
And, I guess, I should have placed the phone a lot further away from the place where I was doing the stick welding.
Have you replaced a smart phone battery, or a smart phone screen? How did it go? Did you use a hot mat like the one in the photo?
Have you used a shopping-mall smart phone repair kiosk service? If so, did they have the parts to do a same-day repair? What did it cost? Was it scary to watch the repair work? Did they use a blue hot mat?
Please post a comment below.
Carl,
Thanks for the tips. I did a battery replacement on an old Samsung Galaxy S7 (just to see if I could do it). Given your hourly billing rate – what was the cost of your repair? 😊I could have used a hot mat (but I didn’t know they existed), and instead I used a hot air gun. Getting the back case off and getting the old battery out were the most difficult tasks (I ended up slightly cracking the back case – not enough heat). Reconnecting all the parts and connectors was not too difficult, but the screen repair you describe seems to be somewhat complicated. The S7 worked after my repair, but I am sure it is no longer waterproof. I previously tried to resurrect an Apple iPhone 5 which took a non-clear water drop into a toilet so far without success. I have also repaired some Android phones which have taken clear water drops. I always but a screen protector on a new phone. Next time I will buy one of the hot mats.
Barry