
I have aways sort of vaguely assumed that at some point in my youth I must have sat in a class in which the teacher made a potato battery and used it to light up a light bulb. Recently I got it into my head that it might be interesting to reconstruct that old classroom demonstration. But events of the past few days, recounted in this blog article, make me think that the old classroom demonstration must have never actually happened. I must have just read about it in books and I must have sort of assumed that you could do, in real life, anything that is described in a book. After many false starts, I did eventually manage to light up a light with a potato battery.
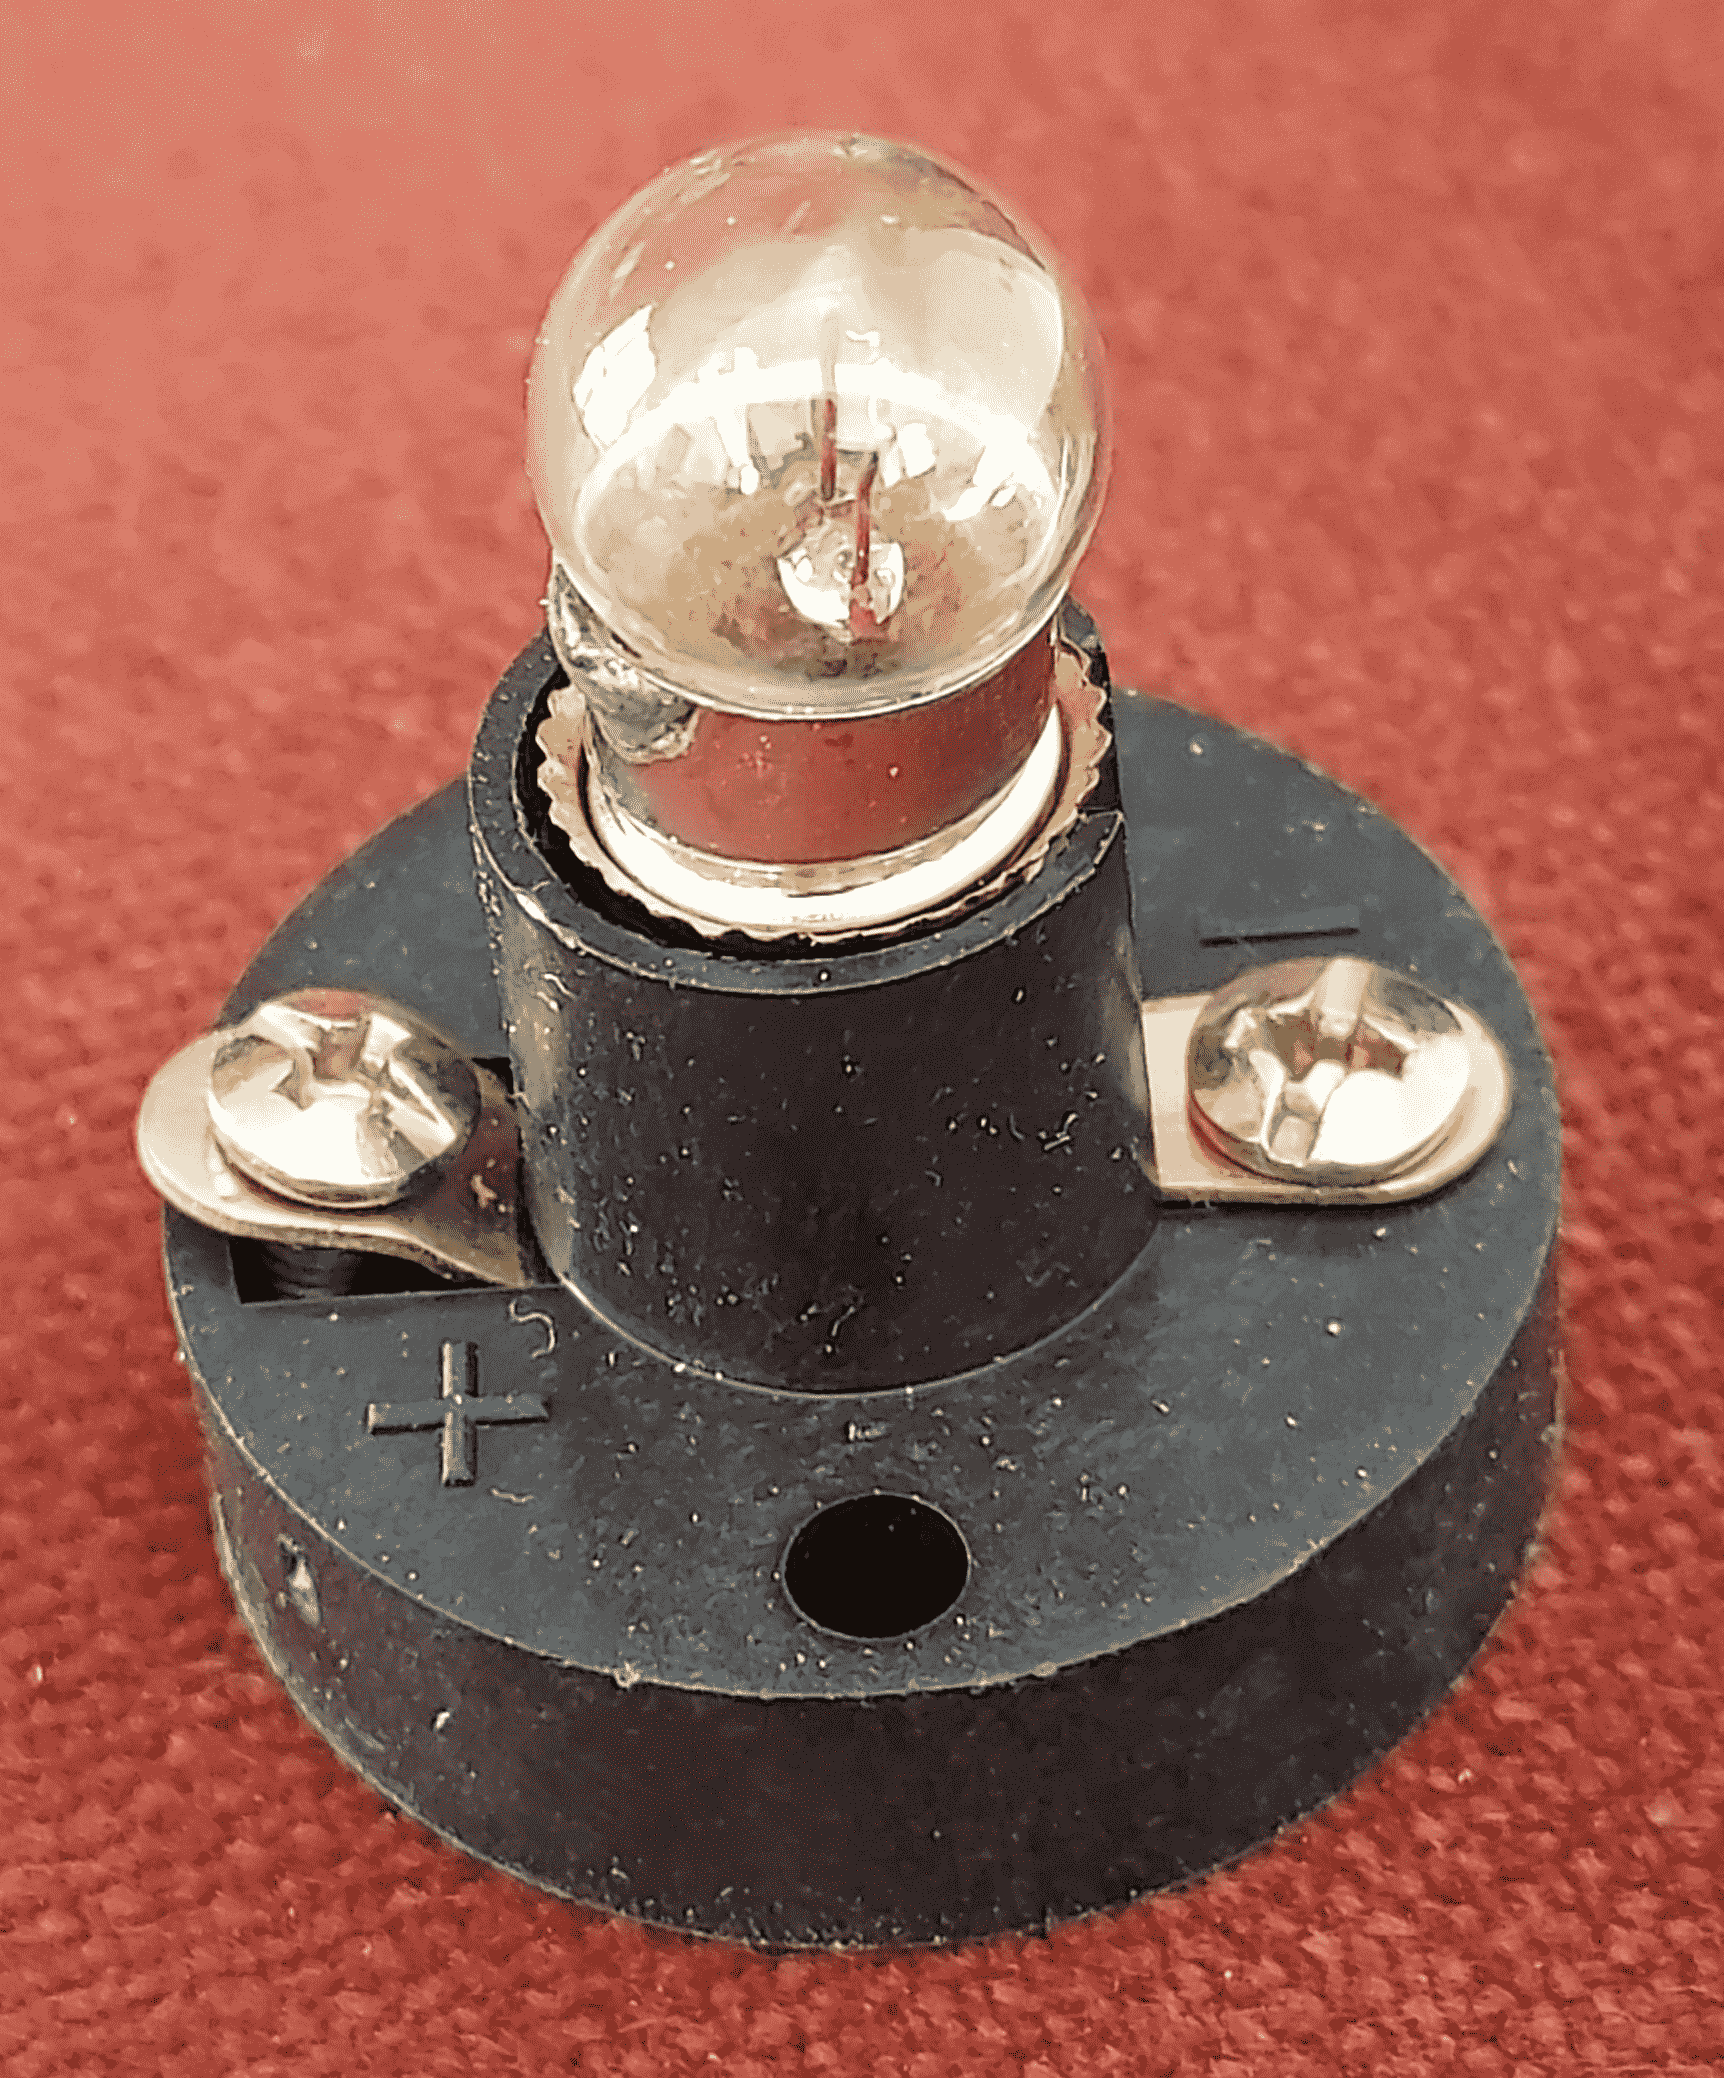
We all sort of vaguely recall what’s going on with a potato battery. You approach the potato and you poke two electrodes, made of non-identical metals, into the potato. You use a couple of clip leads to connect the electrodes to terminals on a bulb holder like the one shown above, and the light lights up! Do this in the presence of an alert youngster and maybe you get the youngster interested in electrochemistry.
I tried this recently, using electrodes made of copper and aluminum, these being the two elemental metals that were near to hand.
The bulb did not light up.
I decided to try to figure out what was wrong. Surely the problem was that the bulb had burned out. But no, swapping in a second bulb and a third bulb was no help.
The bulbs were the lowest voltage incandescent bulbs that I could find. They were rated for 1.5V and 350 mA. The alert reader will multiply the two numbers and will work out that the bulb consumes about half a watt of power.
I put an ammeter across the battery. It was generating something like 50 μA (microamps) of current through the short circuit of the ammeter. I put a voltmeter across the battery. It was generating something like seven-tenths of a volt. This works out to maybe 35 μW (microwatts) of power, which is so little power that normally nobody even bothers to measure the power if all that you have is microwatts.
But if there was anything that these measurements yielded, it was a realization that it would take something like fourteen thousand of these potato batteries to make the bulb light up.
I eventually recalled that the potato battery that I had either seen as a schoolchild, or had reimagined through book-learning, was a battery where the non-copper electrode was zinc. As we all recall from the electrochemistry chapter of our first college chemistry class, you can look at a table in the textbook, and and you can pick out your two electrode materials on the table, and you can find two voltages in the table, and subtract them one from the other, and you can predict what voltage would come out of a battery using those two metals.

Aluminum and copper are not very far apart in the table. Zinc and copper are further apart in the table. It means you will probably get more voltage if you use zinc instead of aluminum for the non-copper electrode. So I rummaged through my parts box for zinc, eventually finding several Romex cable clamps shown at right. Each clamp is made of three pieces of steel and two pieces of zinc. I used the big zinc piece as my non-copper electrode. The cell voltage improved to about eight-tenths of a volt. The short-circuit current improved slightly. But still this was never going to light up the bulb.
The other thing that slowed me down was the realization that very often when a household item is said to be made of cast “zinc”, it is actually cast from what some people call “pot metal”, which is what you get when you throw lots of random recycled non-ferrous scrap metals into a furnace for casting. The resulting alloy, containing unknown portions of such metals as zinc, lead, copper, tin, magnesium, aluminium and cadmium, is a prime candidate for self-corrosion when it gets wet, and will have no particular predictable place in an electrochemical table. I realized I probably needed to get my hands on some pure or nearly pure zinc.
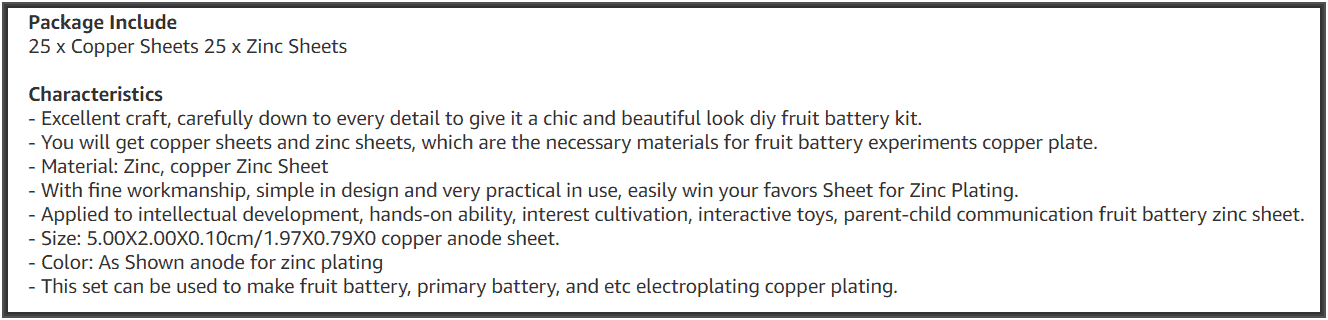
I went to Amazon and sure enough, there are vendors who are very glad to sell you kits containing one or two dozen strips of zinc, and a corresponding number of strips of copper, specifically for use in home science experiments with potato batteries. Here is the description from the Amazon listing:
-
- Zinc Anode Sheet: Applied to intellectual development, hands-on ability, interest cultivation, interactive toys, parent-child communication.
- Diy Fruit Battery Kit: This set can be used to make fruit battery, primary battery, and etc.
- Zinc Anode: Through interesting fruit battery science experiments, let students explore and understand the mysteries and improve their hands-on ability.
- Copper Anode Sheet: Special design and it is in fine craftsmanship. It is the best replacement for your old, broken one.
- Zinc Plate: Can help students to understand the principle of fruit power generation and electricity.
Who could resist a kit with such a description? The kit, priced at $17, was said to contain 25 copper electrodes and 25 zinc electrodes, each about an inch by 2½ inches in size. (For reasons that might mean something later, I mention that the vendor was located in China.) I ordered up one of the kits. It arrived. I was immediately disappointed to see that the 25 non-zinc electrodes were distinctly yellow in color, not copper in color. The vendor was shipping brass and was calling it copper.
It will be recalled that brass is an alloy of copper and zinc. Using brass as the non-zinc electrode in a potato battery is really dumb, since the zinc in one of the electrodes is not very far apart, in the electrochemical table, from the zinc in the other electrode. I actually tried it out using the brass and zinc electrodes, and the battery did sort of work. It generated comparable current and voltage to the battery that used the zinc cable clamps with copper.
I decided that for my remaining efforts, I would use the zinc strips from the Amazon vendor with my own copper strips.
Now I already know what many readers are shouting into their computers right now as they read this blog article. Why didn’t you try lemons? Lots of people make lemon batteries instead of potato batteries! And my only answer, not a very satisfying answer, is that I was going to be stubborn and try to make potatoes work.
As I clicked around on the Internet, I found lots of web pages where people talked about making a potato battery. I could see that nearly all of them were written by people who did not know anything at all about the actual chemistry or physics involved, and who had no clue about using, say, a math equation or a chemistry formula to figure something out. Many of the writers would use the word “power” when they meant “energy” or vice versa. They would get volts mixed up with amps or watts. Some writers would take pains to specify what color of insulation should be in a wire that went from one place to the next, when the real-life situation is that at absolutely does not matter what color the wire is. (The sole exception to this is with action-adventure movies where the protagonist is faced with the problem of deciding whether to cut the red wire or the blue wire to disarm the ticking time bomb. The correct answer, as everyone knows, is always the blue wire.)
What some writers would say, and I figured there was a chance it might be connected with reality, is that soaking the potato in brine (salt water) ahead of time might help, and that cooking the potato ahead of time might help.
But what I eventually realized is that I was going to have to squarely face the problem that my initial calculations and measurements had made it clear that I would need something like fourteen thousand of the potato batteries to light up the bulb. I could keep trying not to think about this problem, but sooner or later I would have to face it.
Which brings us to the quantum-physics part of this discussion.
My idea for a way to deal with the “14000 potatoes” problem was to move the goalposts. The idea was that maybe I could use a light-emitting diode instead of an incandescent light bulb. Maybe the LED would light up.
Now of course the usual problem when you are hooking an LED up to a power source is that you need to take careful steps to prevent too much current trying to flow through the LED. Many LEDs will burn up if you try to run more than 20 or 25 mA through them. So the normal protective measure is to put a current-limiting resistor in series with the LED. With a correctly selected current-limiting resistor, the current through the LED can be kept down to a safe level. (Some LEDs have a current-limiting resistor built in, and are rated to run on some particular voltage. But most LEDs do not have a built-in current-limiting resistor, which is actually much better because then you can choose for yourself how many volts to use.) In all of my experiments thus far, the generated currents were well under one milliamp, so I figured the chances of burning up an LED by delivering 20 or 30 milliamps were remote.
So I constructed yet another potato battery, hooked up some alligator clip leads to the electrodes, and braced myself for the excitement of connecting the alligator clip leads to a red LED. I was prepared to be dazzed.
Of course if I were to randomly connect the clip leads to the LED, this would give me a 50% chance of not being dazzled, because maybe I would connect it backwards. This does not harm the LED but it is sort of disappointing because the LED would not light up. And indeed it did not light up. So I made ready to reverse the leads, all the while preparing myself to be dazzled.
Again it did not light up.
The alert reader already knows where I am going with this. The way an LED works is that electrical current is applied to the LED and it tries to push some electrons up a hill (called the “band gap”) of a solid-state diode, and over a cliff, where they fall back down. Then if everything works as it is supposed to work, a particular electron will fall over the cliff and, as it falls, will emit a photon. The photon becomes emitted light, which then … wait for it … leads to the term “light emitting diode” or LED.
There are quite a few interesting things about what I just wrote. One interesting thing is that the height of the hill and the distance of the drop off the cliff are what they are. You don’t get to go, say, half way up the hill and then drop off to go back down. The way that this semiconductor structure works, it is all or nothing.
A second interesting thing to try to work out how we might predict the color (or colors) of the emitted light. This is of course tied into the equation that we all learned in first-year physics in college, E = hν, where h is Planck’s constant, v is the Greek letter “nu” which is tied to the wavelength (and thus the color) of the light, and E is the energy associated with the activity that is going on. Here, of course, the activity that is going on is pushing electrons up a hill and dropping them off a cliff and seeing if they emit photons of light. So E is tied to whatever the amount of energy it takes to push the electron up the hill.
It turns out that if the LED you have in your hand happens to be a red LED, then the band gap is in the range of about 1.63 to 2.03 volts (depending on the exact semiconductor materials used to make it). We can then compare this with the measured voltages from the potato battery. No matter what materials I picked for the electrodes, the potato battery never generated more than about 0.6 to 0.9 volts.
And there you have it. Because 0.9 is a smaller number than 1.63, it is absolutely futile to have any wish that the LED would light up.
Other colors of LEDs are even more demanding. A green LED has a band gap in the range of about 1.9 to 4 volts, again depending upon materials choices. A UV LED requires 3 to 4 volts to light up.
Again the challenge is you can’t generate a fractional photon using some voltage that is less than the band-gap voltage. Either you generate an entire photon, or nothing at all (except maybe a bit of waste heat).
It means if I put two or maybe three of the potato batteries in series, I have a shot at getting the LED to light up. But no matter how many times I try to light up the LED using only one potato battery, I am absolutely and predictably doomed to fail.
So we are now squarely presented with the quantum-physics part of this discussion. Most experiments that we might do around the house with a goal of helping youngsters learn about science are experiments where we don’t see any quantum physics going on, not with our own eyes. If you chill a tape measure and it gets shorter, and if you let it warm up and it gets longer (blog article), there is no directly visible quantum physics going on. When you do the experiment of flipping a “ground” switch back and forth on a Fender showman amplifier to see which position is quieter (blog article), there is no directly visible quantum physics going on. The reason that in day-to-day life we almost never see directly visible quantum physics going on is that Planck’s constant is so very small! It is 6.62607015 × 10⁻³⁴ m2 kg / s. That is a very small number. It is incredibly small when compared with most of the other physics and chemistry numbers that characterize the things that are happening in most of the experiments that we do to help children to learn about science.
But here we have it. The band gap in the LED is maybe 1.6 volts (for red) or 1.9 volts (for green), and the voltage coming out of the potato battery is maybe 0.9 volts. The LED does not light up.

But then we can put several potato batteries in series. If we do, then we get a happy result like what is shown at right. With five potato batteries in series, we get a bright cheery green LED! The five potato batteries add up to something like 3.3 volts, and their short-circuit current is something like 600 microamps. Importantly, 3.3 volts is more than enough to satisfy the band gap in this particular green LED. One battery would fail, but with more batteries, we succeed.
This is quantum physics, directly observed by our own eyes.
Now I know very well what many alert readers are shouting at their computer screens right now. If you put a first and second electrode into a potato, it is not a battery at all, not according to the strict definition of “battery”! Yes I know this. If you put a first and second electrode into a potato, what you get is strictly only a “cell”. Only if two or more cells are in series can we strictly say that we have a “battery”.
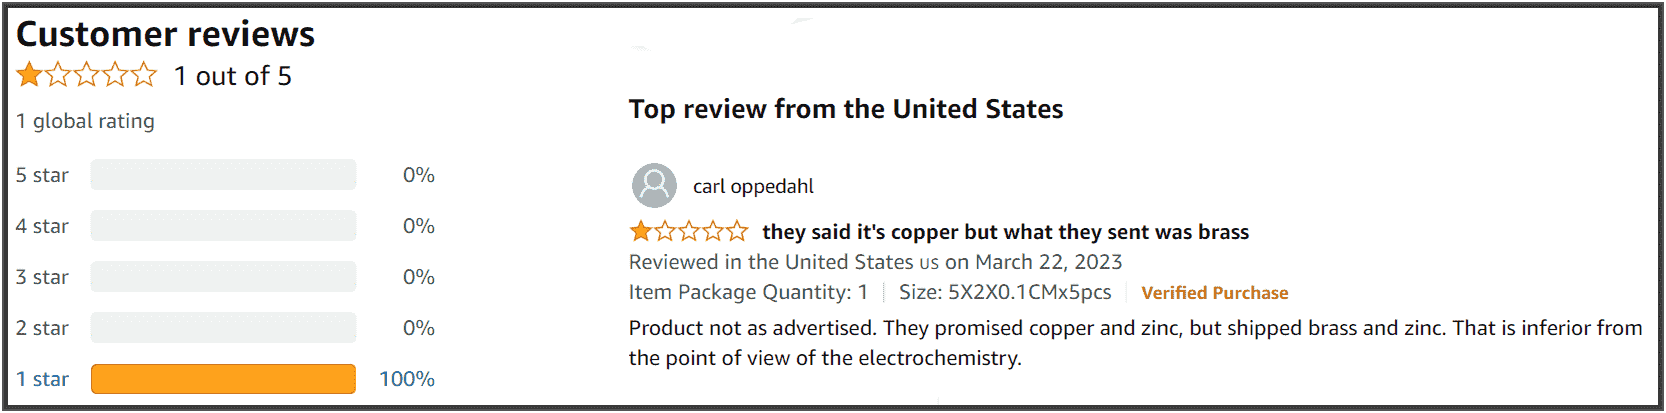
I did post a review on Amazon for the electrode kit. You can see it at right. Which now brings me to my puzzlement as to how the vendor might have gotten brass mixed up with copper. It turns out that the Chinese word for “copper” is 铜 (pinyin “tóng”) and the Chinese word for “brass” is 黄铜 (pinyin “huáng tóng”). If you pick apart the two Chinese characters for “brass”, it turns out that 黄 by itself means “yellow”. So the way “brass” is communicated in the Chinese tongue is sort of like “yellow copper”.
The inquiring reader will of course want to know “what about bronze?” It turns out that the Chinese word for “bronze” is 青铜 (pinyin “Qīngtóng”). It turns out that 青 by itself means “green”. So the way “bronze” is communicated in the Chinese tongue is sort of like “green copper”.
Anyway, I have wondered whether maybe some employee of the vendor, who maybe is not technically trained, might have somehow looked for “copper” from a supplier, and placed an order for “yellow copper”, maybe thinking that it is almost the same thing. Maybe this was an inadvertent substitution of brass for copper.
As a non sequitor, I invite the reader to return to the screw-in bulb holder in the photo at the top, and ask yourself why the maker of this bulb holder went to the trouble to label one of the electrical terminals with a “+” sign?
Please post a comment below.
When my son did this experiment for science fair (no potatoes, but he did have some pickled tomatoes in addition to lemon and vinegar), I think there may have been some galvanized nails involved – because you don’t need solid zinc, you only need the surface to be zinc so long as what the zinc is coating is electrically conductive.
I’m not even sure “what the zinc is coating” needs to be electrically conductive so long as the leads are in electrical contact with the zinc, but I defer to the ee’s on the blog.
What made you think about creating a potato battery? Why didn’t you use a lemon instead?
I suspect the difference between a lemon battery and a potato battery is that there’s a lot more H+ in the lemon and so it generates a lot more current than the potato does. There is a Wikipedia page https://en.wikipedia.org/wiki/Lemon_battery which mentions “commercial potato clock kits”. My guess is that the clocks require only microamps and so a potato’s low acidity suffices.
Interesting — incandescent bulbs are notoriously high-current, and now you’ve pointed out that LED’s are strictly “high” voltage relative to this regime.